Design&TESTING
The design and testing process is going to be discussed in two aspects: the hardware and the software. Max was responsible for hardware design and construction, including the mechanism and sensor testing. Min was responsible for the GUI design and software integration.
HARDWARE
The flow below shows the mechatronics design of APD.
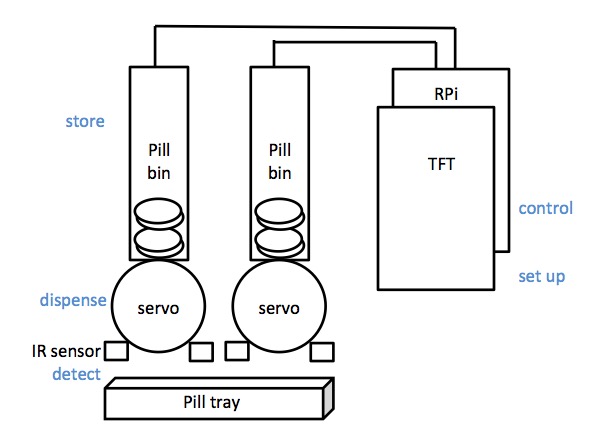
Figure 3. Design Concept
The first difficulty is the dispensing mechanism. Two mechanism was came up at the first brainstorm session. The pictures below are the two mechanisms.
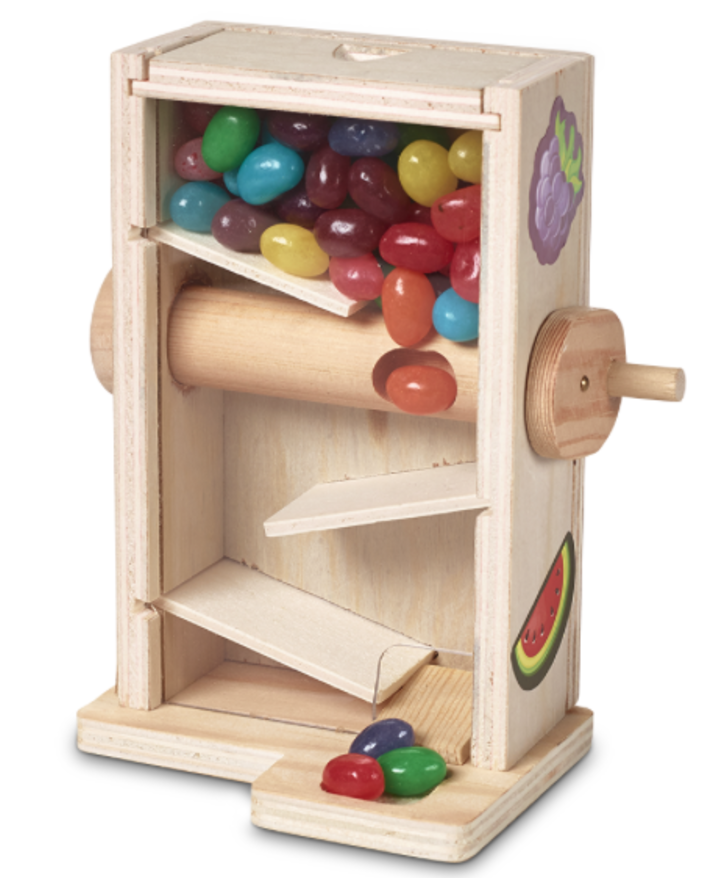
Figure 4. First Mechanism Concept
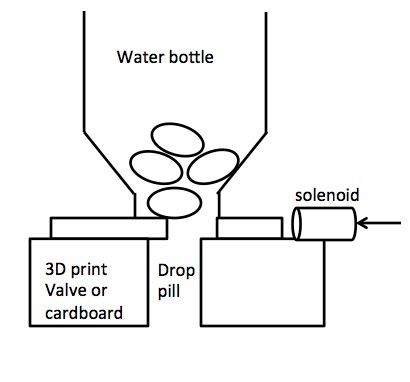
Figure 5. Second Mechanism Concept
The design on the left is a rotating mechanism. A pill will drop into the cavity on the rotator and the pill will drop out from the cavity when the rotator rotates to a certain degree. The design on the right is a linear mechanism. A pill will drop into the hole on the slider and when the hole on the slider matches up with the hole on the base, the pill will drop out.
The first design was taken into testing since we already have servos for the rotating motion and it need to manufacture the least components. The picture below is the design in solidworks.
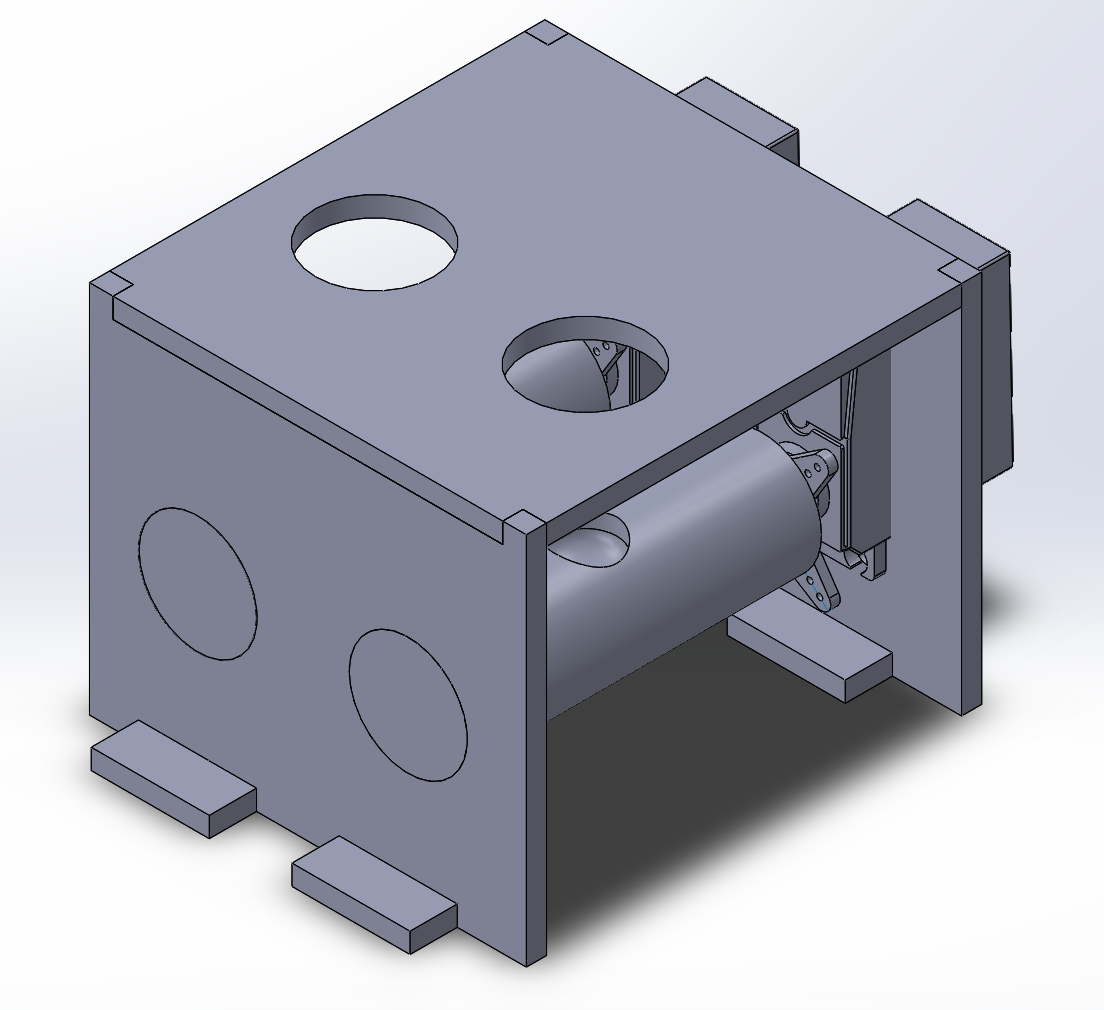
Figure 6. Solidworks Screenshot
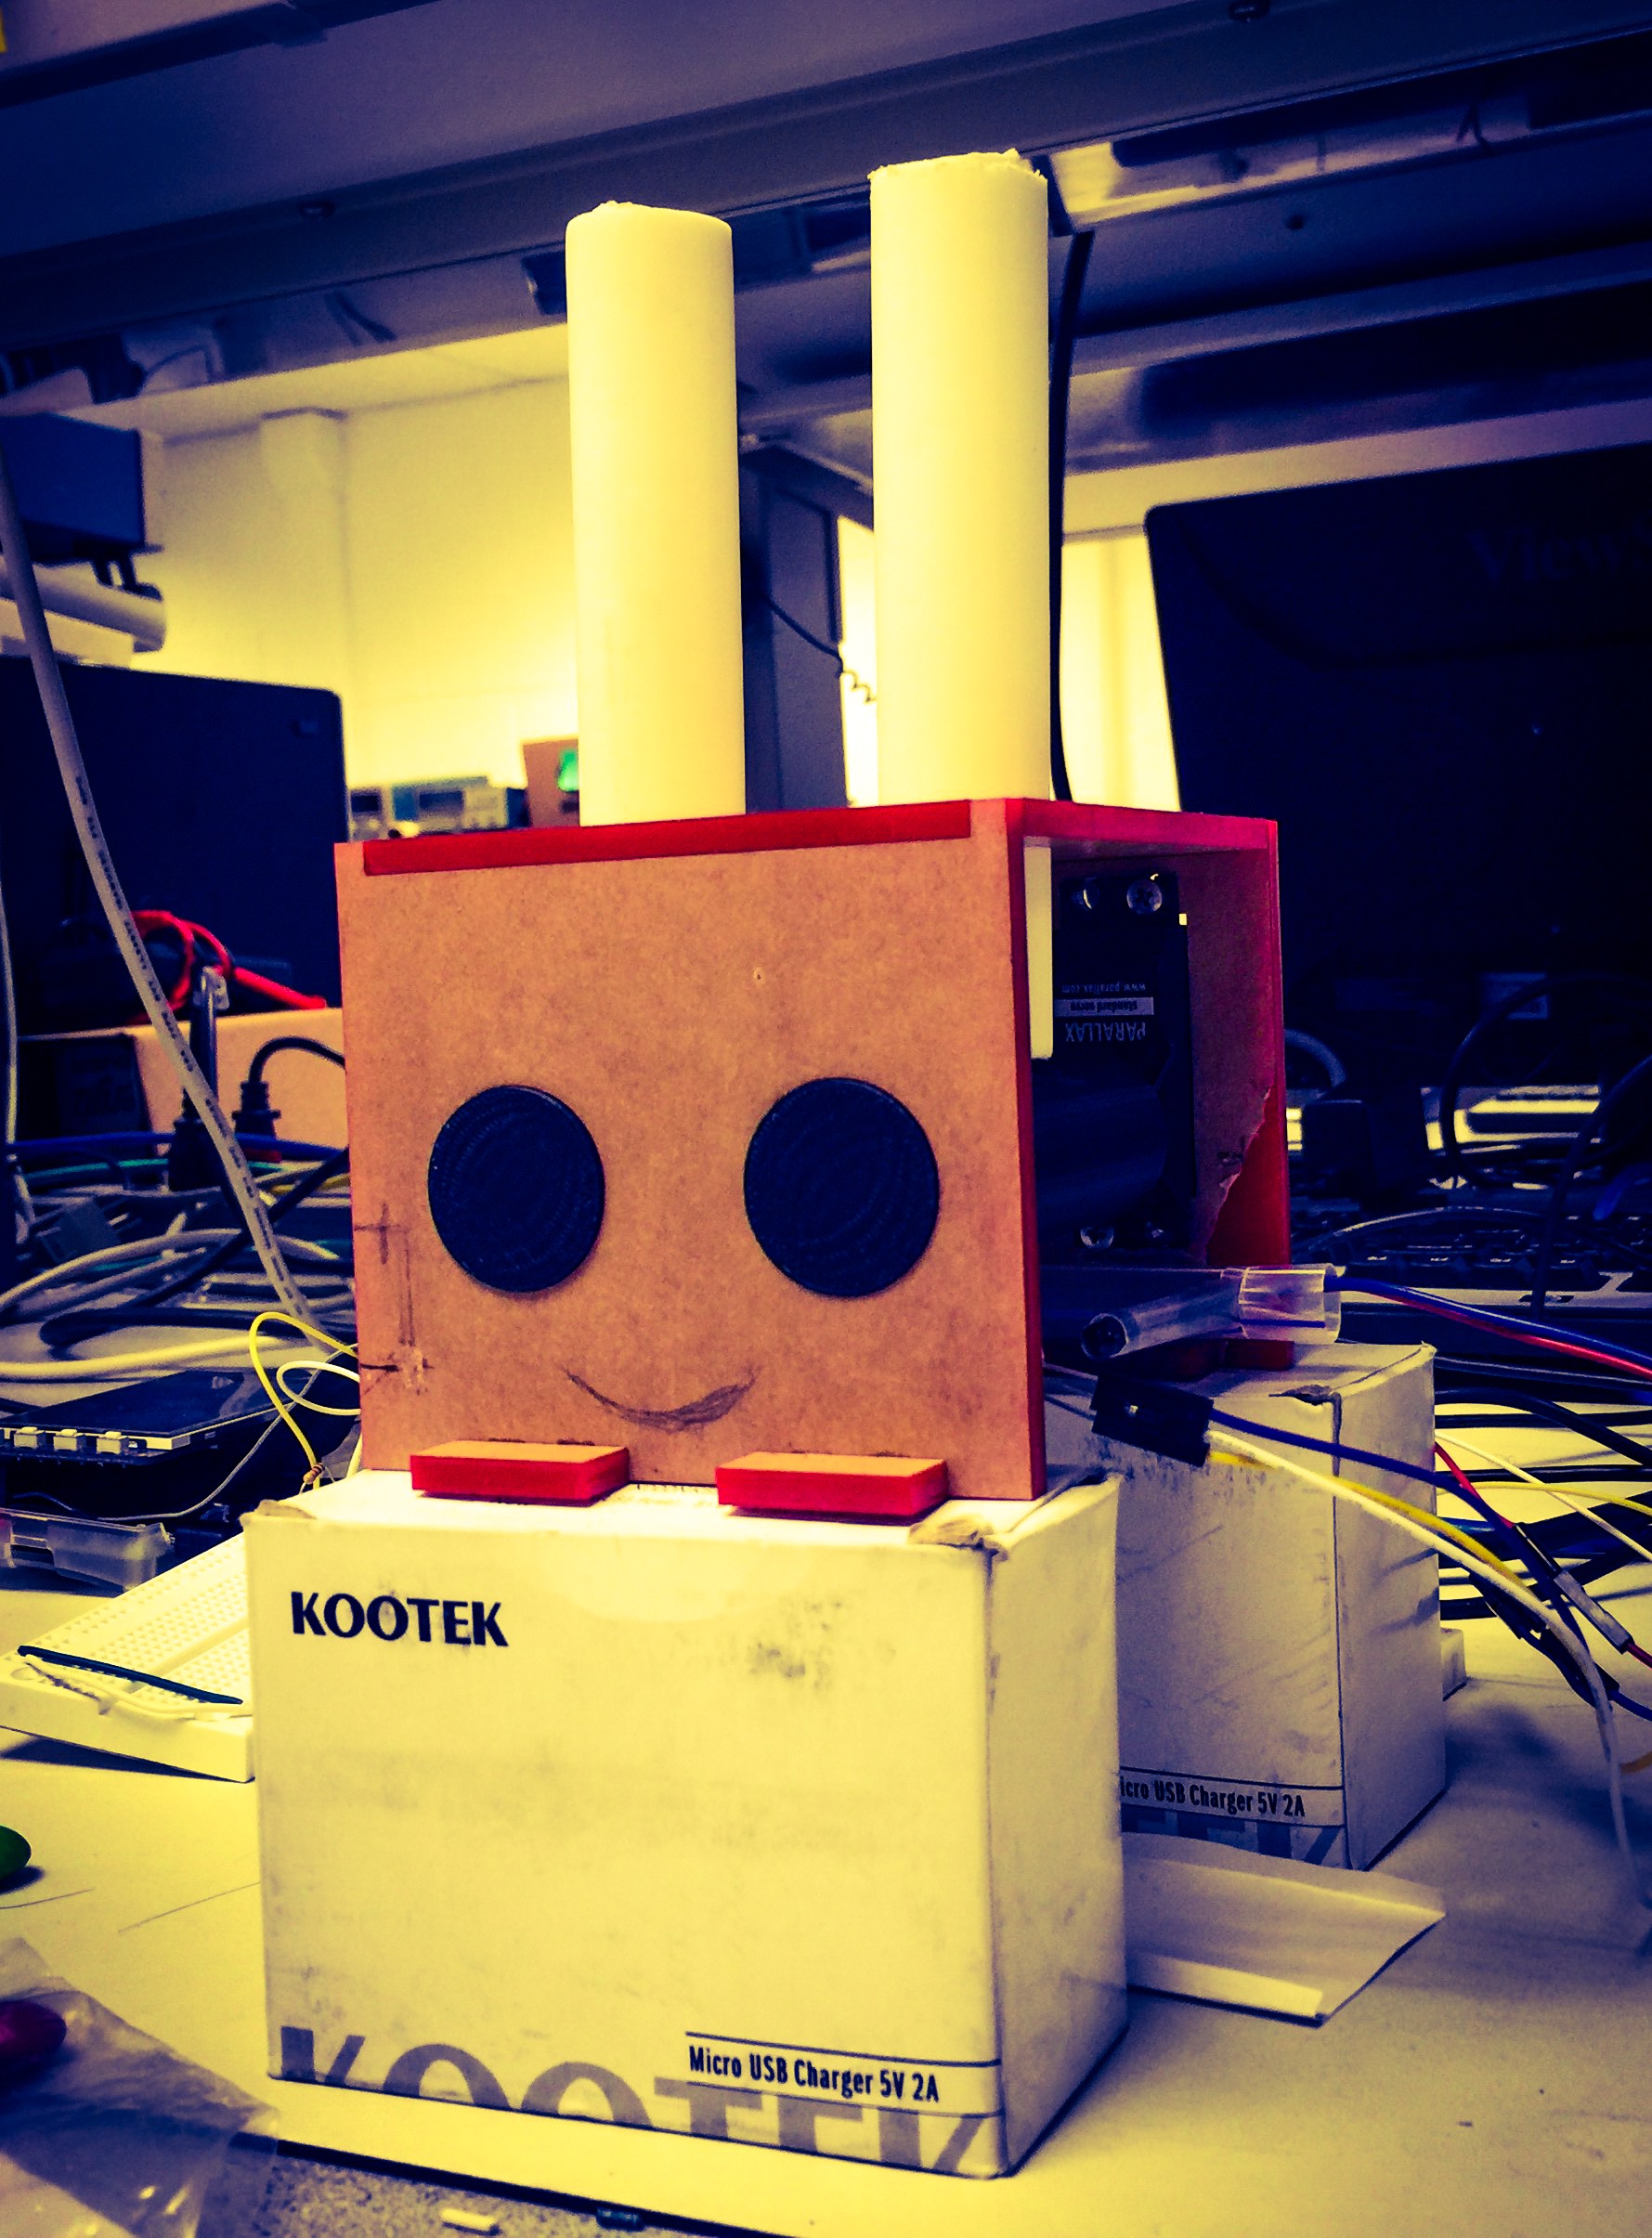
Since one of the purposes of the APD is to dispense multiple pills, this design can hold and dispense two different pills with the same size. In our testing, skittles are used as the substitute of pills. The picture below shows the final assembly.
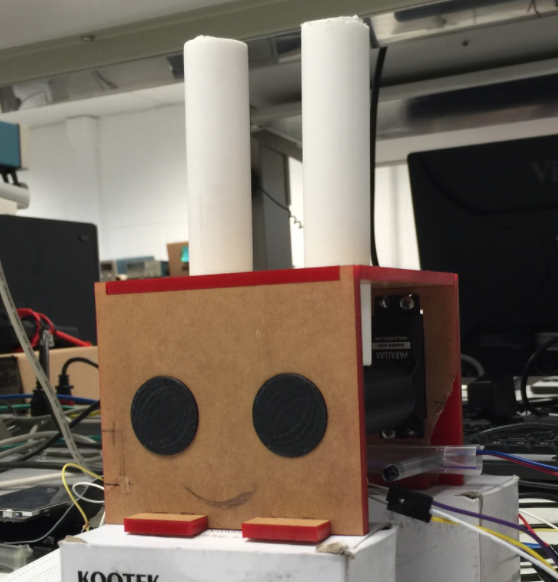
Figure 7. Front view
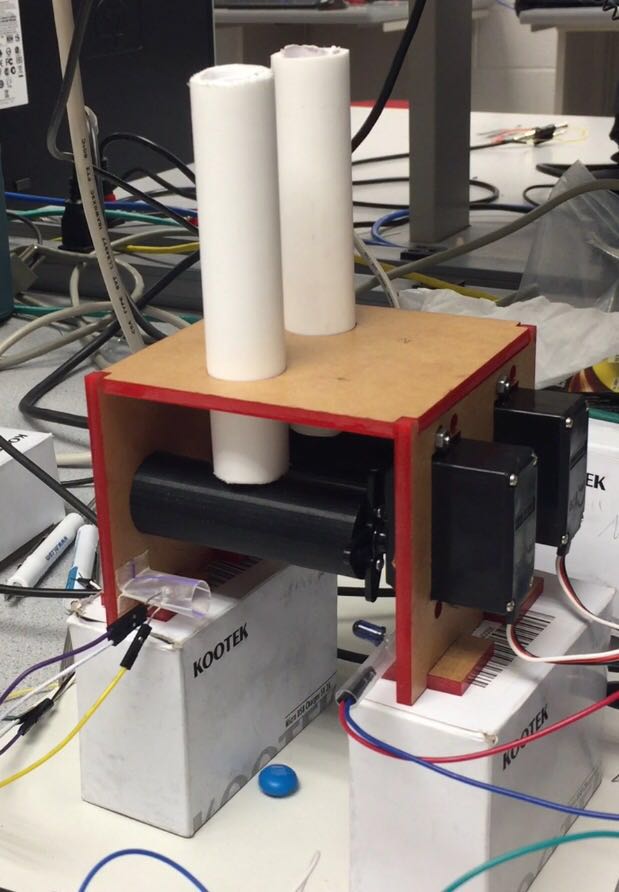
Figure 8. Side View
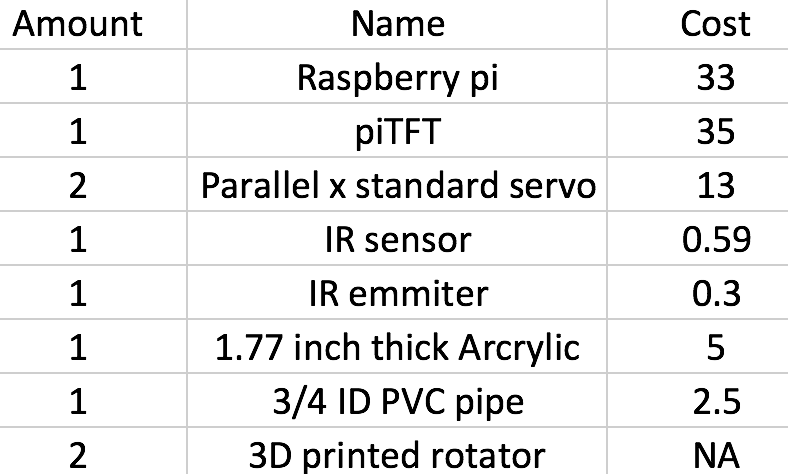
The frame structure were made out of acrylics and was manufactured by laser cutting. The black rotator with a cavity was manufactured by 3D printing. The pill reservoir were made out of PVC pipes and manufactured with hand tools. Just like every great design in the history, this design was not done in 1 iteration. In the first few testing model, we had issue with pill stuck in the middle of the PVC pipe and pill stuck in the cavity of the rotator. By changing the inner diameter of the PVC pipe and enlarging the cavity with Dremel rotatory tool, the final product was able to dispense pill 100% successfully.
As you may aware, a dark blue LED was also installed on the APD. It is a IR emitter. Professor Skovira introduced to us this idea of usage of an IR sensor. The APD without the IR sensor is only an open loop control system, i.e. there is no feedback from the system. By adding a IR emitter and a IR sensor pointing at each other, whenever a pill drops, the IR signal would be blocked by the pill and the system can know that there was a pill dropped. If the APD is put into use of pill, missing a dose of pill could be lethal sometime. The sensor of detecting if the APD dispensed the correct amount of pill is very important. In a similar way, another pair of IR sensor and emitter can be added on the pill reservoir to detect how many pills left.
Since the IR sensor detection was incorporated in the latter stage of the assembly, the frame design did not have mounting slots for the IR sensor. A few pairs of sensors and emitters were tested and the pair with longest detection range was selected. The emitting range of the IR emitter we are using is still very short. At the same time, the sensor and the emitter has to be line up perfectly for the signal to be detected. It took us one night to brainstorm for a solution. In the end, we came up with the idea of using straws as the supporting structure. Gluing a large straw on the wall as base and then stick small straws perpendicularly into the large straw from the side. In this way, the IR emitter can fit into the small straw and the wires can go through the straw perfectly.
The circuit is simple and shown in the picture below along with our build.
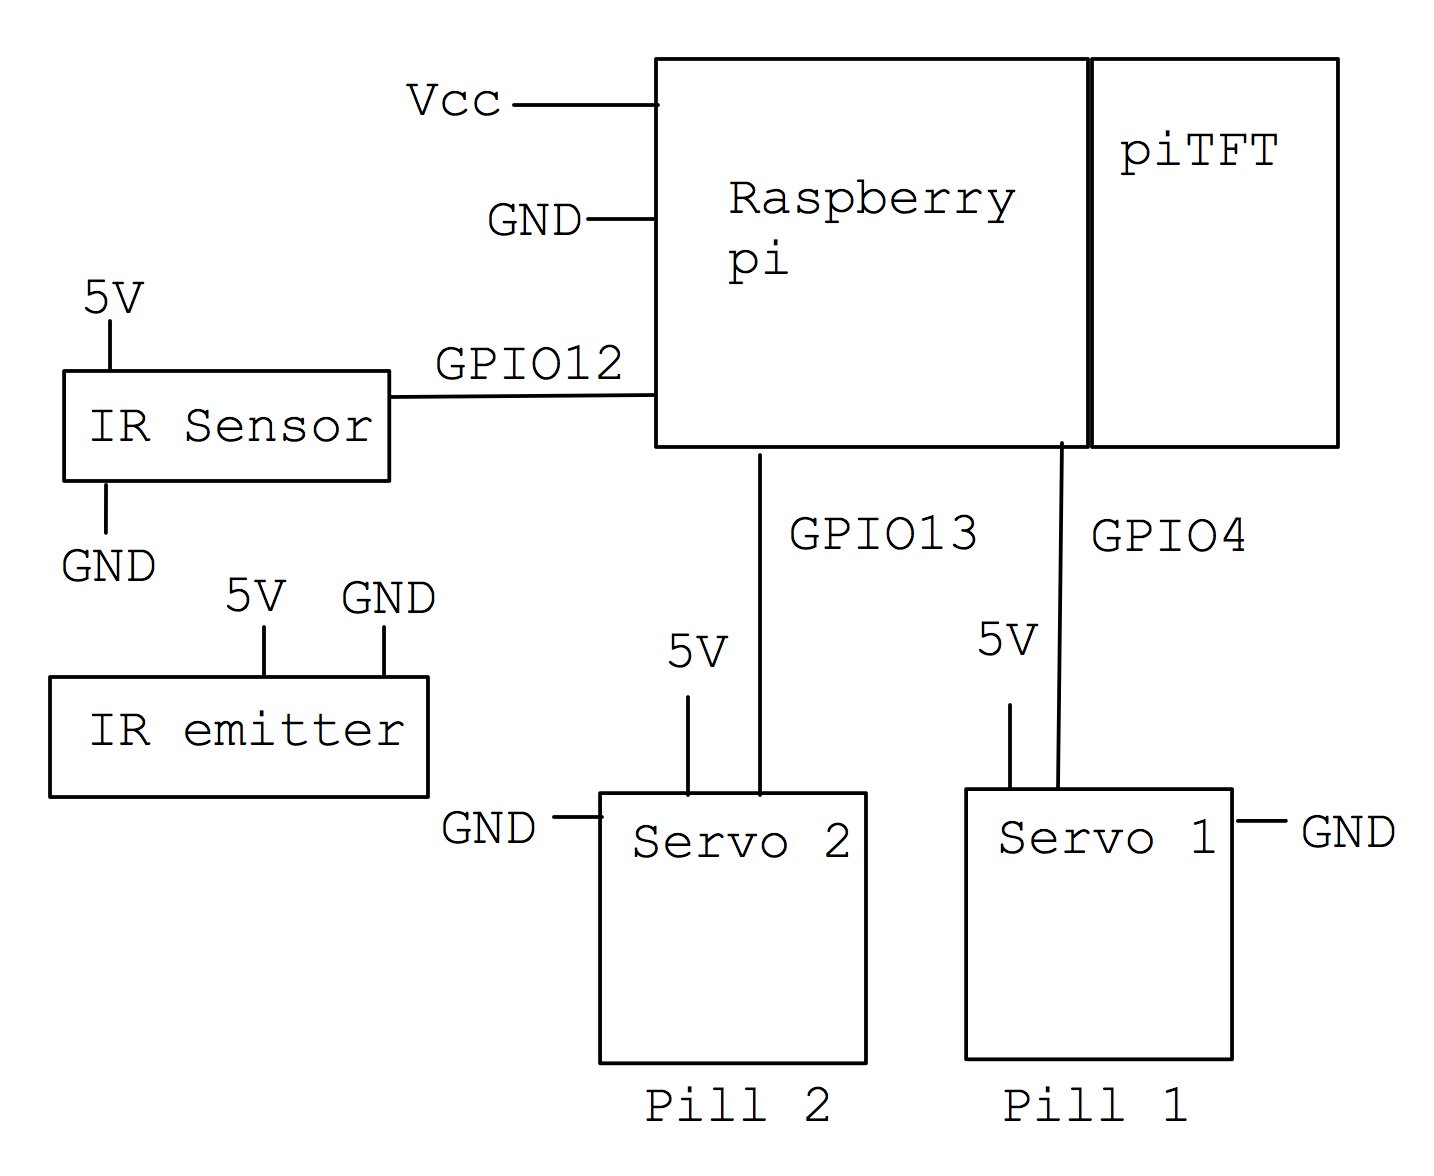
Figure 9. Circuit Design
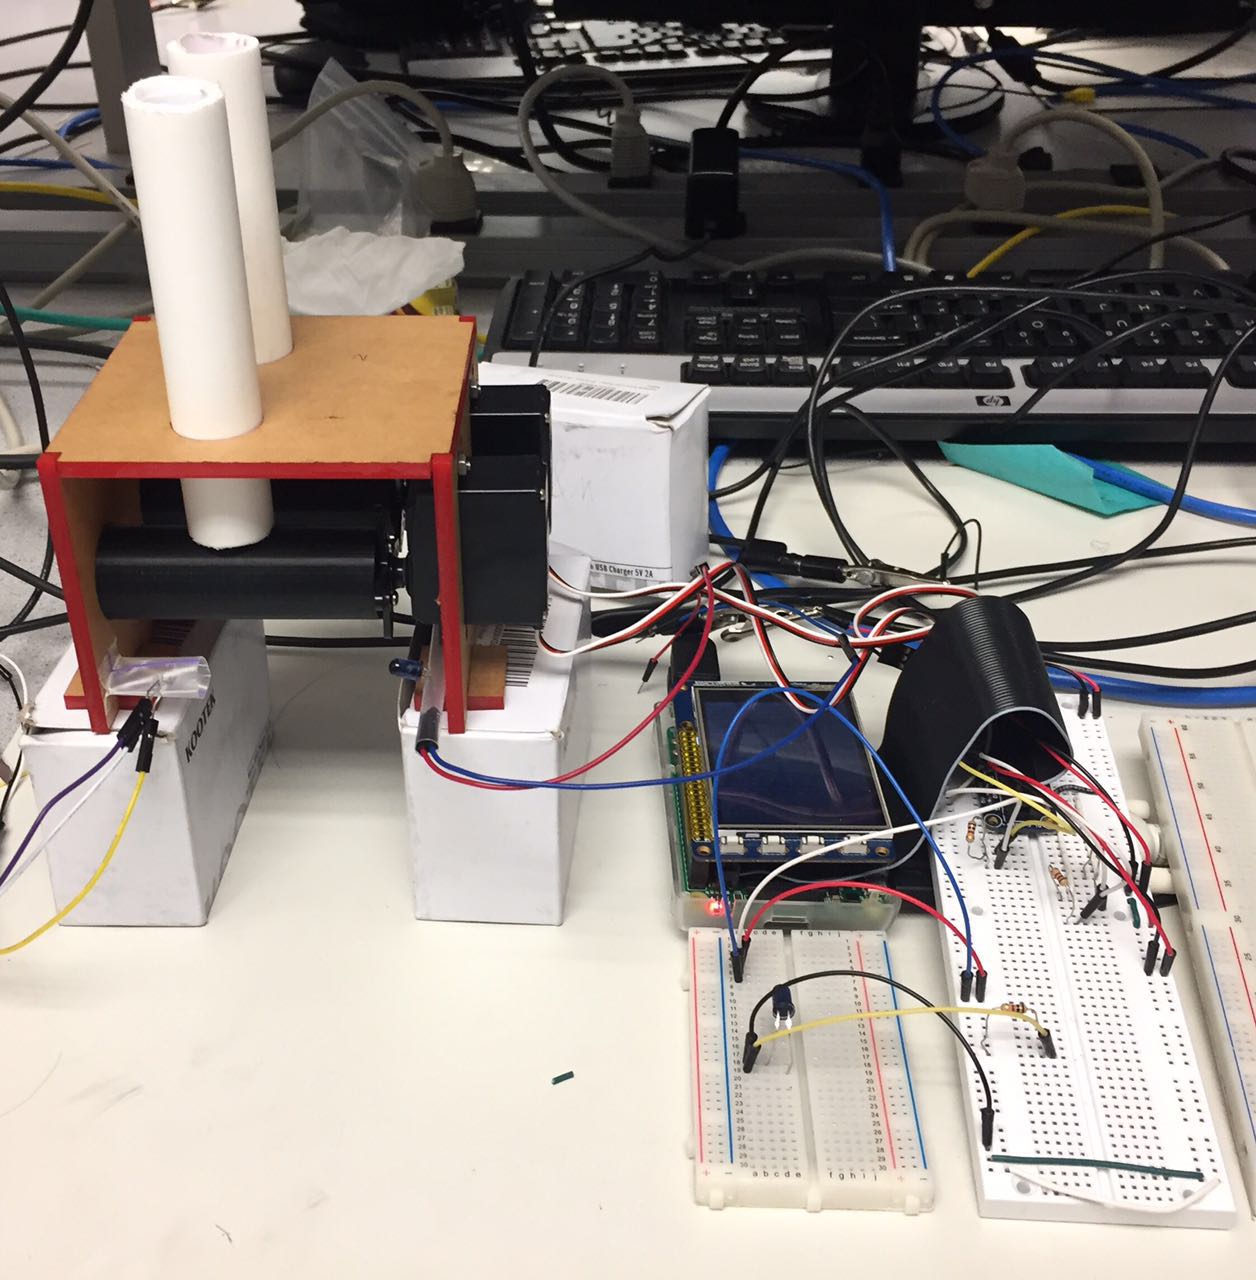
Figure 10, Circuit Snapshot
The piTFT is installed on the Raspberry pi and the Raspberry pi is powered by the wall charger. Two servos and the IR sensor are directly connected to the 5V external power source. The IR emitter was connected to the 5V external power source through a 1k resistor. All the GPIO connection to the Raspberry pi were connected through 1k resistor for protecting the Raspberry pi.
The servo motors we are using are standard servos. They were controlled by PWM through GPIO. Different PWM signals correspond to different gear positions. The IR sensor send high voltage level when detects IR signal and it was implemented just like a push button switch. When the IR signal was blocked, the "button" was considered pressed.
SOFTWARE
The software implementation was done using Python. It mainly consists of three parts. The first part is a GUI that prompts the user for the desired pill-taking schedule. Then the second part is to compare the schedule with current time, and dispense the pills accordingly. The third part allows the system to check if the mechanism has dispensed pills correctly with an IR sensor.
USER INTERFACE
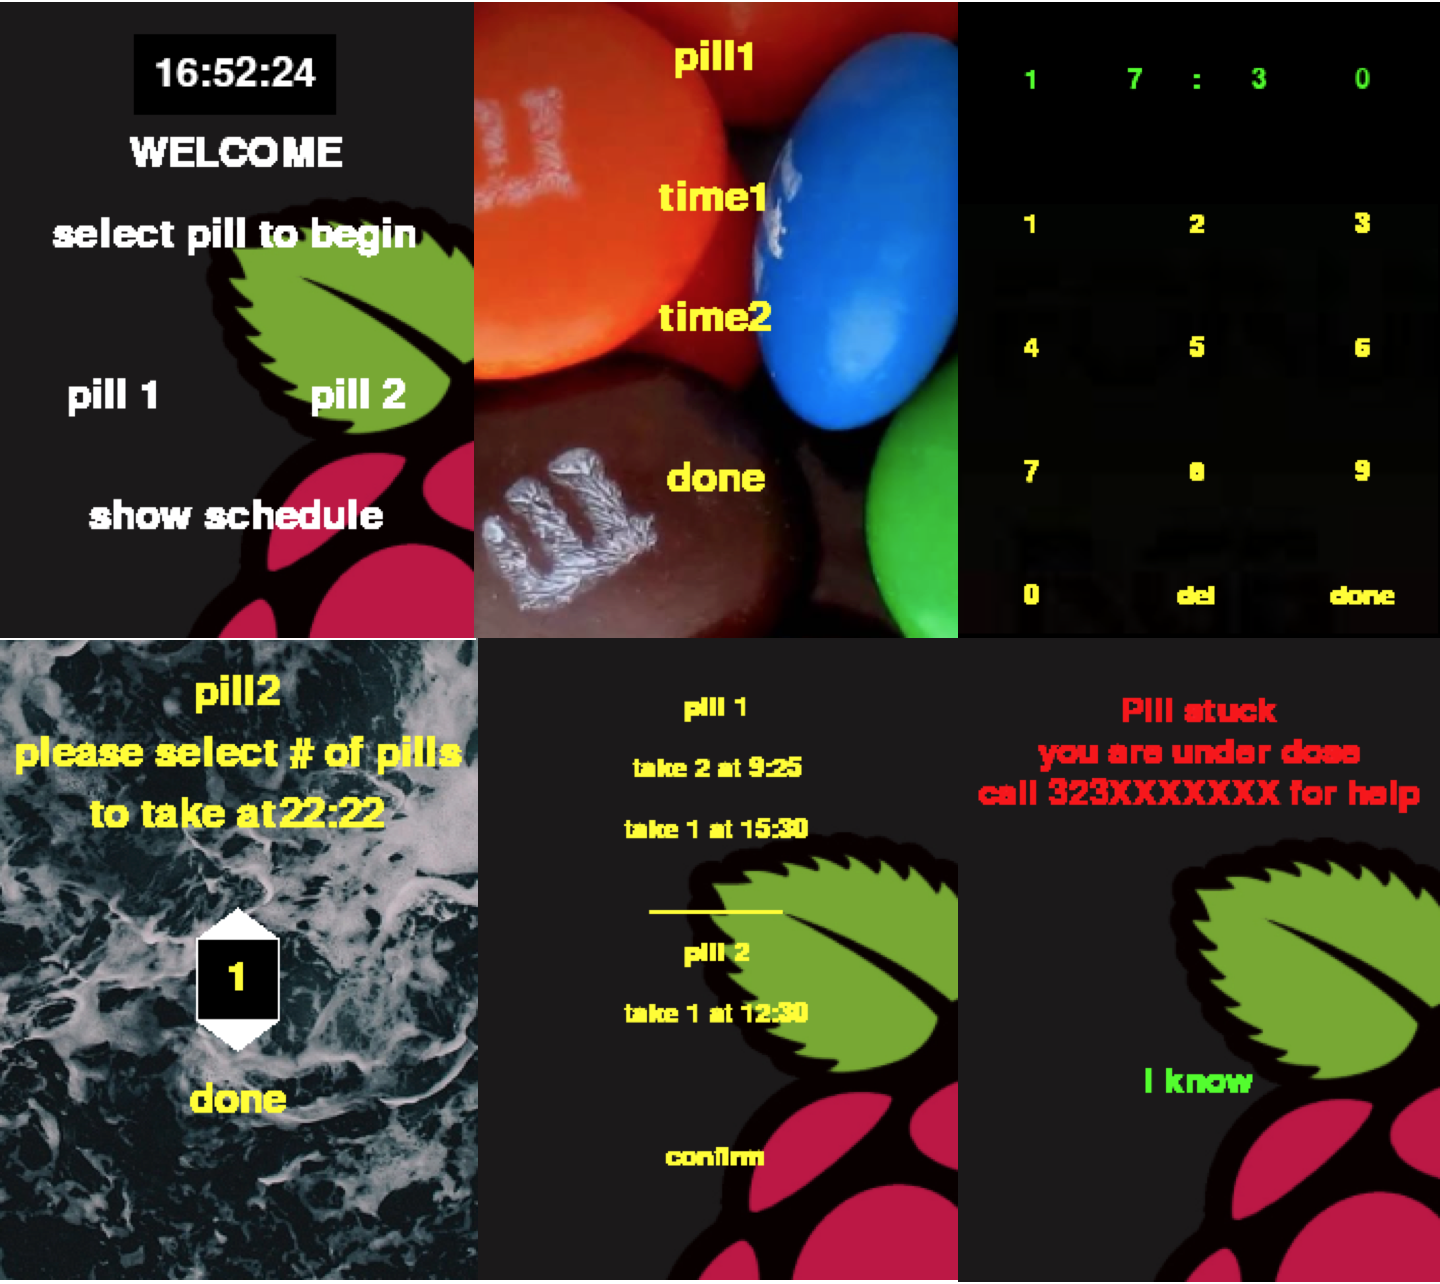
Figure 11. The User Interface
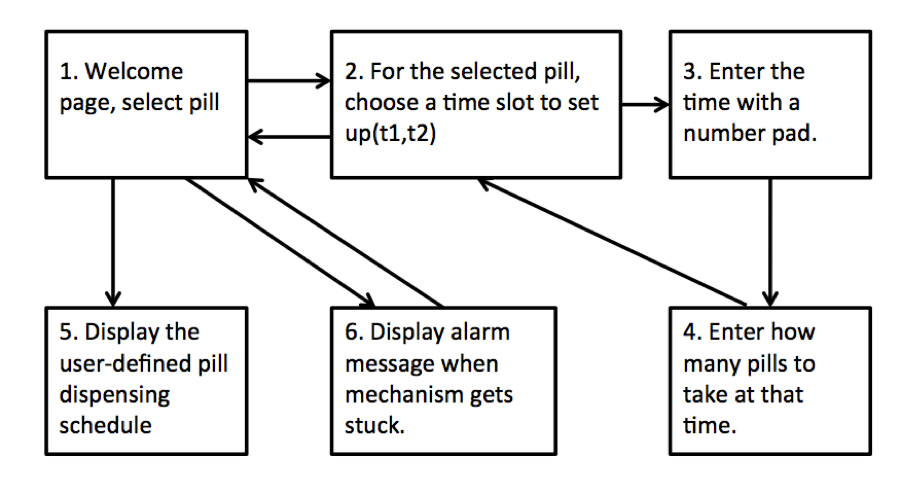
Figure 12. Flow chart of UI
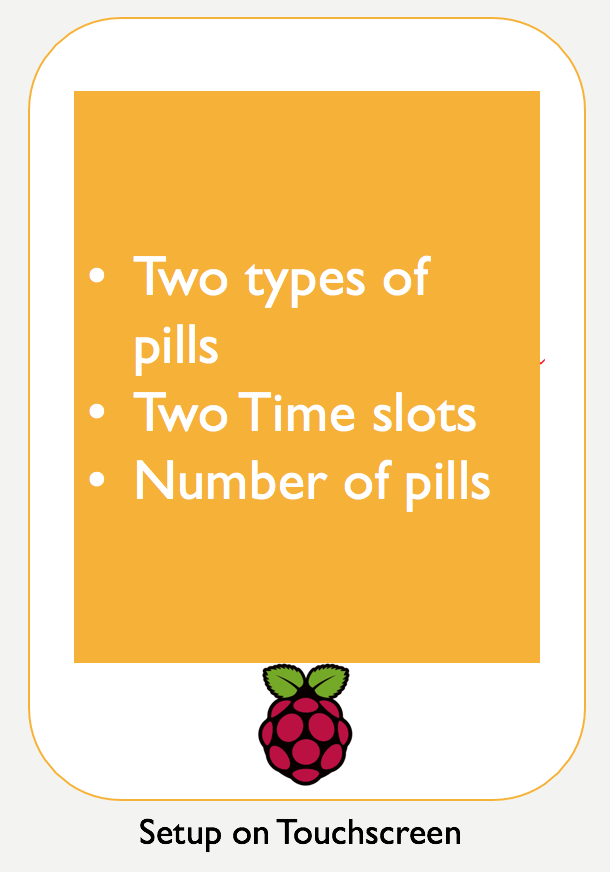
The main purpose of the GUI is to prompt the user for time and dose for each pill. The GUI offers good flexibility in scheduling, so that the time and dose for each pill can be setup separately, and the time can be specified to minute. The user firstly needs to select which pill to set up (p1). Also, on p1, the current time is displayed on the screen with hour, minute and second. The next page prompts for a time slot number (time1, time2) to set up (p2). Then, on a number pad, the user can specify a time by 24-hour (p3). The user is able to delete the last digits of the input in case of modifications. The system reminds the user when the “done” button is pressed if the input time is incomplete or invalid, for example, ‘20:__’ or ’28:80’. Also, it allows only 2 minutes after the current time as an input. This design is to prevent missing the dose due to operating delay. A message specifying the error will appear and stay until the user’s next action if the input time is invalid (FigureXX). The user will be able to quit the current setup by hitting the “done” button again to go back to the last page. With a valid time input, the user then selects how many pills to take at that time (p4). For the best user experience, the input is not accomplished by a number pad, but by pressing “+” or “-” button. Considering that usually the user takes up to 5 pills each time, we design the system that takes a maximum input of 5. When finish, the user can return to p2 to set up for a different time slot. Also, from p2, the user can return to p1 to select a different pill, or to view and confirm the schedule (p5).
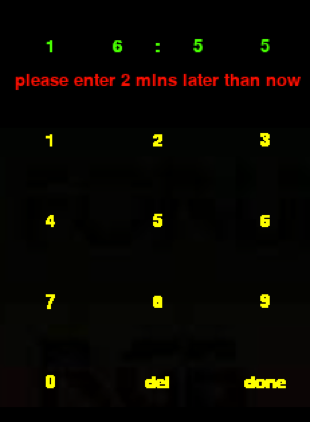
FIgure 13. Error Message 1

FIgure 14. Error Message 2
The GUI was implemented with pyGame library. Many GUI libraries are available, and Tkinter toolkit was firstly considered because of convenience. However, learning that Tkinter only works on the x terminal, we decided to still use pyGame. Each page of the interface is defined by a function that can be called in the main while loop. Each page has a number for identification. The current page number can be updated to move forward or backward.
Pill dispensing and Safety Detection of Pills Dispensed
Once the user sets up the schedule, the system will dispense the pills at the set time autonomously. A function called “checkClock” reads the current time and compare to the user’s input. “checkClock” is called at p1, so that the pill will not be dispensed while the user sets up the schedule. Once the time has been matched, a “dispense” function rotates the motor according to the pill information.
Also, the IR sensor detects the number of pills that fall using a callback function. Once the rotor finish dispensing and the pills number does not match with expected, the alarm will be triggered. A set of Boolean variables are set up and updated throughout the loop. Their purpose is to restrict the mechanism to dispense pills only once for each time slot, and to close the alarm message once the user has viewed it. A function called “ifToday” checks if the date has changed, and update the Boolean arrays accordingly.

Figure 15. Flow chart of the control
Software challenges and improvements
Many challenges were encountered throughout the progress. The first is to store the user input orderly to be used later. Since there are two kinds of pills, two time slots with different numbers to dispense, the data structure may be very confusing. The approach adopted was to use a four-layer list. Although it caused some troubles when extracting the information for dispensing, as a single list, it is easy to pass in and get updated within the functions. There may be better solutions to this problem though for future improvements. A second challenge is to implement the error checking in user input. For example, to figure out all the possible invalid input cases that may occur. Also, the error message to display needs to be specific and clear. This task requires careful design, testing and others’ suggestions. Another challenge is that “segmentation fault” error appeared in the final stage of the implementation. Since the error appeared without indicating specifically the location of bug, the process of debugging was very tedious. In the end, we figured out that the problem was caused by an improper syntax when using pyGame.
The software implementation can be improved for better performance and clarity. Firstly, the background can be artistically designed, while currently all buttons and texts are displayed by pyGame. For example, it can be decorated with a product logo; and the buttons can be drawn using other software and import with the background. Secondly, the code can be developed with better data structure and algorithm to avoid delays, therefore providing better user experience. Also, for future steps, the number of pills and number of time slots can be expanded to meet user need.