What Goals We want
- Build a robotic system to play mobile game app
- High accuracy (high scores) is guaranteed
- High speed to play the game apps is also guaranteed

Get to know Our Idea
Raspberry Pi is an ideal platform to build a small robot. We get the idea from Lab3 which we can build a robotic car on a raspberry pi system by writing some controlling programming. But, in Lab3, our robot does not have “eyes”. So, here is our idea – we want to build up a robot with eyes and make it play some simple game apps, such as Lumberman. Lumberman is a mobile game app, where you need to avoid the branches when you chop the wood. We implemented the algorithm to detect where the branches are and make our raspberry pi to chop the wood happily!
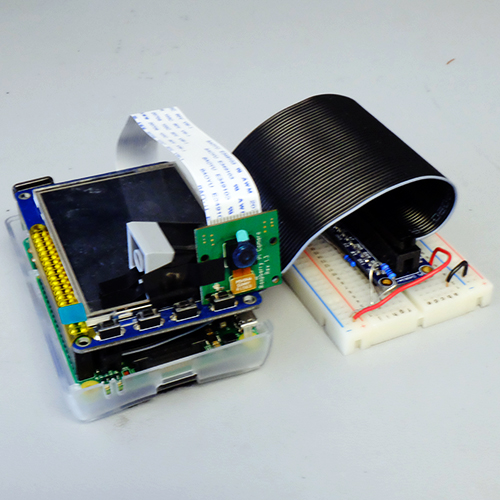
Keyword: Raspberry Pi, PiCamera, Image Processing, GPIO output control
Setup environment For PiCamera and Libraries
Before we start our project, we need to set up the environment for raspberry pi.
- PiCamera
python-picamera is a pure Python interface to the Raspberry Pi camera module for Python 2.7 (or above) or Python 3.2 (or above).
First: Enable PiCamera
Run sudo raspi-config and choose in the menu to enable the pi camera. A reboot is needed after doing this.
Second: Install the Library for PiCamera
Run the following commands to get the library.$ sudo apt-get update
$ sudo apt-get install python-picameraNow you can import piCamera and capture a picture!
import picamera
camera = picamera.PiCamera()
camera.capture('image.jpg') Image Processing Related Libraries
Since we need our raspberry pi to "see" a scene, and we need the image-processing algorithm to help us to detect if there is a branch at specific site or not. And we need to install the libraries including SciPy, Python Image Library (PIL), matlibplot , and skimage.Scipy/NumPy/matplotlib
The SciPy library is one of the core packages that make up the SciPy stack. It provides many user-friendly and efficient numerical routines such as routines for numerical integration and optimization.
NumPy is the fundamental package for scientific computing with Python. It contains among other things:
- a powerful N-dimensional array object
- sophisticated (broadcasting) functions
- tools for integrating C/C++ and Fortran code
- useful linear algebra, Fourier transform, and random number capabilities
Besides its obvious scientific uses, NumPy can also be used as an efficient multi-dimensional container of generic data. Arbitrary data-types can be defined. This allows NumPy to seamlessly and speedily integrate with a wide variety of databases.
matplotlib is a python 2D plotting library which produces publication quality figures in a variety of hardcopy formats and interactive environments across platforms.$ sudo apt-get install python-numpy python-scipy python-matplotlib python-pandas python-sympy python-nose
Python Imaging Library (PIL)
The Python Imaging Library (PIL) adds image processing capabilities to your Python interpreter. This library supports many file formats, and provides powerful image processing and graphics capabilities.
Here we are going to install PIL using pip, so we start with installing python-pip.$ sudo apt-get install python-pip
With pip installed, install the required development packages:$ sudo apt-get install python-dev libjpeg-dev libfreetype6-dev zlib1g-dev
After installing these packages, we have to symlink the three image libraries into /usr/lib. A symlink, which is short for symbolic link, is a special type of file that contains a reference to another file or directory. The reference is in the form of an absolute or relative path and it affects path-name resolution. To do that, type in the following commands on the terminal:
$ sudo ln -s /usr/lib/`uname -i`-linux-gnu/libfreetype.so /usr/lib/
$ sudo ln -s /usr/lib/`uname -i`-linux-gnu/libjpeg.so /usr/lib/
$ sudo ln -s /usr/lib/`uname -i`-linux-gnu/libz.so /usr/lib/Now we are ready to install PIL. Type the following:
$ sudo pip install pil
To install Pillow (recommended), type the following:
$ sudo pip install Pillow
Tips: The total size of these libraries is about 2.2GB. But since you have to download the compressed file and then unzip them, the total free space required on your disk/SD card is about 3GB. Please make sure that you have enough space before you start downloading. By checking the space availible on your curren Linux system, following command can be used:
$ df -h
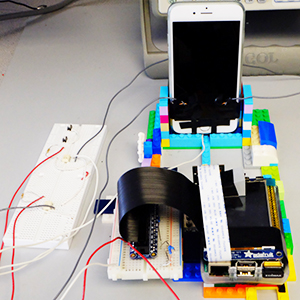
Sofeware and Hardware work together :)
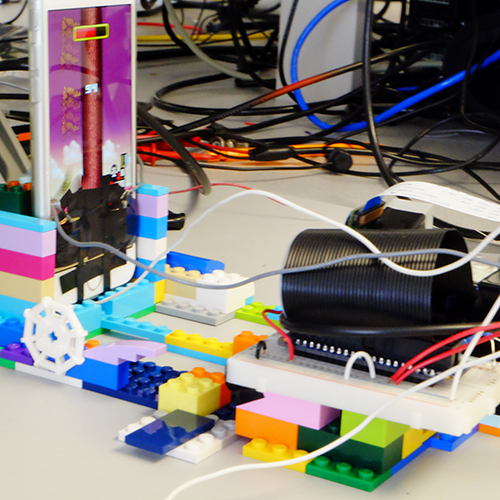
Our project can be split into three categories: platform design, software design and hardware design. Platform design is to provide the spaces for our smartphone and the raspberry pi, also, make sure the relative position of the camera and our smartphone can be fixed. Then software part can be analogous as the mind of our raspberry pi. We apply the image-processing algorithm to detect the branches and decide where to chop the woods on the screen. Last but not least, we build the "hands" for the raspberry pi to trigger the touch events on the capacity screen of the smartphone when it needs to move to the other side. This project is lots of fun! Join us and see how each part works by scrolling down!
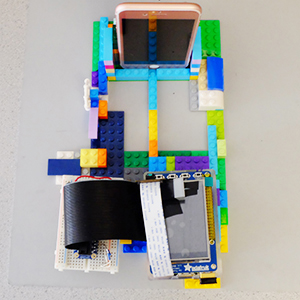
Platform Design
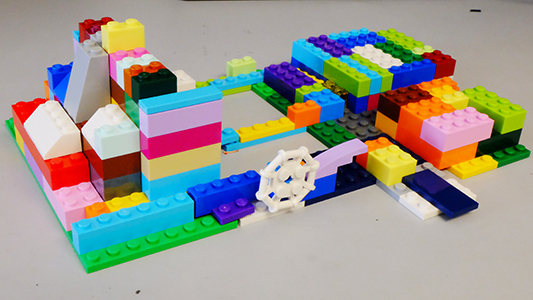
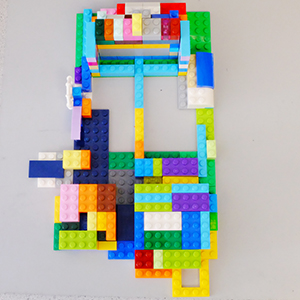
For the platform design, we used LEGO to build our architecture. With the flexibility of LEGO, we can rebuild the platform anytime we want when it's not fit for our aim. On this platform, we built several spaces for different parts. Mobile phone, raspberry pi, and the breadboard all have their specific areas to put in. More importantly, it can help us to fix the relative distance from the picamera and mobile phone. By this proper platform, we can eliminate some uncertainties when we restart our work each time thus make it easier to implement the image processing algorithm.
Software Design
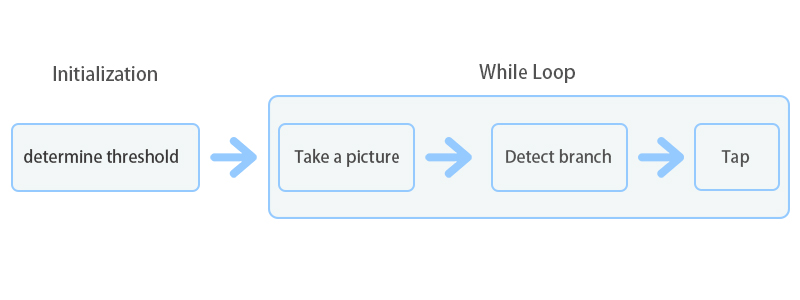
The flow-chart shown above is the basic idea for software part to detect the branch and tap the screen of our mobile phone. At the initialization stage, we take 5 pictures in a row to make sure the lighting condition and the white balance setting are stable for piCamera. The first several photos are too bright so we use the fifth photo we take to determine the threshold for our detecting part. Actually, we have improved the performance of our algorithms by implementing different versions of our codes, so we will go through each version and highlight the significant improvement in each step.
- First version with highest scores 40
The first version of our design is the slowest algorithm but with high accuracy. The idea is quite simple. Among all the steps in our implementation, deciding the values of a threshold is the trickiest part for our algorithm. In our first version of our algorithm, we stored the mean values of intensities over the region of the first branches right above the head of the lumberman. The reason we use the mean values is because that at the beginning of the game, there is definitely no branch right above the head of the lumberman. Besides, the region right above the head of the lumberman contains lots of high-intensity values (white color with intensity 255), then the mean value at the site is high enough to differentiate the mean values for the intensities when there appears a branch (with green, black color which lower the intensity of the area). Therefore, we just need to calculate the differences between the mean values of the intensities of the specific region with the stored values at the beginning, and if the difference is larger than some value (we set 60 here) then we can know there is a branch.
The lumberman chops the tree with correctly dodging the branches but the speed is really low so that time runs out after about 14 chops (14 points). We guess the slowest process is about taking a photo and we also want to do some accurate measurement about the time for each process. So we used the time module in Python as the timer to calculate how long does each function take when it executes in our algorithm to find out the bottleneck step which takes the most time. After such operation, we found that the time for PiCamera to take a picture requires 0.2-0.4 secs while the calculation of the mean values and differences only takes a few milliseconds. In order to speed up the speed of the capturing photos, we set the parameter use_video_port True in the capturing method. After this small improvement, it helped quite well - it can achieve 40 points, but the time for taking photos is still too long.camera.capture(fileName, use_video_port=True)
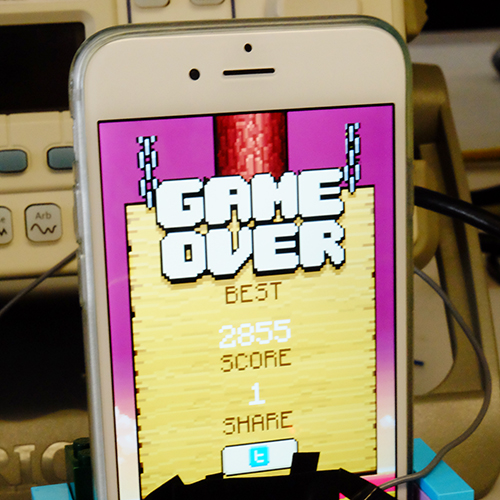
- Second version with highest scores 2855
In the Lumberman game app, time is a key factor to get high scores. When you respond too slow, the remaining time decays much quicker; while if you tap quickly and correctly the remaining time will increase. So we did lots of improvements to speed up. Here are some efforts we've tried.(1) Lower the resolution of the picture took
We lowered the resolution which can help to eliminate the number of pixels we need to consider about and make it faster to write to a file and read the image file. The resolution of the pictures for our latest version is 160 * 120.(2) Isolate a CPU core and try to eliminate latency from CPU
We referred to LectureNote 35 and tried to reduce the latency from CPU by isolating a CPU core. We set the configuration like the instruction following:Add 'isolcpus=3' to /boot/cmdline.txt
After that, everytime we run our python script, we type the following to run our code.
Taskset –c 3 python fileName.py
This is a good way to reduce the latency from the system and it can help to speed up for 0.03 - 0.04 seconds.
(3) Using in-memory streams to store the picture instead of storing in SD card.
The other problem we think we encountered is SD card speed limitations. In other words, we need to capture to something faster like a network port or in-memory streams. So we utilized the stream = io.BytesIO() and turned the stream to PIL (Python Image Library) object for further image-processing. It can help speed up for a little (0.03 faster).stream = io.BytesIO()
camera.capture(stream, format='jpeg',use_video_port=True)
stream.seek(0)
image = Image.open(stream).convert('L' )
arr = np.fromiter(iter(image.getdata()), np.uint8)
arr.resize(120, 160)All the three methods listed above slightly reduce the time for one tapping thus now sometimes the highest score can reach 45. However, we have to find another way to improve our Pi Game Player's performance because the bottleneck here is still the long time for taking photos and it is hard to reduce any more.
(4) Tap several times after taking a picture (most significant)

This idea is inspired by the generous TA - Jinyao Ren. He suggested that we can try to tap three times when we take a picture and it can help to speed up three times. We took his good advice and implement the algorithm to detect five branches at a time and tap five times accordingly. In this implementation, we encountered several challenges.
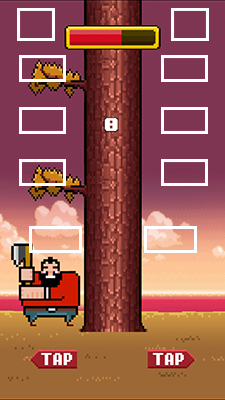
The image shown above is the screenshot of Lumberman app. As you can see here, when we take the first image to determine the threshold values, we have to consider 10 sites and set thresholds for each site. But, how? Firstly, we need to know if there is a branch at each area or not. Secondly, based on our analysis of the intensities of the images taken by PiCamera, the intensity values can vary a lot owing to the environmental lighting condition. Which results in different intensity values between not only different layers but also left-hand side and right-hand side. Therefore, as a small summary here, we need to assign different thresholds for each site. We tried different methods to determine the thresholds and improve accuracy. Like using minimum values - because if there is a branch, it would contain the black color in the area and the intensity is 0. However as we said earlier in this session, due to various environment lighting condition, the intensities at different regions are not consistent. Using minimum or maximum can not reach high accuracy for detection a branch. At last, we came up with a great idea about this, that is using "variance" values over the regions for branches. Since in the case that if there is no branch at site 1,2,3,4, the background is uniform, and the variance of the intensity values at these areas is small. When there exists a branch, the variance of the intensity values can be a large value! So in lastest version of our design, the detection method for site 0 is to find out the differences between the original image and each image we take for tapping event; the detection method for site 1,2,3,4 is to use variances as our threshold - if the variance at the specific area is larger than some value (we set 300 here) and it means there exists a branch. Furthermore, to fit this new detection method, we need to carefully decide the region we want to detect due to some unexpected situations - such as the screen pops up "Level x" when you reach Level x and the time-remaining strip affects the detection as well. The image shown below is the regions we decide to detect the branches.
With this modified detection method and good hardware part for tapping the capacitive screen of our mobile phone, our raspberry pi can score with 2855 - a really high new record! But there is still another issue here, that is the threshold setting is optimally designed for the red background of the game. This game contains three kinds of background, it is required to have different detection method for our algorithm.
- Challenges for different background
Another interesting challenges worth noted is that: in Lumberman game app there are three different background settings! This contributes to different relative values between the intensities of background and foreground, and we need to customize our code to fit in different situations.


In order to deal with the issue of different background color, we analyzed the pictures before writing our code. We wrote a small helper function to help us to calculate the intensity values. We found some interesting things. Firstly, for red background, it's easy to differentiate the branches (green) and background (red), so it is quite accurate when we utilized the variances among intensity values over the pictures. However, for the other two background settings, it's more difficult to differentiate background from foreground when we calculated the variances for intensity values over RGB. Therefore, we explored more by separating the intensity to three layers (R,G,B), and we found that if we only extract the intensity from green level, the area with a branch and the area without it are easily recognized from the calculations! That is, after extracting the G intensity values from RGB, the variance values when there is no branch will reduce to less than 100 while the variance can roar to larger than 200 when there is a branch. The reason results in this situation are that for the other two background settings, the green values contribute a lot in RGB with small R and B, and if we do the calculation by averaging RGB, it would enhance the variances owing to the big gap among these three layers. And if we only take care of G values, the high influence of less-related R values and B values can be reduced and the variance values can be obviously told apart from the site with a branch or without one.
Hardware Design
So after our Raspberry Pi finishes the process of taking photos and detecting branches, it is time to build "hands" for it to tap on the screen. Instead of using expensive robotic arms, we build circuits using electric switches controlled by GPIO pins to trigger the tapping on the touch screen of our smartphone. Key points are building pads for contacting with the touch-screen, circuits for controlling the tapping by normal switches, circuits for controlling the tapping by GPIO pulses and the test of the minimum tapping time.
(1) Tapping Pads
The basic principle for tapping on the capacitive touch screen is to draw a few electrons from the screen. For example, when people touch the screen with fingers, they are able to draw some electrons by the circuit loop from the cell phone to the ground since people has a capacitance about 30pF~50pF. Thus for triggering a tap on the capacitive touch screen, conductor with a certain magnitude of capacitance is required.
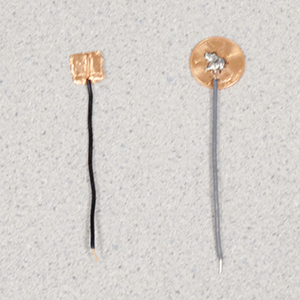
Firstly we used several layers of copper tape to build the tapping pads. After many experiments, we found that the capacitance of copper tap with ten layers was good to trigger the tapping accurately. However, a deadly defect of the copper tap pad is that it is unstable and hardly to be reused. It performs really good at the first time, but next time when we re-stick the pad on the screen, it is not as sensitive as before. The reason is obvious. The process of tearing off these copper tape pads from the screen slightly changes the space among each layer thus intensely alters its capacitance. It is quite annoying that we have to re-build two pads for each time we restart our work. So we decide to find other stable methods to build these two pads.
Then we found the one cent coin could also serve as a good pad for triggering the tapping. Furthermore, within a wire soldered on it, it contacts really well and very stable. Here is the picture which shows these two kinds of pads, the left one is built by the copper tap and the right one is built by the one cent coin. One tricky thing here is that the distance between the pad and the screen should be very small. So every time when we restart our work, we have to bind the pads tightly on the screen by powerful black tapes or else the sensitivity of tapping will be severely influenced which leads to a higher probability of missing tapping.
(2) Circuits using normal switches
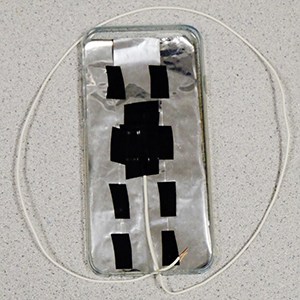
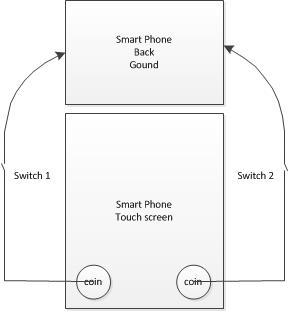
After resolving the problem of stable pads for touching the screen, a simple current loop for testing its basic function is essential. To trigger a tapping on the screen, the other side of the pad has to be connected to the ground (the back of the cell phone). So a ground platform made by tinfoil with the same size of our cell phone helps the connection between the other side of the wire and the back of our cell phone. As the following picture (left side) shows, with the proper phone case, it contacts pretty good. Then the pad and the ground is connected separately on the two side of a switch. There is also a diagram (right side) shows the circuit of this connection. It works very weel so now we can play the Lumberman within two switches. By successfully triggering the tapping by normal switches, it is time to move on electric switches.
(3) Eletric switches
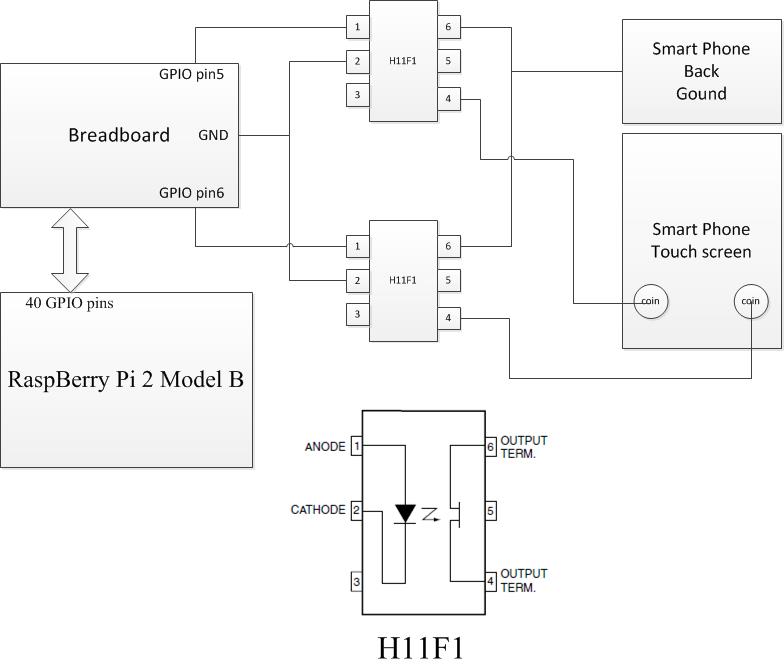
As for the Pi Game Player, it can not perform the "touch" actions like human beings. What it can do is to output pulses through GPIO pins. So we build two electric switches by H11F1. According to the datasheet of H11F1, H11F1 is composed of a Gallium-Aluminum-Arsenide IRED emitting diode and a symmetrical bilateral silicon photodetector (ideal isolated FET). So if the diode on the left side is turned on, the output TERM. (pin4 and pin6) will be connected. For our circuit, two GPIO pins are selected to output PWM (pulses) for controlling the tapping. When the GPIO (pin5 or pin6) output high-level voltage, the diode is turned on which leads to the connection between the pad (the coin) which is bound on the capacitive touch screen and the ground of the smartphone. After a while, GPIO will output low-level voltage so that the touch screen can detect an effective tapping. That is the basic principle of tapping on the capacitive screen controlled by the Pi Game Player.
By the way, the game requires the lumberman to dodge branches by selecting his position towards the trunk. So for playing this game, touches on the left side of the screen and the right side of it are demanding so that two pads are built. And the reason of binding them on the bottom of the smartphone is that there is only the place available to be shaded.
(4) Tapping time requirement
Finally, we write a basic python script for testing the output with these electric switches. This code is also in the Appendix. The basic aim of this script is to test whether these two coins can correctly trigger the tapping. From the analysis in last part, the sleep time between the high-level and low-level output is the minimum time required for the tapping. Even if Raspberry Pi is able to touch the screen in really a fast speed (in a magnitude of us), the capacitive touch screen is unable to detect that kind of fast touch. Some time is required for drawing some electrons from the touch screen and calculating the position of the touching point. In general, capacitive touch screen is able to finish this process in 3ms. But actually, we are using coins and electric switches as tapping medium so that time for drawing a few electrons may become longer. After continuous testing, we found that 0.03s is required for triggering a correct touch. However, since we want to continuously tap five times on the screen. The debounce time between each tapping should also be seriously considered. After several experiments, 0.1s is enough for the debouncing mechanism for iPhone touch screen. However, with our Pi Game Player become strong enough--the more accurate branches detection, miss tapping sometimes happens. If we extend the tapping time, the miss tapping is assuaged but its speed decreased. So there is a trade-off between the accuracy of tapping and the tapping time. After several tests, we found that the total tapping time 0.15s (0.05s tapping+0.1s debouncing) is a good balance between the accuracy and speed of tapping.
Now our Pi Game Player can play the game! Come join us and see if you can beat it!!
How Good We Achieved
Until now, out powerful Pi Game Player have reached a score up to 2855! It is pretty high which even beat one of the developers who is really good at this game (1000). So we think our robot can defeat any human players! Here we will introduce some timing specification of our awesome Pi Game Player to analyze why it can defeat human players quantitatively.
Video
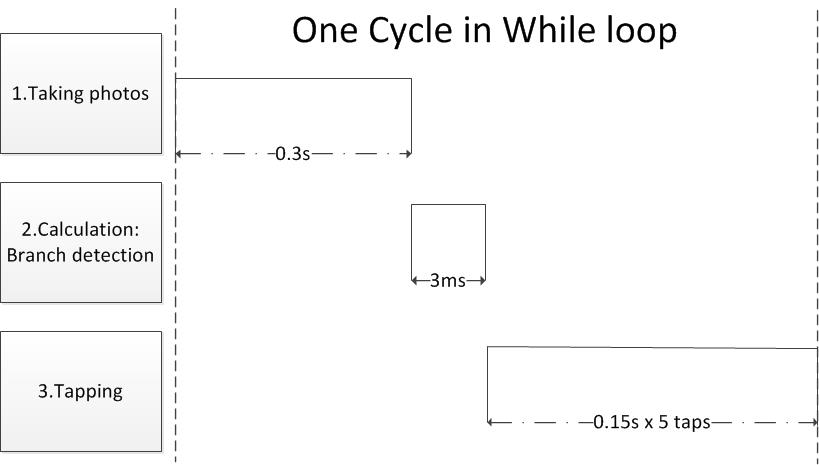
- The following picture shows the timing specification for one cycle in the main while loop. Here we execute the timer for the processes including taking photos, calculations for detections and tapping in serial. As shown in the following picture, taking one phone takes about 0.3s; the calculation takes about 3ms which is faster compared with other two processes thus can be ignored; the five tapping takes about 0.75s. So for each tapping, our Pi Game Player takes about 0.21s and it can play this game without any wrong detection. For human beings, the time for seeing an image and generate a signal to act is at least 0.1s; the time for taping is at least 0.11s and this can be tested by the Stopwatch on our cell phone. So even the most powerful human player can only perform one tapping in 0.21s - the same speed of our Pi game player. However, people will be tired and distracted by the environment which can lead to the misjudge of the branches so human players can't keep the highest speed - 0.21s one tape for a long time. Thus, now it is impossible for any human players to defeat our Pi Game Player.
What strategies To improve it
Even if our Pi Game Player is able to defeat all human players, the accident game-over caused by miss tapping on the touch screen is an annoying but important issue for this project. If this problem can be resolved, our Pi Game Player can get an infinite score in theory. Another problem is that now our Pi Game Player is a little fragile which means its performance is not stable. Therefore this part is going to analyze the reasons of these problems and covers some methods to improve or resolve it.
Performance influenced by Miss Tapping
In this part, we will analyze the possible reasons for the miss tapping and provide two possible solutions for it.
Firstly, the missing tapping probably owing to the circuit we built for triggering a tapping. The most suspicious part which can cause this problem is the H11F1. According to its datasheet, the time for turning on/off is less than 15us which seems pretty good. However, here we are using coins as the pad for drawing electrons so that time consumed maybe not stable. Thus sometimes the time for drawing a few electrons from the screen maybe even more than the tapping time (0.05s) we set here which leads to a miss tapping.
Secondly, the miss tapping may also result from the miss detection of the capacitive touch screen. We all have the experiences that sometimes the touch screen is not so sensitive when we touch our smartphone. Thus, such so-called miss tapping may actually the missing detecting of our touch-screen which is unavoidable.
(1) Golden Pad
To address the problem of the missing tapping owing to electrodes, TA Jacob recommended us we can use a gold pad for our electrodes since the conductivity of golden is higher than copper. So it can collect electrons from the electrodes better and faster than the copper pads which we are using for our project right now.
(2) Parallel Execution
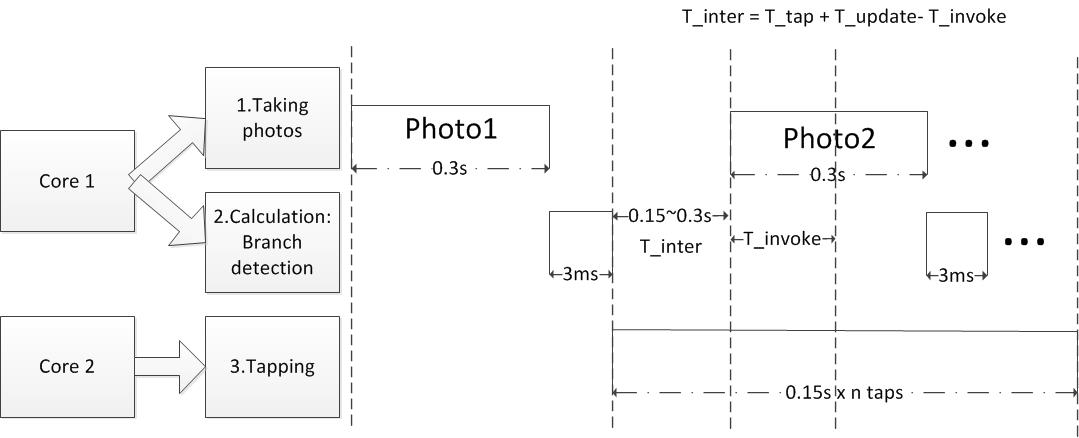
This method is an advanced strategy which can not only decrease the probability of the miss tapping but also further improve the playing speed. Now we want to reduce the miss tapping without injuring its general performance. But it seems that the most practicable way to reduce the probability of the miss tapping is to increase the time consumed on each tapping. So the timing control becomes a tricky issue here because the time for each process like taking photos, tapping can't be further decreased separately. Under this condition, the best idea for improving the speed of executing multiple processes is pipelining/parallel execution.
Here we want to appreciate our professor - Professor Joseph who provided this idea! So we can build a FIFO system to store the control signals generated by the calculation. We can use different cores to be in charge of different jobs here. For example, the job of Core 1 is to take photos, calculate the values for detection and store control signals into the control FIFO. Core 2 is responsible for tapping on the screen. However, it is a tough work to implement it.
Following is the timing specification of the parallel execution for our project. Here we have to analyze the timing issue carefully. Just as the timing diagram shows, after the first picture taken and analyzed, five tapping control signals have been stored into the output FIFO. The T_inter is a critical time here for starting to take the second photo. We want to add two more control signals in the output FIFO because the time for two tappings is nearly the same with taking one photo. By doing this, we can fill the pipeline thus get the highest throughput. We have to take the second photo within the screen updated after two tappings but before its updating for the third tapping. As the following equation shows, T_tap is the time for the first tapping (0.15s); T_update is the time for updating the display; T_invoke is the prepareing time for taking one photo like invoking the functions. By analyzing these parameters, we can get the correct point to start the process of taking further photos so that the process of watching+thinking and tapping can be fluently paralleled executed. So now the time for each tapping can be 0.15s. The time contraint for this game is about 0.21s for each tapping which means within this tapping speed, players can continuously play this game nearly forever without mis-judgments. Under that condition, we can extend the tapping time to 0.16~0.20s to improve the tapping accuracy and improve the current performance (playing speed) as well.
Unstable Performance caused by Wrong Branch Detection
Besides the problem of miss tapping, the vulnerable detection is also an annoying problem. Here we list the main reason--environmental light condition and provide some possible solutions.
(1) Increase Resolution
In this project, we put lots of effort in speeding up our algorithm so we made the resolution of the picture taken by the piCamera really low (160*120). However, this idea makes our algorithm vulnerable to the environmental light condition - every time we test our program we have to make the environmental light condition uniform by keeping it for a certain distance. We can make our algorithm less vulnerable by elevating our resolution to 320*240. If we make the resolution higher, the image would contain more intensity information and we can make our algorithm more stable and accurate.
(2) Detection with GRB Color Sensor
For now, our platform uses a cheap picamera which provides a low-quality image and slows the speeds of our implementation. Another alternative to speed up our algorithm and enhance the accuracy of our detection is to use RGB Color Sensor with IR filter. With the RGB Color Sensor, it can detect the changes of the color over a region fast and accurately, which provides a better solution than piCamera. Furthermore, using this sensor, we don't need to take care of the issue of environmental light condition change because it only detects the changes in the RGB values.
What we have created / referenced For this project
Here is the code appendix for our project. We've created several versions of codes here.
Parts List
| Name | Quantity | Price |
| Raspberry Pi2 B | 1 | 35$ |
| PiCamera Board Module | 1 | 19$ |
| H11F1 | 2 | 3.3$ |
| Breadboard | 2 | 5$ |
| Wires+Resistors+Tape | some | 1$ |
| Total | 71.6$ |
Codes
First version - with highest scores as 14 points
This version is our first trial, which chops the trunk slowly. The main bottleneck is the time for taking a picture. The progress of this algortithm is - take a picture, image-processing and then trigger the touch event. However, the picamera is initialized and turned on its configuration each time when it needs to capture a picture. Therefore it goes slow.############################################################################### # # # file: runOnPy.py # # # # authors: Wen-Yu Wang - ww424 # # Hanchen Jin - hj424 # # # # date: April 30th 2016 # # # # brief: Version1, use mean value of the intensity at specific areas to # # see if there is a branch. It runs really slow because picamra # # has to be turned on when each time it capture the picture. # # # ############################################################################### ### Imports ################################################################### import picamera from PIL import Image import numpy as np from scipy.misc import imread, imsave import matplotlib.image as mpimg import RPi.GPIO as GPIO import os from time import sleep #### Detction of branch ####################################################### def detectBranch(site, value,thr): if site == 0 and (thr - value ) > 0.06: return True elif site == 1 and thr - value > 0.06: return True else: return False #### Function that receive a photo and make a decision ######################## def play(camera, thLU,thRU): # fileName: image name ; status: where to go ; 0 : go right, 1: go left status = 1 while True: fileName = "image.jpg" camera_width = 320 camera_height = 240 camera.resolution = (camera_width, camera_height) camera.capture(fileName,format='jpeg') image_data = imread(fileName) #normalize image data to be between 0 -1 image_dataN=image_data/255. #Detect the branch by take average of intensity of the image at specific area leftUp =np.mean(image_dataN[36:48, 25:80]) rightUp =np.mean(image_dataN[36:48, 150:200]) if status == 0 : if detectBranch(0,leftUp,thLU): status = 1 doit(status) else : status = 0 doit(status) else: if detectBranch(1,rightUp,thRU): status = 0 pre = cur doit(status) else : status = 1 doit(status) #### GPIO output ############################################################## def doit(status): if status == 1: print("go Left") GPIO.output(5,1) sleep(0.05) GPIO.output(5,0) else: print("go right") GPIO.output(6,1) sleep(0.05) GPIO.output(6,0) #### Initialize PiCamera ###################################################### def main(): # GPIO.setmode(GPIO.BCM) GPIO.setup(5,GPIO.OUT) GPIO.setup(6,GPIO.OUT) GPIO.output(5,0) GPIO.output(6,0) print("Initializing the camera .....") #initialize picamera camera = picamera.PiCamera() # verizontal flip camera.vflip = True # Capture the first pic to determine the threshold camera_width = 320 camera_height = 240 camera.resolution = (camera_width, camera_height) camera.capture("threshold.jpg",format='jpeg') image_data = imread("threshold.jpg") camera.capture("threshold.jpg",format='jpeg') image_data = imread("threshold.jpg") image_dataN=image_data/255. thLU = np.mean(image_dataN[36:48, 25:80]) thRU = np.mean(image_dataN[36:48, 150:200]) print("Initialization done! And Start to Play!") play(camera, thLU,thRU) print("Game Over") if __name__ == '__main__': main()Second version - with highest scores as 2855 points
In this version we significantly improve the perfomance of our Pi Game Player. In detail, the most effective method applying here is to continuously tap for five times by the analysis of one photo thus the speed of playing this game is increased for nearly 5X. We also properly elongate the time for each tapping to guarantee the tapping accuracy.############################################################################### # # # file: runOnPyFinal.py # # # # authors: Wen-Yu Wang - ww424 # # Hanchen Jin - hj424 # # # # date: May 12 2016 # # # # brief: This is our version7 code, using minimum intensity to detect if # # there is a branch, and we also clean our code, making it clear. # # # ############################################################################### ### Imports ################################################################### import picamera from PIL import Image import numpy as np from scipy.misc import imread, imsave import matplotlib.image as mpimg import RPi.GPIO as GPIO import os from time import sleep import io ### Main function including Setup ############################################# def main(): #Setup for GPIO pins GPIO.setmode(GPIO.BCM) GPIO.setup(5,GPIO.OUT) GPIO.setup(6,GPIO.OUT) GPIO.output(5,0) GPIO.output(6,0) # Capture the first pic to determine the threshold # Low resolution making it read file faster print("Initializing the camera .....") threshold =[[135] * 5 for i in range (2)] camera = picamera.PiCamera() camera.vflip = True camera_width = 160 camera_height = 120 camera.resolution = (camera_width, camera_height) for _ in range (5): camera.capture("threshold.jpg",format='jpeg',use_video_port=True) image_data = imread("threshold.jpg") threshold[0][0] = np.mean(image_data[90:98, 48:68,:]) threshold[1][0] = np.mean(image_data[87:95, 89:107,:]) print("Initialization done! And Start to Play!") play(camera,threshold) print("Game Over") ### Detect branch and move accordingly ######################################## def play(camera,threshold): # fileName: image name ; status: where to go ; 0 : go right, 1: go left status = True branch = [[0] * 5 for _ in range(2)] move = [False] * 5 while True: fileName = "image.jpg" camera_width = 160 camera_height = 120 camera.resolution = (camera_width, camera_height) camera.capture(fileName,use_video_port=True) image_data = imread(fileName) #Detect the branch by take average of intensity of the image at specific area branch[0][0] = np.mean(image_data[90:98, 48:68,:]) branch[1][0] = np.mean(image_data[87:95, 89:107,:]) branch[0][1] = np.var(image_data[66:76, 45:60,:]) branch[1][1] = np.var(image_data[65:73, 97:107,:]) branch[0][2] = np.var(image_data[50:58, 45:60,:]) branch[1][2] = np.var(image_data[48:57, 93:107,:]) branch[0][3] = np.var(image_data[33:43, 40:52,:]) branch[1][3] = np.var(image_data[32:46, 95:107,:]) branch[0][4] = np.var(image_data[20:30, 45:57,:]) branch[1][4] = np.var(image_data[20:32, 91:107,:]) temp = status for j in range (5): ##Detect branch and move if j == 0 : if (threshold[temp][0] - branch[temp][0]) > 55.: temp = not temp elif j in [1,2,3,4]: if branch[temp][j] >= threshold[temp][j] : temp = not temp move[j]=temp status = temp for i in range (5): if move[i] is True : GPIO.output(6,1) sleep(0.06) GPIO.output(6,0) sleep(0.09) else: GPIO.output(5,1) sleep(0.06) GPIO.output(5,0) sleep(0.09) if __name__ == '__main__': main()Tapping testing- controlled by GPIO output pulses
This is the script for testing the function of two tappings controlled by Raspberry Pi GPIO pins. Also it can perform the function of cleaning GPIO settings since the while loop in the main function can be only interrupted by "CTRL+C" which may lead to some problems on the next execution.############################################################################### # # # file: output_test_vfinal.py # # # # authors: Wen-Yu Wang - ww424 # # Hanchen Jin - hj424 # # # # date: May 1 2016 # # # # brief: This is the final version of testing tapping function controlled # # GPIO pulses # # # ############################################################################### #import GPIO library, sleep function import RPi.GPIO as GPIO from time import sleep #set GPIO mode GPIO.setmode(GPIO.BCM) GPIO.setup(5,GPIO.OUT) GPIO.setup(6,GPIO.OUT) GPIO.output(5,0) GPIO.output(6,0) #set initial value a=-1 while a < 2: #input 0,1 for testing tapping pads, other positive number for cleaning GPIO settings a= raw_input("Input a number:") a= int(a) if a==1: #input 1 for testing one tapping pad GPIO.output(6,1) sleep(0.05) #tapping time required:0.05s GPIO.output(6,0) elif a==0: #input0 for testing another tapping pad GPIO.output(5,1) sleep(0.05) #tapping time required:0.05s GPIO.output(5,0) print("Control finishes!") #clean up GPIO when normal exit GPIO.cleanup()
References
PiCamera DocumentScipy installation
Python Image Library Document
The Python Imaging Library Handbook
ECE 5760: Final Project: Flappy Bird Player
H11F1 Datasheet
One-page bootstrap template
At last, We want to say ...
This project is lots of fun and challenging!! At first, the motivation for this project is that we want to build a system that can help us to play the game and get high scores. When developing this project, we found it challenging. The difficulties we faced includes environmental lighting condition, the stability of the tapping electrodes, the slow speed of pi-camera, the low-quality of images taken by pi-camera. We faced these difficulties and came up with the solutions accordingly, at last, we made it!! Combining the techniques of software and hardware, we help our raspberry create its eyes and hands. Finally, we made it can score almost 3000 points.
Authors

Wen-Yu Wang (ww424) :
In charge of software part, including developing the algorithm for detection of branches (testing and debugging), cooperating with hardware part, and the template, formatting of the report. She loves this project and she thinks this project is the most interesting project she has worked during her student life. In this project, she thinks they have learned how to developing a "project" and how to solve problems systematically. )

Hanchen Jin (hj424) :
In charge of hardware part, including the circuit design, testing and debugging. And he also provides some ideas and assistance for implementing the algorithm of detecting branches. Actually at first, He thinks it is easy to build the circuit to tapping on the touch screen, however, selecting material to build the stable hardware requires lots of experiments thus is really tough. Furthermore, he was impressed by the powerful Python libraries and he got some interests towards software development.

Acknowledgement
Thanks professor and TAs for the helpful advices. In the process of developing this project, professor Joe gave us lots of useful information, great ideas and cared about us very much. We really appreciated that. And the advices from TAs were helpful as well. Thanks for their efforts which made this project more perfect. Besides, Wen-Yu wanted to give a special thank to her boyfriend for the creative idea for this project :)