C++ Implementation
The code for this section was developed by Siddharth Mody
Design
The primary purpose of implementing a C/C++ code for digit recognition was two-fold: First, C/C++ gives better results mainly in terms of speed-up and area as compared to Python (without any code optimization). Second, explore and implement the OpenMP directives as covered in the class ECE5990. The primary goal of this project was to give the input digit (test input) through a touch screen, read the pixel values from the screen and predict the results. The following implementation strategy was adopted: First, develop a C++ code for digit recognition. Second, develop a python script using pygame to enable touch screen initialization to read input pixels. Third, create a python script for calling C function. Lastly, implement multithreading using OpenMP to achieve better run time.
The step by step procedure of how the digit recognition was implemented on C is as follows: The K-Nearest Neighbor algorithm was chosen because it is inherently flexible and has high level of parallelism which can be exploited using OpenMP directives. The algorithm basically requires a test input and a training set. To start with, a number of testing instances were defined and stored in a testing.dat file and similarly, a set of pre-defined training data set which comprises of 1800 data for each digit (0-9) were defined. The testing and the training data set were leveraged from Prof. Zhiru Zhang’s class (ECE5775). The algorithm is divided into two parts namely - Update K-nn and K-nn vote. In Update K-nn, first a k-nn matrix of 10x4 is created where each row of the matrix corresponds to a digit input and each column correspond to K nearest values. The k-nn matrix is initialized with a default decimal value of 50. This is because the training and test data is of 49 bits and a maximum distance of 49 can be obtained between the two. The set bits are summed up and stored as decimal value which is further used to calculate the Manhattan distance between the test and train. In order to calculate the distance between the two, Ex-or is done between the test input and each value of training data. If the new distance calculated is smaller than the neighboring distance, the K-nn matrix is updated for that particular digit. In this way, the values of k-nn set are rigorously compared and updated after every pass. In the end, a k-nn set of 10x4 is obtained with the lowest 4 distances of each digit. Next, a k-nn vote function was developed which identifies the minimum distance across all the digits in the k-nn set and predict the result. In order to do, a sum was taken across these four distance values and updated in a new matrix. A conservative search was ran across these values to find the smallest of all and the corresponding index (0-9) is given as predicted output. Once the algorithm was running, rigorous testing was done to ensure the correct functionality of the program as well as to determine optimal value of K. Thus with k=4, an accuracy of 95 % was achieved.
The following diagram shows a visual representation of Knn algorithm implemented in C++
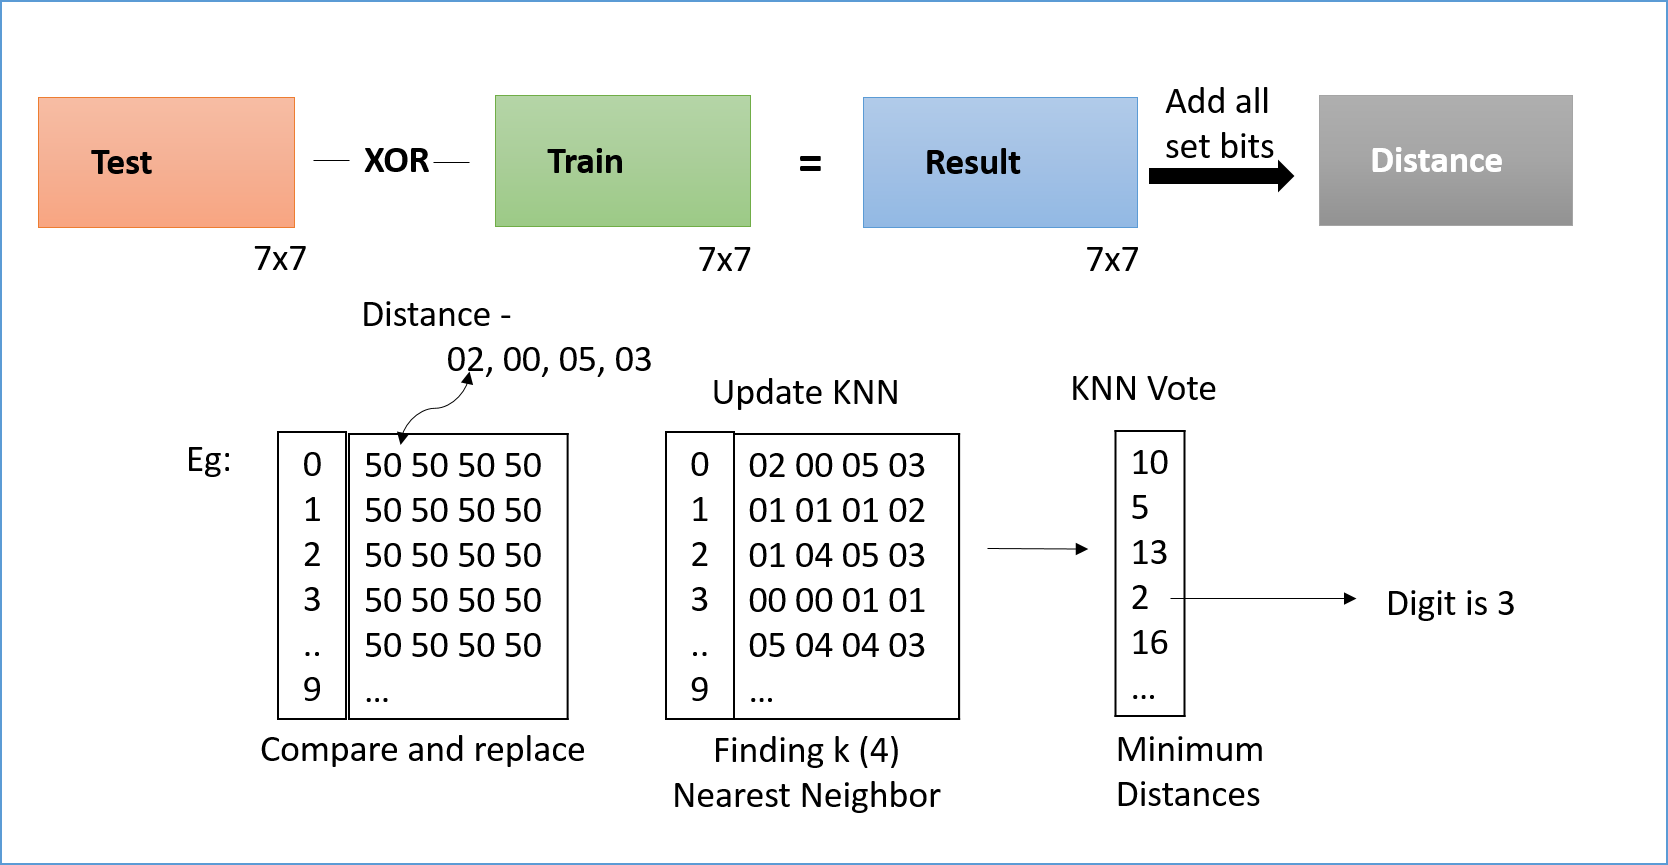
Figure 1: Algorithm
Python calling C-function:
Once the C/C++ code was implemented, next aim was to initialize the screen using python and call a function in C which executes the main program in C using OpenMP and display the result. Since only python need to call C function once, there was no cross communication needed and a 'none' value was returned to python. Note: A python extension module can be used as a normal C library. These libraries end in .so (unix) and .dll (windows)
Creating python extension module: Typically four things are required to call a c function using python:
1.A header file Python.h
2. C function as interface- Pass python variables to C function. This is achieved using the python header file. If there is no return value, none can be passed using py_return_none. The C function names are always static as they are always defined inside the python module. This functions are called using a mapping table constructed using a structure.
3.A table to map python to C functions- A mapping table is usually a python structure which uses three members named ml_name, ml_meth and ml_flags. These structure members are required to connect the C functions with Python script. Each member needs to be terminated with either zero for null value.
4.An initialization function- This is the function which is called by the Python interpreter. This function requires to be named init”function_name” where function_name is the name of the module.
These four steps when combined together can be used for c-python interface. However a number of issues were faced in order to implement it.
Challenges
A number of challenges and issues were faced at different stages of development. This section describes the steps taken to resolve them either successfully or unsuccessfully.
Since the training data was leveraged from the class of ECE5775, it had many arbitrary precision width data types such that the variables can be initialized to any binary value. These data types are not supported on Linux kernel without Xilinx license. These data types were converted to primitive data type i.e. long long int in C. Because of this, the next challenge was to perform x-or operation on decimal values and then compute the bitwise distance between the training data and test data. After every X-or operation, the result was converted to binary. Since the result is of 49 bits, a total of 5 operations were required to get the distance.
The most challenging part was the python calling C function implementation. It had issues with python header file. The C file was unable to read the python key words such as pyobject. This is because the packages installed for python script had some files missing. Thus, we had to manually download the missing files. Moreover it was observed while downloading all the header files from the link [1], most of the components were installed in /usr/lib folder and all the files had to be manually copied to the current working directory (where the python code was written). Even after that there were a number of instances where the program used to crash due to unknown variable passing. After unsuccessful debugging, we moved ahead to OpenMP implementation.
Another challenge was changing static test instances given from a text file to real time input from pi-TFT screen. The screen resolution of pi-TFT is 320x240 which was divided into quadrants of 16 such that we now have total 300 (20x15) pixels. But it is not possible to store 300 bits in a variable in C since max size available is 64 bits (long long int). We came up with multiple solutions for this where we can either make changes in C code or python screen initialization. In C code, we can change the testing input to accommodate bits in multiple arrays and then split the training data such that the comparison now takes place on a group of bits rather than as a whole. In Python, we can increase the size of the quadrant such that 320x240 is read as two- dimensional 7x7 matrix. However each method had some pros and cons. For the former method, it will degrade the performance since the total runtime will be relatively large, while for the latter, the accuracy will drop since the testing data size is cropped.
Another challenge was to enable a dynamic memory allocation to implement self-learning mechanism. This is because after each comparison, if the predicted output is incorrect, the database of the digit needs to be modified.
Code Appendix
Knn Algorithm [2]
1 2 3 4 5 6 7 8 9 10 11 12 13 14 15 16 17 18 19 20 21 22 23 24 25 26 27 28 29 30 31 32 33 34 35 36 37 38 39 40 41 42 43 44 45 46 47 48 49 50 51 52 53 54 55 56 57 58 59 60 61 62 63 64 65 66 67 68 69 70 71 72 73 74 75 76 77 78 79 80 81 82 83 84 85 86 87 88 89 90 91 92 93 94 95 96 97 98 99 100 101 102 103 104 105 106 107 108 109 110 111 112 113 114 115 116 | //========================================================================== //Digit Recognition using OpenMP //========================================================================== // @brief: A k-nearest-neighbors implementation for digit recognition // Name: Siddharth Mody, Mayank Sharma Net-id: sbm99, ms3272 // Class: ECE5990 #include "training_data.h" #include "digitrec.h" #include <iostream> using namespace std; int digitrec( long long int input ) { // This array stores K minimum distances per training set int knn_set[10][K_CONST]; //===================================================================================== // Initialize the knn set //===================================================================================== for ( int i = 0; i < 10; ++i ) for ( int k = 0; k < K_CONST; ++k ) // Note that the max distance is 49 knn_set[i][k] = 50; int j; long long int training_instance; for ( int j = 0; j < 10; j++ ) { for ( int i = 0; i < TRAINING_SIZE; ++i ) { // Read a new instance from the training set long long int training_instance = training_data[j * TRAINING_SIZE + i]; // Update the KNN set update_knn( input, training_instance, knn_set[j] ); } } // Compute the final output return knn_vote( knn_set ); } //----------------------------------------------------------------------- // update_knn function //----------------------------------------------------------------------- // Given the test instance and a (new) training instance, this // function maintains/updates an array of K minimum // distances per training set. void update_knn( long long int test_inst, long long int train_inst, int min_distances[K_CONST] ) { long long int bit_diff = test_inst ^ train_inst ; //XOR to compute bitwise distance int distance = 0; while (bit_diff != 0){ distance += bit_diff % 2; // computing the bitwise distance bit_diff = bit_diff / 2; distance += bit_diff % 2; // computing the bitwise distance bit_diff = bit_diff / 2; distance += bit_diff % 2; // computing the bitwise distance bit_diff = bit_diff / 2; distance += bit_diff % 2; // computing the bitwise distance bit_diff = bit_diff / 2; distance += bit_diff % 2; // computing the bitwise distance bit_diff = bit_diff / 2; } int flag = 0; int i; // # pragma omp parallel for private (i) shared (min_distances) for (int i = 0; i < K_CONST; i++){ if(min_distances[i] > distance && flag == 0){ min_distances[i] = distance; // checking and swapping the min distance flag = 1; // flag being used to swap only once per value and keep iterations constant } } } //----------------------------------------------------------------------- // knn_vote function //----------------------------------------------------------------------- // Given 10xK minimum distance values, this function // finds the actual K nearest neighbors and determines the // final output based on the most common digit represented by // these nearest neighbors (i.e., a vote among KNNs). int knn_vote( int knn_set[10][K_CONST] ) { int sum[10] = {0,0,0,0,0,0,0,0,0,0}; int minimum_knn_sum = 50; int index_num = 0; for (int i=0; i<10; i++){ for(int j=0; j<K_CONST; j++) { sum[i] += knn_set[i][j]; // sum of min distances } if(sum[i] < minimum_knn_sum){ minimum_knn_sum = sum[i]; //computing the min distance and storing the index index_num = i; } } return index_num; } |
Python Calling C function[1]
C function:
1 2 3 4 5 6 7 8 9 10 11 12 13 14 15 16 17 18 19 20 21 22 23 24 25 | //Helloworld.c // Signature C function to be called by Python script // Tutorials Point, projects #include <Python.h> static PyObject* helloworld(PyObject* self) { return Py_BuildValue("s", "Hello, Python extensions!!"); } static char helloworld_docs[] = "helloworld( ): Any message you want to put here!!\n"; static PyMethodDef helloworld_funcs[] = { {"helloworld", (PyCFunction)helloworld, METH_NOARGS, helloworld_docs}, {NULL} }; void inithelloworld(void) { Py_InitModule3("helloworld", helloworld_funcs, "Extension module example!"); } |
Python Script:
1 2 3 4 5 | //Python Script for Calling C function: from distutils.core import setup, Extension setup(name='helloworld', version='1.0', \ ext_modules=[Extension('helloworld', ['hello.c'])]) |
Reference
[1] Tutorials Point. Tutorials Library/ Python Extension Programming with C [Online]. Available: http://www.tutorialspoint.com/python/python_further_extensions.htm
[2] Prof. Zhiru Zhang, Class ECE5775
Contact
Mayank Sen Sharma (ms3272[at]cornell.edu), Siddharth Mody (sbm99[at]cornell.edu)
Graduate students of Class 2016 at Cornell University
Ack
Special thanks to Prof. Joseph Skovira and Gautham Ponnu