ECE5725 Project
RaspberryPi-based Smart Camera "The Eye"
By Yufu Mo (ym445), Yixuan Jiang (yj373)
Objective
The purpose of the project is to design a device to help blind people to understand the world they are facing. Based on some rapidly growing technologies such as face recognition technology and OCR technology, a Raspberry Pi based smart camera “The Eye” is designed and implemented in this project. Users just need to take a photo using the device, and it will give a general description of the photo, recognize the faces and extract text information in the photo. After that, all the information will be output in audio form.
Introduction
Considering our target users are blind people, this device is designed as simple as possible and very easy to use. As for the
hardware, there is a piCamera used to take photos. By pressing the buttons on the Raspberry Pi, the users can use all the
functions of the device.
Our smart camera can send the photo to the cloud server and receive the general description of the photo from the server. The face
recognition function is mainly implemented with openCV library. The LBP cascade classifier is used for face detection and all the
three face recognition models in this library are used for better performance of face recognition. As for the text extraction, we
used the library “tesseract-ocr” to transform the photo into text information. Finally, the library “flite” is used to output all
the information in audio form.
Design Plan
Hardware Design
As the following figure shows, besides Raspberry Pi we have three modules in the whole system. The piCamera is used to acquire the image and what the camera sees will be displayed on the piTFT. Then, the acquired images will be sent to the Raspberry Pi and it will finish the task of giving general description, face recognition and text extraction with the help of some cloud servers. After that, the results will be output through a speaker in audio form.
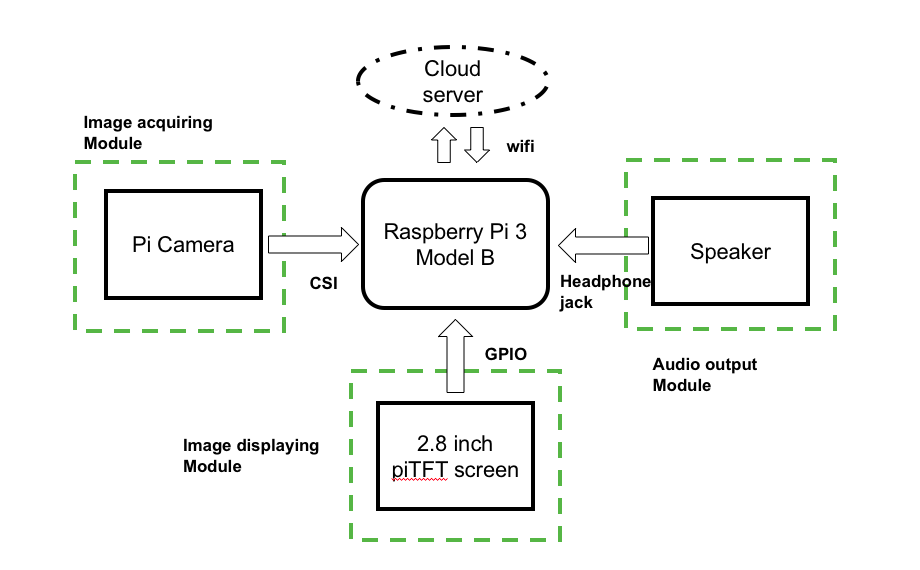
Figure 1. Hardware design of “The Eye” system
Software Design
The following flow chart shows the overall scheme of the software. It mainly consists of five modules: image acquiring and display, general description, face recognition, text extraction and audio output. After the code starts running, the piCamera will continuously take photos and display the latest one on the piTFT. At the same time, the press event of each button will be checked. If none of the buttons is pressed, the code will continuously check the press events, acquire and display the image. Once the press of any button is detected, corresponding code will be executed. As shown in the flow chart, once the button 17 is pressed, the device will output a brief description. Button 22 corresponds to face recognition function, while button 23 corresponds to text extraction.
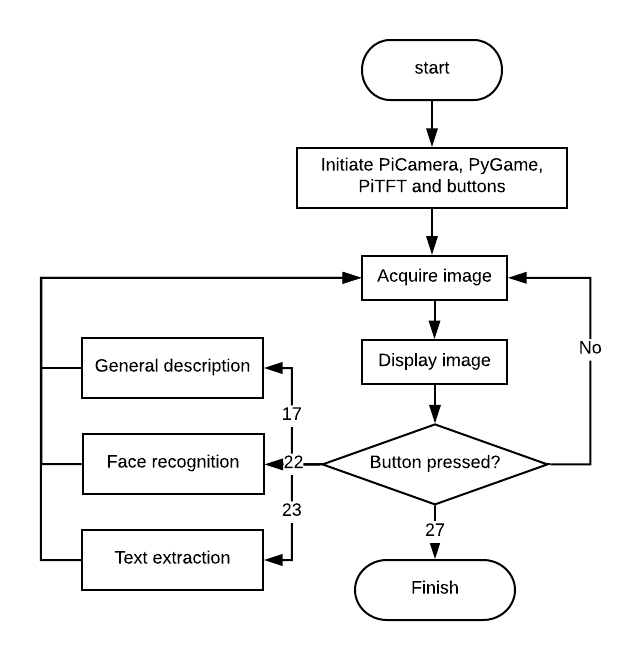
Figure 2. Software design of "The Eye system"
Image Acquiring & Display
We use piCamera to take photos. What the piCamera sees will be displayed on the piTFT. For the image acquiring, it can be implemented with the python package “picamera”. What the piCamera will do is just continuously taking photos and the latest photo will be stored in the variable “image”. And this variable will continuously being renewed until some button is pressed. Once that happens, the latest image will be taken and processed by corresponding code. As for the image displaying, it is used for debugging. The python package “pygame” is used to display images taken by the piCamera on the piTFT. The following figure shows the front view and rear view respectively with the “image acquiring and display” module turned on.
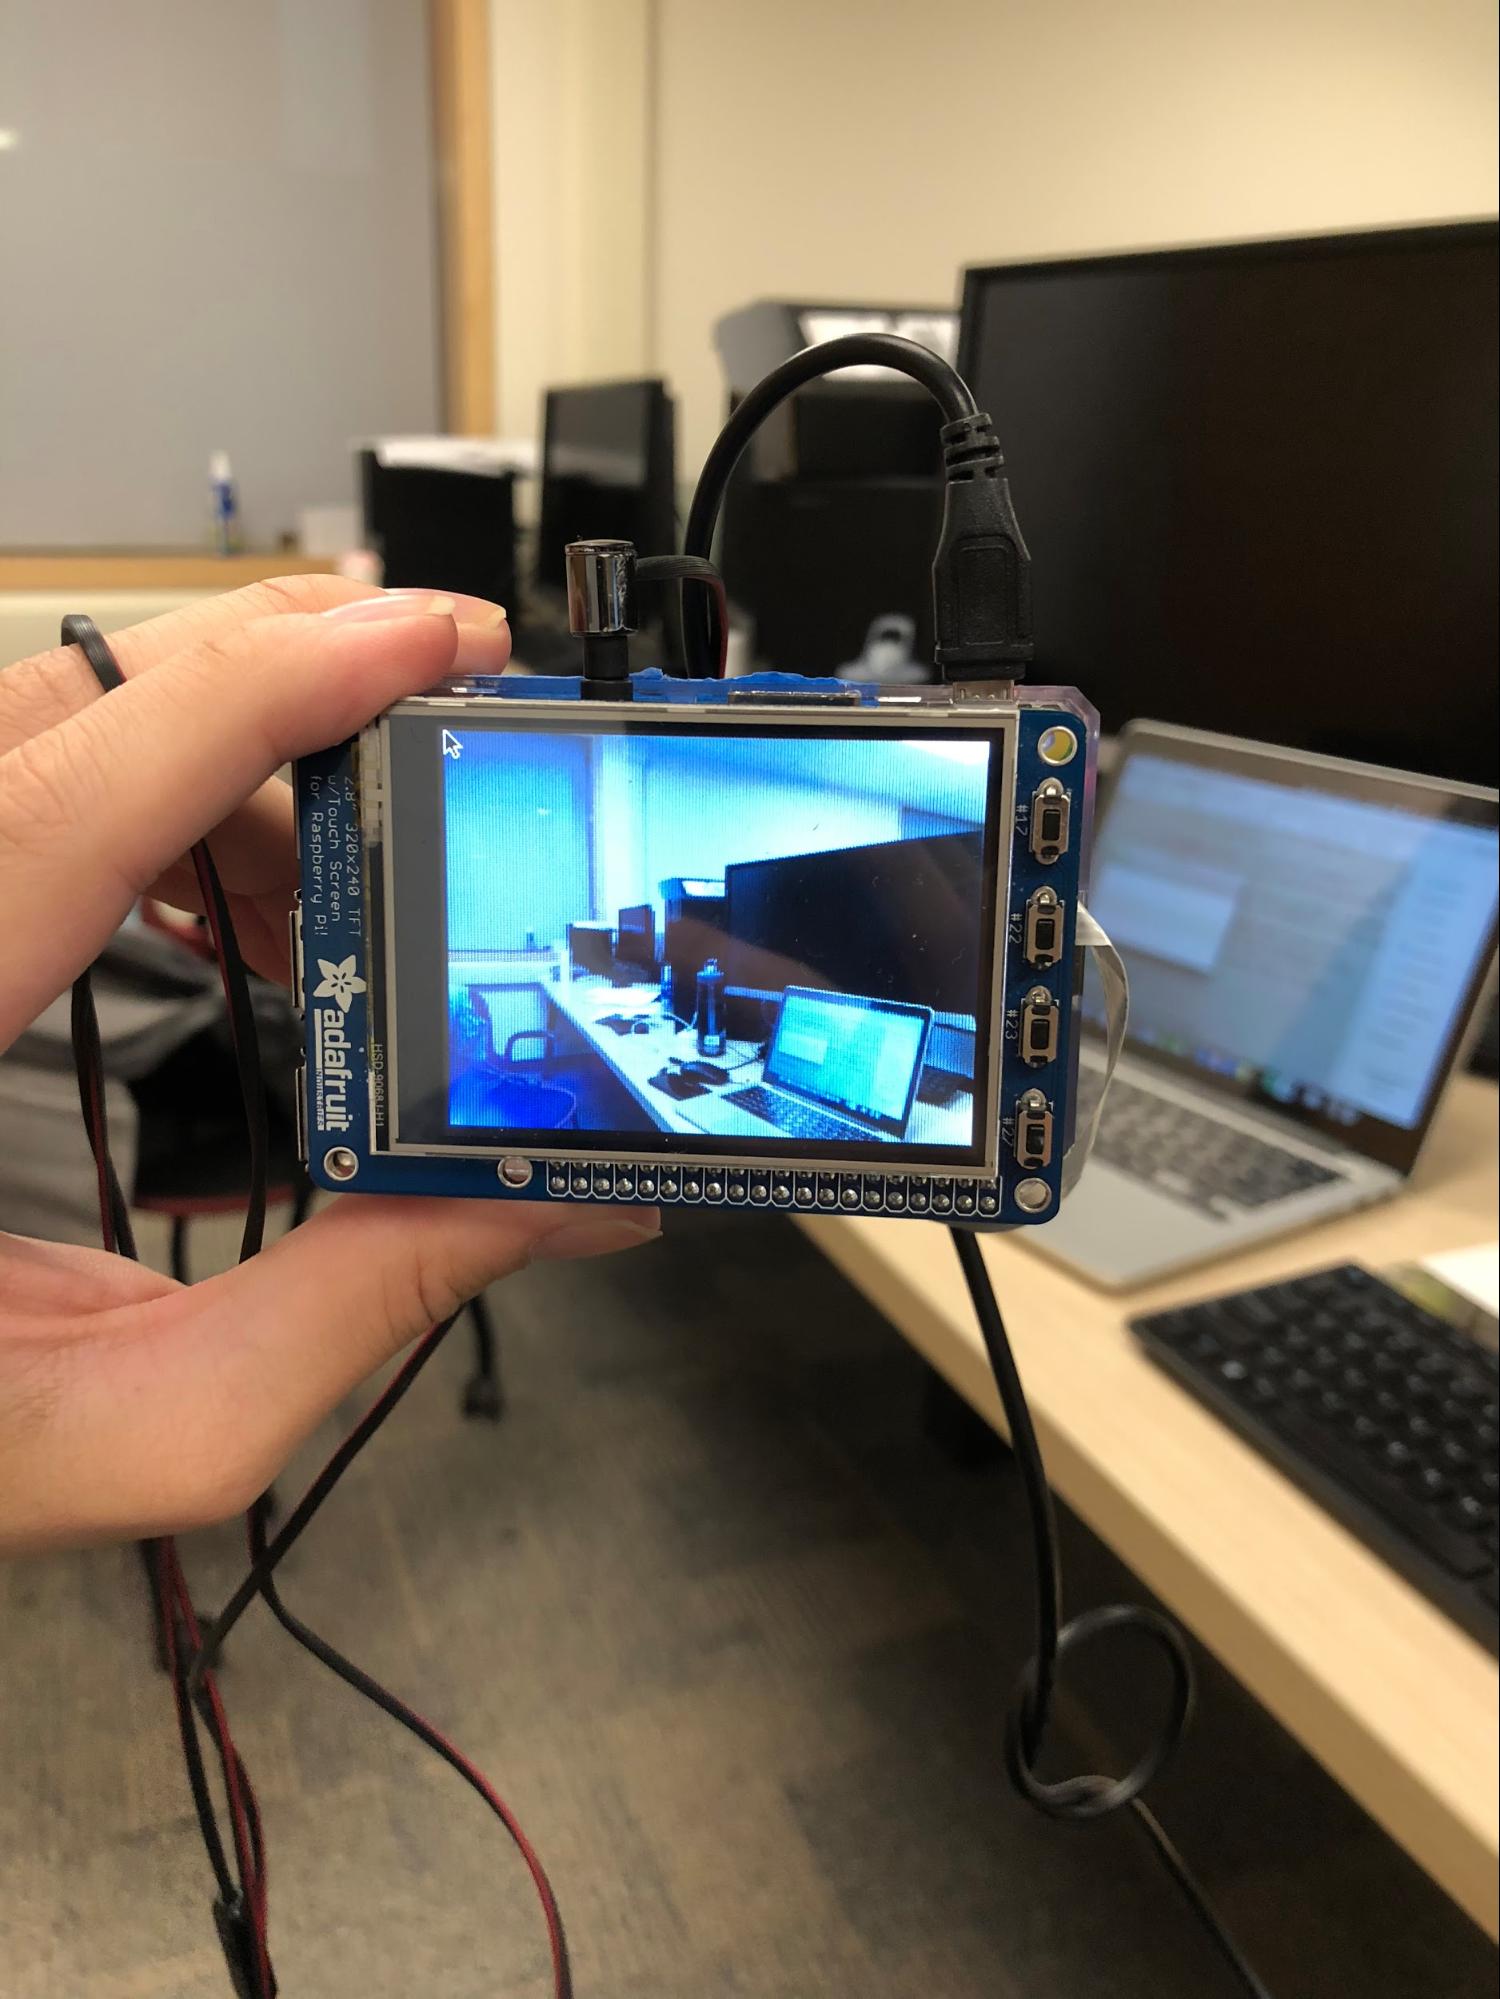
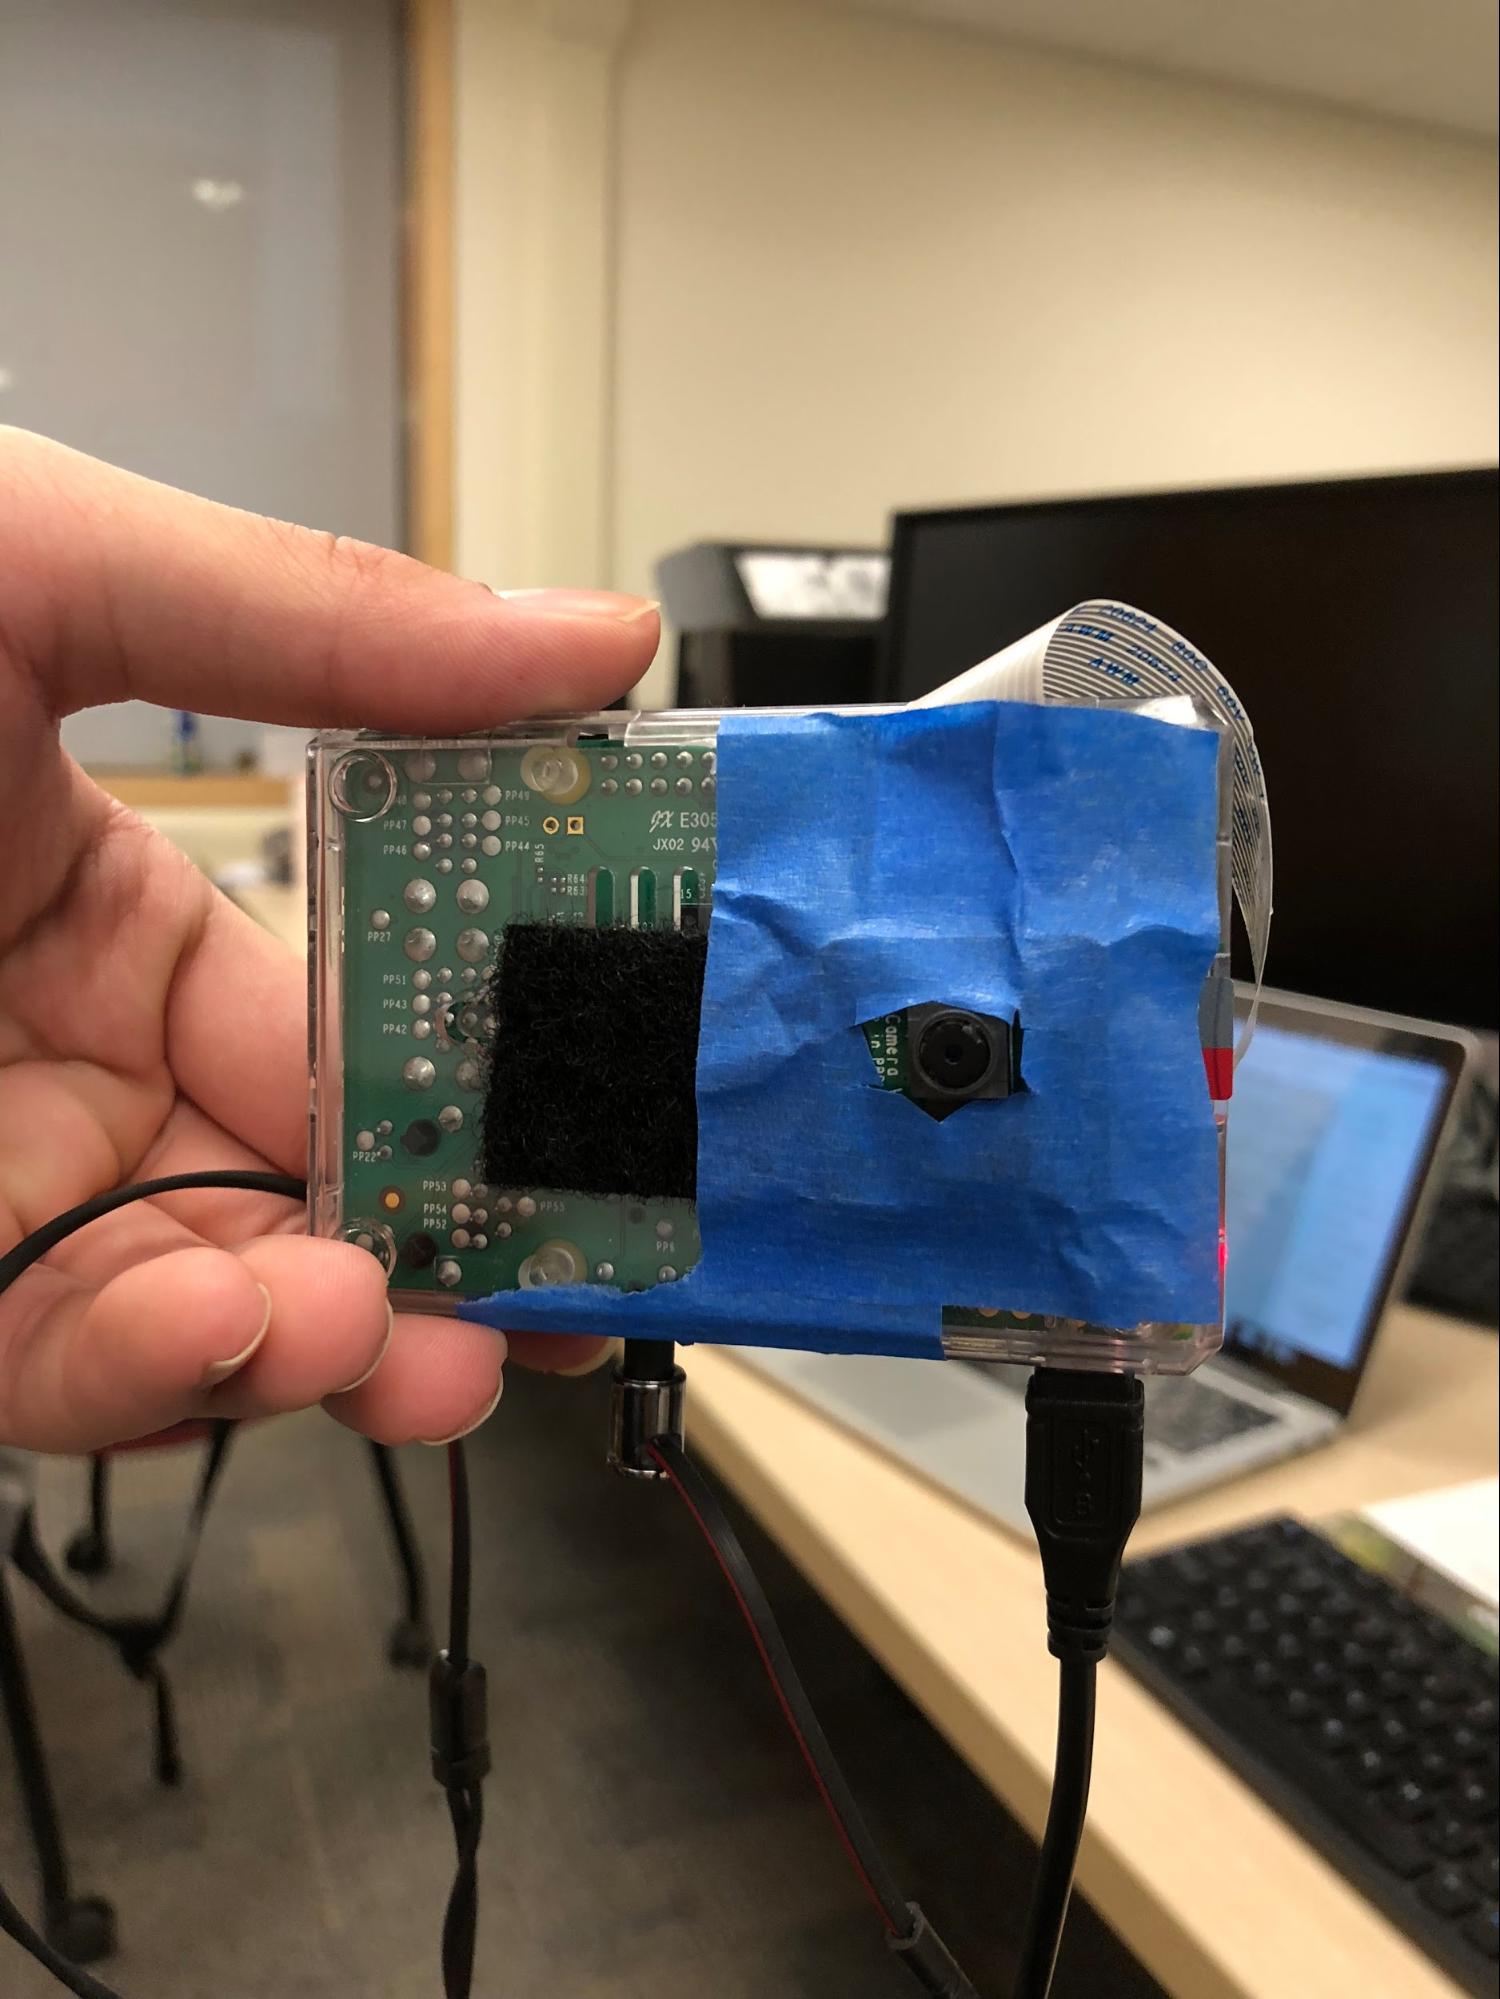
Figure 3. Front view and rear view of the smart camera
General Description
For general description, we want to give the user some general information and description of the image taken by the PiCamera. There are two forms of general description, describing the whole view in a short sentence and giving a set of keywords. For this function, we mainly relied on Microsoft Cognitive Services and CloudSight.ai, which are both cloud service that takes in images and helps the users to analyze it. Since we are using cloud service, the key part for general description is to make HTTP request, encode image data and decode JSON response. First, we applied for Microsoft Cognitive Services and CloudSight.ai, got the keys of our account for making the request. Then we set up the header, parameters and body of the HTTP POST request as the code below. The image will be encoded into Base64 string and put into the request body.
curl -X POST \
https://api.cloudsight.ai/v1/images \
-H 'authorization: CloudSight YOUR_API_KEY' \
-H 'cache-control: no-cache' \
-H 'content-type: application/json' \
-d '{
"image": "data:image/png;base64,R0lG0dJDAhgbn...etc",
"locale": "en_US"
}'
After that we set up the HTTP POST request, it is sent using Python Request package. The response will be a JSON string, which can be decoded into a JSON object. A JSON object is actually a dictionary in Python, we can get the data according to the key value. For general description in a sentence, the key is “captions”, and for keywords, the key is “tags”. Then we output the sentence and keywords to the speaker module.
Face Detection and Recognition
1. Face Detection
For face detection, we implemented both online and offline detection. When we have the access to the internet, we can use both online and offline two methods to detect faces in the photo. When we have no access to the Internet, we can just use the offline method to detect the faces in the photo.
1.1 Online Face Detection
As we mentioned above in general description, the online face detection is also making a HTTP POST request to the Microsoft cloud server and decoding the JSON response. The response of the face detection includes a good amount of information. For each face, we can inquire information like age, hair color, smiling or not, accessories etc. by changing the parameters of the HTTP request. Thus, in the JSON object, there is a list of all the faces detected. In each faces, we get the age, hair, gender and smiling information and we make several sentences like below.
She is stranger. She is around 22 years old. She is not smiling. She has black hair. Also, in order to do face recognition, we need small images of faces. To do this, we can find the location and size of the detected faces and crop the face images using these information. Since OpenCV images are saved in Numpy array, cropping the face images is actually taking the subarray of the original image.
1.2 Offline Face Detection
We also tried to implement our own offline face detection function in OpenCV, in case there is no internet connection. For face detection, OpenCV library has a widely used algorithm implemented, called cascade classifier. There are mainly two cascade classifiers, LBP classifier and Haar classifier. LBP is a lot faster but it has higher probability to miss some of the faces, while for Haar it is slower but might give more accurate result. We tested on both of these algorithms and compared the results. We found that, with the same parameters, Haar can detect our faces most of the time, while LBP missed our face even though it is faster. Thus, we chose Haar as our detecting algorithm. First, the Haar model, which is an XML file, is loaded during initialization. Second, create a detector and set the parameters of this detector, including "minNeighbors", "scaleFactor", and so on. "scaleFactor" determines the running time of the algorithm. Greater "scaleFactor" leads to longer running time. "minNeighbors" determines the number of detected circles. If the "minNeighbors" parameter gets too small, more ‘faces’ will be detected, but it is more likely to detect wrong faces, and less likely to miss faces. We finally decided that "minNeighbors = 2", "scaleFactor = 1.1" and we did not set minimum or maximum area.
2. Face Recognition
After our device detects all the faces in the photo, we also want it to recognize us among all the faces. To be more specific, our device is expected to classify all the faces into three categories: Yixuan, Yufu and Strangers. The first step of implementing this function is to create the training dataset. What we did is just taking photos for both of us with piCamera and used face detection module to crop the faces in the photo.As for the size of the dataset, we found that if we use too many photos to train the model, it is more possible for our device to recognize a stranger as one of us. Thus, we took 20 photos for either of us to train the model. The label of “Yixuan” is 2 and the label of “Yufu” is 3.


Figure 4. Samples of training dataset
Then, we need to create a face recognition model. There are three face recognition methods provided in openCV: Eigenfaces, Fisherfaces and Local Binary Patterns Histograms (LBPH). Each time we input a photo to the model, the model will output a label and confidence. If the confidence (the lower the better) is higher than the threshold, the photo will be recognized as “Stranger”. Otherwise, the model will make a decision according to the label. After doing many experiments with these three methods respectively, we found that these methods perform well in different situations.For example, the Eigenfaces method is sensitive to distance. Therefore, we decided to create a model using all these three models. Each model will make decision respectively, and we will take the majority of the decisions from these three models.
Text Extraxtion
1. Online Text Extraction
For online text extraction, we are also using Microsoft Cognitive Services. The reason we are using online text extraction after we have implemented offline OCR text extraction is that Microsoft Cognitive Services separate different regions for us, so that it won’t mix all the text together, which makes more sense. We did that same thing as we mentioned above about HTTP request. After we get the JSON object, since the words are detected separately. We need to combine these words into a string of text. Since there are some special characters in the string such as double quote and single quote which will affect the performance of audio output, we need to replace all these characters with spaces before we send the string to ‘flite’.
2. Offline Text Extraction
Another OCR method that can be run offline is also implemented. The name of the OCR software is “Tesseract OCR”. First, we installed it on the Raspberry Pi by running the following command line: “sudo apt-get install tesseract-ocr”. Then, we can just use a command line to extract text information from any photos we want. Here is a basic format of the command that are used: “tesseract imagename outputbase [-l lang] [--oem ocrenginemode] [--psm pagesegmode] [configfiles...]”.
Audio Output
Since the target users of our device are blind people, we need to output the information in audio form. What we use is an embedded library “Flite” which allows synthesis of strings of text and text file from the command line. After getting the text information from previous modules, we ran the corresponding command line using “subprocess”. The format of the command line is as following: “flite -t ‘text information’”.
Result
General Description
To test the first funtion, we pressed the button 17. The output is printed in the console window, which is shown in the following figure. After that, the text information will be sent to "flite" and be transformed into audio form. As shown in the figure, our device correctly gives a setence of description "A person sitting at a table using a laptop computer". Besides that, our device also output a list of key words which can describe the photo.
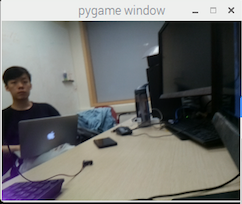

Figure 5. Output of the first function
Face Recognition
After pressing button 22, our device will take a picture and recognize the faces in the photo. In the following demo, I took a photo of both of us and the device successfully recognize us and give a brief description of us.
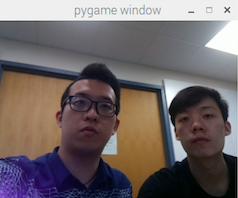
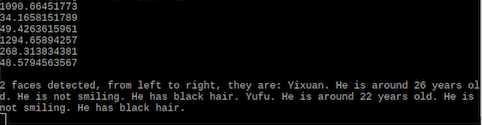
Figure 6. Output of the second function
Text Extraction
As for the third function, we press the button 23 and try to extract the text information from a photo of magazine. The following figure shows result. And similar to the first function, the output will be first printed in the console window, and the it will be sent to "flite" and output in audio form.
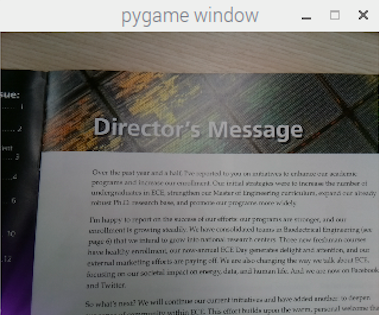

Figure 6. Output of the second function
Code Appendix
image_acquiring.py
# main script that acquires image data, sets up the buttons and PiTFT,
# calls different functions for pressing different buttons

import cv2
from picamera import PiCamera
from picamera.array import PiRGBArray
import time
import face_util
import msft
import general_des
import RPi.GPIO as GPIO
import time
import sys
import subprocess
import speaker
import os
import pygame

from threading import Thread

## pygame setup

quit_flag = False
os.putenv('SDL_VIDEODRIVER','fbcon')
os.putenv('SDL_FBDEV', '/dev/fb1')

pygame.init()

size = width, height = 320,240
screen = pygame.display.set_mode(size)

image = []
## camera setup
camera = PiCamera()
camera.resolution = (1280,960)
camera.framerate = 32
rawCapture = PiRGBArray(camera, size=(1280, 960))
time.sleep(0.05)
face_cas = cv2.CascadeClassifier("/home/pi/project/detect_model/lbpcascade_frontalface.xml")

# load three pretrained model for face recognition
model_eigen = cv2.createEigenFaceRecognizer()
model_fisher = cv2.createFisherFaceRecognizer()
model_lbph = cv2.createLBPHFaceRecognizer()
model_eigen.load(face_util.TRAINING_FILE_EIGEN)
model_fisher.load(face_util.TRAINING_FILE_FISHER)
model_lbph.load(face_util.TRAINING_FILE_LBPH)

## GPIO setup
GPIO.setmode(GPIO.BCM)
GPIO.setup(17, GPIO.IN, pull_up_down=GPIO.PUD_UP)
GPIO.setup(22, GPIO.IN, pull_up_down=GPIO.PUD_UP)
GPIO.setup(23, GPIO.IN, pull_up_down=GPIO.PUD_UP)
GPIO.setup(27, GPIO.IN, pull_up_down=GPIO.PUD_UP)

# callback function for general description
def GPIO17_callback(channel):
	global image
	json = msft.msft_vision(image)
	general_des.general_description_sentence(json)
	time.sleep(2)
	general_des.general_description_words(json)

# callback function for face utilities
def GPIO22_callback(channel):
	global image
	faces = msft.msft_face(image)
	# if no internet connection, run offline face detection
	if faces == False:
		faces = face_util.face_detect(image, face_cas)
	face_util.face_recognize(faces, model_eigen, model_fisher, model_lbph)

# callback function for OCR text extraction
def GPIO23_callback(channel):
	global image
	list = msft.msft_OCR(image)
	# if no internet connection, run offline OCR
	if list == False:
		list = []
		list.append(speaker.OCR_offline(image))

	for i in range(len(list)):
		speaker.speak_out('Region ' + str(i+1) + ': ' + list[i])
		time.sleep(2)

def GPIO27_callback(channel):
	global quit_flag
	quit_flag = True

# set up four buttons, 3 for 3 functions, one for bailing out
GPIO.add_event_detect(22, GPIO.FALLING, callback=GPIO22_callback, bouncetime=400)
GPIO.add_event_detect(23, GPIO.FALLING, callback=GPIO23_callback, bouncetime=400)
GPIO.add_event_detect(27, GPIO.FALLING, callback=GPIO27_callback, bouncetime=400)
GPIO.add_event_detect(17, GPIO.FALLING, callback=GPIO17_callback, bouncetime=400)

for frame in camera.capture_continuous(rawCapture, format="bgr",use_video_port=True):
	if quit_flag:
		break
	image = frame.array
	screen.fill((0,0,0))
	#cv2.imshow("image",image)
	img1 = cv2.cvtColor(image, cv2.COLOR_RGB2GRAY)
	#faces = face_cas.detectMultiScale(image)
	face_imgs = []

	impygame = cv2.resize(image, (320,240))
	# transform, rotate, flip and change color for PyGame image
	surf = pygame.transform.flip(pygame.transform.rotate(pygame.surfarray.make_surface(impygame[:, :, ::-1]), 270), True, False)
	screen.blit(surf, (0,0))
	pygame.display.flip()
	#for (x,y,w,h) in faces:
	#	cv2.rectangle(img1, (x, y), (x + w, y + h), (255, 255, 0), 4)
	cv2.imshow("image",image)
	key = cv2.waitKey(1)&0xFF

	rawCapture.truncate(0)

GPIO.cleanup()
general_des.py
# script to implement general description as a sentence and a list of key words.
# this is good for decoupling the program

import cv2
import speaker


def general_description_sentence(json):
	speaker.speak_out(json['description']['captions'][0]['text'])

def general_description_words(json):
	# for each tag, output to speaker
	speaker.speak_out('Tags for this view: ')
	for tag in json['description']['tags']:
		speaker.speak_out(tag)
create_dataset.py
# help us creating face dataset using Microsoft Cognitive Services

  import cv2
  from picamera import PiCamera
  from picamera.array import PiRGBArray
  import time
  import msft
  from threading import Thread
  import subprocess

  camera = PiCamera()
  # setting up the image size and resolution
  camera.resolution = (320, 240)
  camera.framerate = 32
  rawCapture = PiRGBArray(camera, size=(320, 240))

  time.sleep(0.05)
  face_cas = cv2.CascadeClassifier("detect_model/lbpcascade_frontalface.xml")

  # i is used for naming the image
  i = 0

  for frame in camera.capture_continuous(rawCapture, format="bgr",use_video_port=True):
  	image = frame.array
  	#cv2.imshow("image",image)
  	img1 = cv2.cvtColor(image, cv2.COLOR_RGB2GRAY)

  	cv2.imshow("image",img1)
  	key = cv2.waitKey(1)&0xFF
  	if key == ord('j'):
  		faces_imgs = msft.msft_face(image)
  		for face_img in faces_imgs[0]:
  			cv2.imwrite('yufu/' + str(i) + '.jpg', face_img)
  			i = i+1

  	rawCapture.truncate(0)
general_des.py
# script for face utility, including face detection and face recognition.
# use the pretrained model to detect and recognize faces

import cv2
import speaker

TRAINING_FILE = 'training.xml'

YUFU_LABEL = "Yufu"
YIXUAN_LABEL = "Yixuan"

THRESHOLD1 = 1700.0
THRESHOLD2 = 100.0
THRESHOLD3 = 60.0

YUFU_DIR = './yufu'
YIXUAN_DIR = './yixuan'

TRAINING_FILE_EIGEN = '/home/pi/project/train_data/training_eigen.xml'
TRAINING_FILE_FISHER = '/home/pi/project/train_data/training_fisher.xml'
TRAINING_FILE_LBPH = '/home/pi/project/train_data/training_lbph.xml'

FACE_WIDTH = 50
FACE_HEIGHT = 50

name_to_tag = ["", "stranger", "Yixuan", "Yufu"]

# detect faces, input is an image and a loaded classifier model
# return list of cropped faces
def face_detect(image, face_cas):
	img = cv2.cvtColor(image, cv2.COLOR_RGB2GRAY)

	faces = face_cas.detectMultiScale(img)

	print (len(faces))
	list = []

	for (x,y,w,h) in faces:
		list.append(img[y:y+h, x:x+w])
		cv2.rectangle(img, (x, y), (x + w, y + h), (255, 255, 0), 2)

	return list


# recognize faces, input is a list of face images, and three loaded model (trained)
# 3 models are: eigen, fisher, lbph
def face_recognize(images, model1, model2, model3):

	num = len(images[0])
	if num == 0:
		speaker.speak_out("No faces detected.")
		return

	output = str(num) + " faces detected, from left to right, they are: "

	i = 0

	for image in images[0]:
		identity = 'stranger'

		test_img = cv2.resize(image,
					  (FACE_WIDTH, FACE_HEIGHT),
					  interpolation=cv2.INTER_LANCZOS4)

		label1, confidence1 = model1.predict(test_img)
		label2, confidence2 = model2.predict(test_img)
		label3, confidence3 = model3.predict(test_img)

		vote = [0, 0, 0, 0]
		stranger_count = 0

		# take votes for three algorithms
		if confidence1 < THRESHOLD1:
			vote[label1] += 1

		else:
			stranger_count += 1
		if confidence2 < THRESHOLD2:
			vote[label2] += 1
		else:
			stranger_count += 1
		if confidence3 < THRESHOLD3:
			vote[label3] += 1
		else:
			stranger_count += 1

		# if less than two votes, stranger
		if stranger_count > 1:
			identity = name_to_tag[1]
		else:
			index = vote.index(max(vote))
			identity = name_to_tag[index]

		output += identity + '. ' + images[1][i]
		print(confidence1)
		print(confidence2)
		print(confidence3)

		i += 1
	# output the result as audio
	speaker.speak_out(output)
train.py
# train face recognition model based on face images dataset
# reference: http://docs.opencv.org/modules/contrib/doc/facerec/facerec_tutorial.html

import fnmatch
import os
import cv2
import numpy as np

YUFU_LABEL = 3
YIXUAN_LABEL = 2
STRANGER_LABEL = 1

YUFU_DIR = './yufu'
STRANGER_DIR = './stranger'
YIXUAN_DIR = './yixuan'

TRAINING_FILE = 'training_eigen.xml'

FACE_WIDTH = 50
FACE_HEIGHT = 50

MEAN_FILE = 'mean.png'
STRANGER_EIGENFACE_FILE = 'stranger_eigenface.png'
YIXUAN_EIGENFACE_FILE = 'yixuan_eigenface.png'
YUFU_EIGENFACE_FILE = 'yufu_eigenface.png'


def walk_files(directory, match='*'):
	"""Generator function to iterate through all files in a directory recursively
	which match the given filename match parameter.
	"""
	for root, dirs, files in os.walk(directory):
		for filename in fnmatch.filter(files, '[!._]' + match):
			yield os.path.join(root, filename)

def prepare_image(filename):
	"""Read an image as grayscale and resize it to the appropriate size for
	training the face recognition model.
	"""
	return cv2.resize(cv2.imread(filename, cv2.IMREAD_GRAYSCALE),
					  (FACE_WIDTH, FACE_HEIGHT),
					  interpolation=cv2.INTER_LANCZOS4)


def normalize(X, low, high, dtype=None):
	"""Normalizes a given array in X to a value between low and high.
	Adapted from python OpenCV face recognition example at:
	  https://github.com/Itseez/opencv/blob/2.4/samples/python2/facerec_demo.py
	"""
	X = np.asarray(X)
	minX, maxX = np.min(X), np.max(X)
	# normalize to [0...1].
	X = X - float(minX)
	X = X / float((maxX - minX))
	# scale to [low...high].
	X = X * (high-low)
	X = X + low
	if dtype is None:
		return np.asarray(X)
	return np.asarray(X, dtype=dtype)

if __name__ == '__main__':
	print "Reading training images..."
	faces = []
	labels = []
	pos_count = 0
	neg_count = 0
	stranger_count = 0
	# Read all positive images
	for filename in walk_files(YUFU_DIR, '*.jpg'):
		faces.append(prepare_image(filename))
		labels.append(YUFU_LABEL)
		pos_count += 1
	# Read all negative images
	for filename in walk_files(YIXUAN_DIR, '*.jpg'):
		faces.append(prepare_image(filename))
		labels.append(YIXUAN_LABEL)
		neg_count += 1

#	for filename in walk_files(STRANGER_DIR, '*.pgm'):
#		faces.append(prepare_image(filename))
#		labels.append(STRANGER_LABEL)
#		stranger_count += 1

	print 'Read', pos_count, 'positive images and', neg_count, 'negative images.'

	# Train model
	print 'Training model...'
	model = cv2.createEigenFaceRecognizer()
	model.train(np.asarray(faces), np.asarray(labels))

	# Save model results
	model.save(TRAINING_FILE)
	print 'Training data saved to', TRAINING_FILE

	# Save mean and eignface images which summarize the face recognition model.
#	mean = model.getMat("mean").reshape(faces[0].shape)
#	cv2.imwrite(MEAN_FILE, normalize(mean, 0, 255, dtype=np.uint8))
#	eigenvectors = model.getMat("eigenvectors")
#	pos_eigenvector = eigenvectors[:,0].reshape(faces[0].shape)
#	cv2.imwrite(YIXUAN_EIGENFACE_FILE, normalize(pos_eigenvector, 0, 255, dtype=np.uint8))
#	neg_eigenvector = eigenvectors[:,1].reshape(faces[0].shape)
#	cv2.imwrite(YUFU_EIGENFACE_FILE, normalize(neg_eigenvector, 0, 255, dtype=np.uint8))
#	neg_eigenvector = eigenvectors[:,2].reshape(faces[0].shape)
#	cv2.imwrite(STRANGER_EIGENFACE_FILE, normalize(neg_eigenvector, 0, 255, dtype=np.uint8))
msft.py
# this script implements all the network utilities, HTTP request and JSON encoding and decoding
# reference: https://westus.dev.cognitive.microsoft.com/docs/services/563879b61984550e40cbbe8d/operations/563879b61984550f30395236

import httplib, urllib, base64
import cv2
import json
import speaker


# online face detection using Microsoft Cognitive Services
def msft_face(image):
	headers = {
		# Request headers
		'Content-Type': 'application/octet-stream',
		'Ocp-Apim-Subscription-Key': 'Microsoft-Azure-Key',
	}

	params = urllib.urlencode({
		# Request parameters
		'returnFaceId': 'true',
		'returnFaceLandmarks': 'false',
		# request for age gender smile hair info
		'returnFaceAttributes': 'age,gender,smile,accessories',
	})


	img = cv2.cvtColor(image, cv2.COLOR_RGB2GRAY)
	# encode image to string
	buffer = cv2.imencode('.png', img)

	try:
		conn = httplib.HTTPSConnection('eastus.api.cognitive.microsoft.com')

		conn.request("POST", "/face/v1.0/detect?%s" % params, buffer[1], headers)

		response = conn.getresponse()
		data = response.read()
		# parse json string to json object
		json_response = json.loads(data)
		faces = []
		#print (json_response[0])

		json_response.sort(key=lambda x: x['faceRectangle']['left'])


		descriptions = []

		# get information for each face, crop the faces
		for face_info in json_response:
			x = face_info['faceRectangle']['left']
			y = face_info['faceRectangle']['top']
			w = face_info['faceRectangle']['width']
			h = face_info['faceRectangle']['height']
			faces.append(img[y:y+h, x:x+w])
			cv2.rectangle(img, (x, y), (x + w, y + h), (255, 255, 0), 2)

			#form a set of sentences

			gender = 'She'
			smiling = 'smiling'
			hair = 'no'


			if face_info['faceAttributes']['gender'] == 'male':
				gender = 'He'

			if face_info['faceAttributes']['smile'] < 0.5:
				smiling = 'not smiling'

			if face_info['faceAttributes']['hair']['bald'] < 0.6:
				hair = face_info['faceAttributes']['hair']['hairColor'][0]['color']


			age = str(int(face_info['faceAttributes']['age']))

			description = gender + ' is around ' + age + ' years old. '
			description += gender + ' is ' + smiling + '. '
			description += gender + ' has ' + hair + ' hair. '

			descriptions.append(description)

		conn.close()
		return [faces, descriptions]

	except Exception as e:
		return False
		speaker.speak_out('No internet connection.')
		print("[Errno {0}] {1}".format(e.errno, e.strerror))


# general description using Microsoft Cognitive Services
def msft_vision(img):
	headers = {
		# Request headers
		'Content-Type': 'application/octet-stream',
		'Ocp-Apim-Subscription-Key': 'Microsoft-Azure-Key',
	}

	params = urllib.urlencode({
		# Request parameters
		'visualFeatures': 'Categories',
		'details': '{string}',
		'language': 'en',
	})
	# encode image to string
	buffer = cv2.imencode('.png', img)

	try:
		conn = httplib.HTTPSConnection('eastus.api.cognitive.microsoft.com')
		conn.request("POST", "/vision/v1.0/describe?%s" % params, buffer[1], headers)
		response = conn.getresponse()
		data = response.read()
		# parse json string to json object
		json_response = json.loads(data)

		#print (json_response)
		#speaker.speak_out(json_response['description']['captions'][0]['text'])
		conn.close()
		return json_response
	except Exception as e:
		speaker.speak_out('No internet connection.')
		print("[Errno {0}] {1}".format(e.errno, e.strerror))

def msft_OCR(img):
	headers = {
		# Request headers
		'Content-Type': 'application/octet-stream',
		'Ocp-Apim-Subscription-Key': 'Microsoft-Azure-Key',
	}

	params = urllib.urlencode({
		# Request parameters
		'detectOrientation': 'true',
		'language': 'unk',
	})
	# encode image to string
	buffer = cv2.imencode('.png', img)

	try:
		conn = httplib.HTTPSConnection('eastus.api.cognitive.microsoft.com')
		conn.request("POST", "/vision/v1.0/ocr?%s" % params, buffer[1], headers)
		response = conn.getresponse()
		data = response.read()
		# parse json string to json object
		json_response = json.loads(data)
		list = []

		# put all the words together
		for region in json_response['regions']:
			ans = ''
			for line in region['lines']:
				for word in line['words']:
					temp = word['text'].encode('UTF-8')

					#get rid of ' and "
					temp = temp.replace('"', ' ')
					temp = temp.replace("'", ' ')
					ans += (temp + ' ')

			#ansans.replace('"', ' ')
			#ans.replace("'", ' ')
			list.append(ans)
		print (json_response)
		#speaker.speak_out(json_response['description']['captions'][0]['text'])
		conn.close()
		return list
	except Exception as e:
		speaker.speak_out('No internet connection.')
		return False
		print("[Errno {0}] {1}".format(e.errno, e.strerror))

#a = msft_face(cv2.imread('test3.jpg'))

#print (json['regions'][0]['lines'][0].keys())
speaker.py
# use subprocess to implement flite command line
# use command line to do OCR

import subprocess
import cv2

def speak_out(output):
	cmd= 'flite -t "' + str(output) + '"'
	print subprocess.check_output(cmd, shell=True)
	print (output)

def OCR_offline(image):
    cv2.imwrite('temp.jpg', image)
    cmd= 'tesseract temp.jpg ocr_text'
    print subprocess.check_output(cmd, shell=True)
    file_object  = open(“ocr_text.txt”, “r”)
    return file_object.read()

#speak_out('1 faces are detected, they are Yufu')
Parts List
- Raspberry Pi $35.00
- Raspberry Pi Camera V2 $25.00