Nerf Targeting System
Project By:
Divya Gupta & Daniel Sachs
Demonstration Video
Introduction
For too long, people have had to shoot Nerf guns manually. With an autonomous Nerf aiming system, we will be able to fight the epic battles of the future without even showing up! For our final project in ECE 5725, we wanted to create fun project that develops our skills with computer vision on a Raspberry Pi. We decided to pursue an autonomous Nerf aiming system whose goal is to aim and fire a Nerf dart to hit our targets.
Project Objective
The objective of this project was to build a Nerf aiming system that can autonomously track, aim, and fire at selected targets. The system should use computer vision to detect faces in a frame and perform facial recognition to determine if they belong to targets. If more than one target is present, then the system should choose the one with higher priority. The system should then use servos to adjust the Nerf gun’s position in order to track the target. Once the target’s face is centered, the Nerf gun should fire a Nerf dart. A touchscreen-based user interface will allow users to train new targets and civilians, set priorities, and start the system.
Hardware Design/Testing
Mechanical System
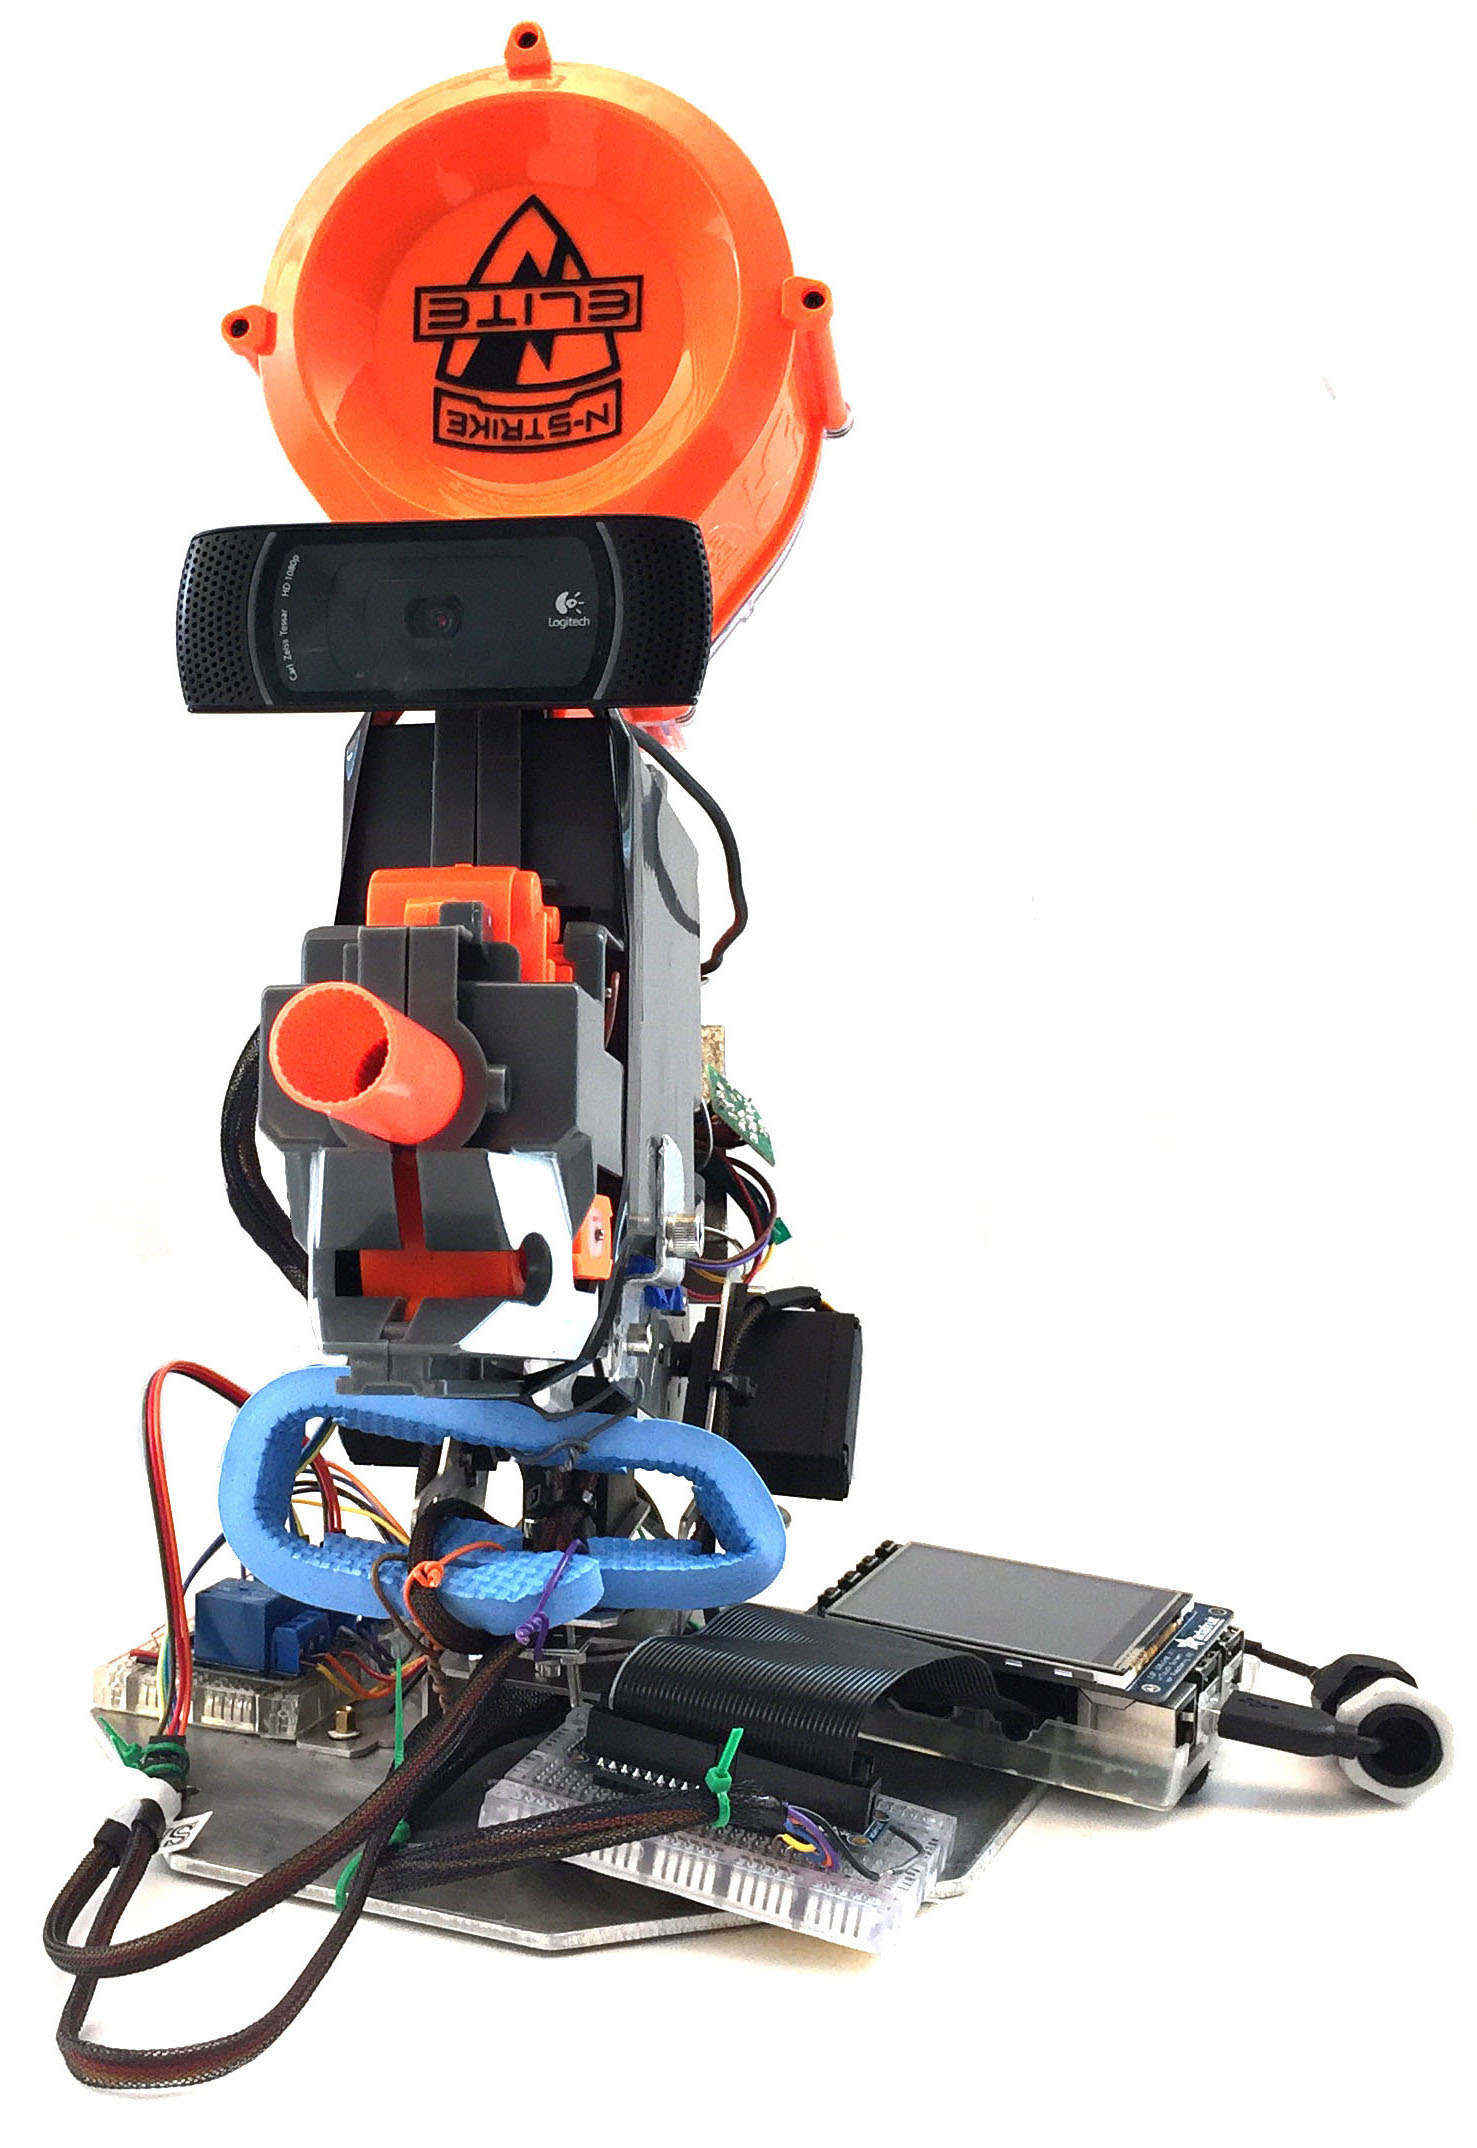
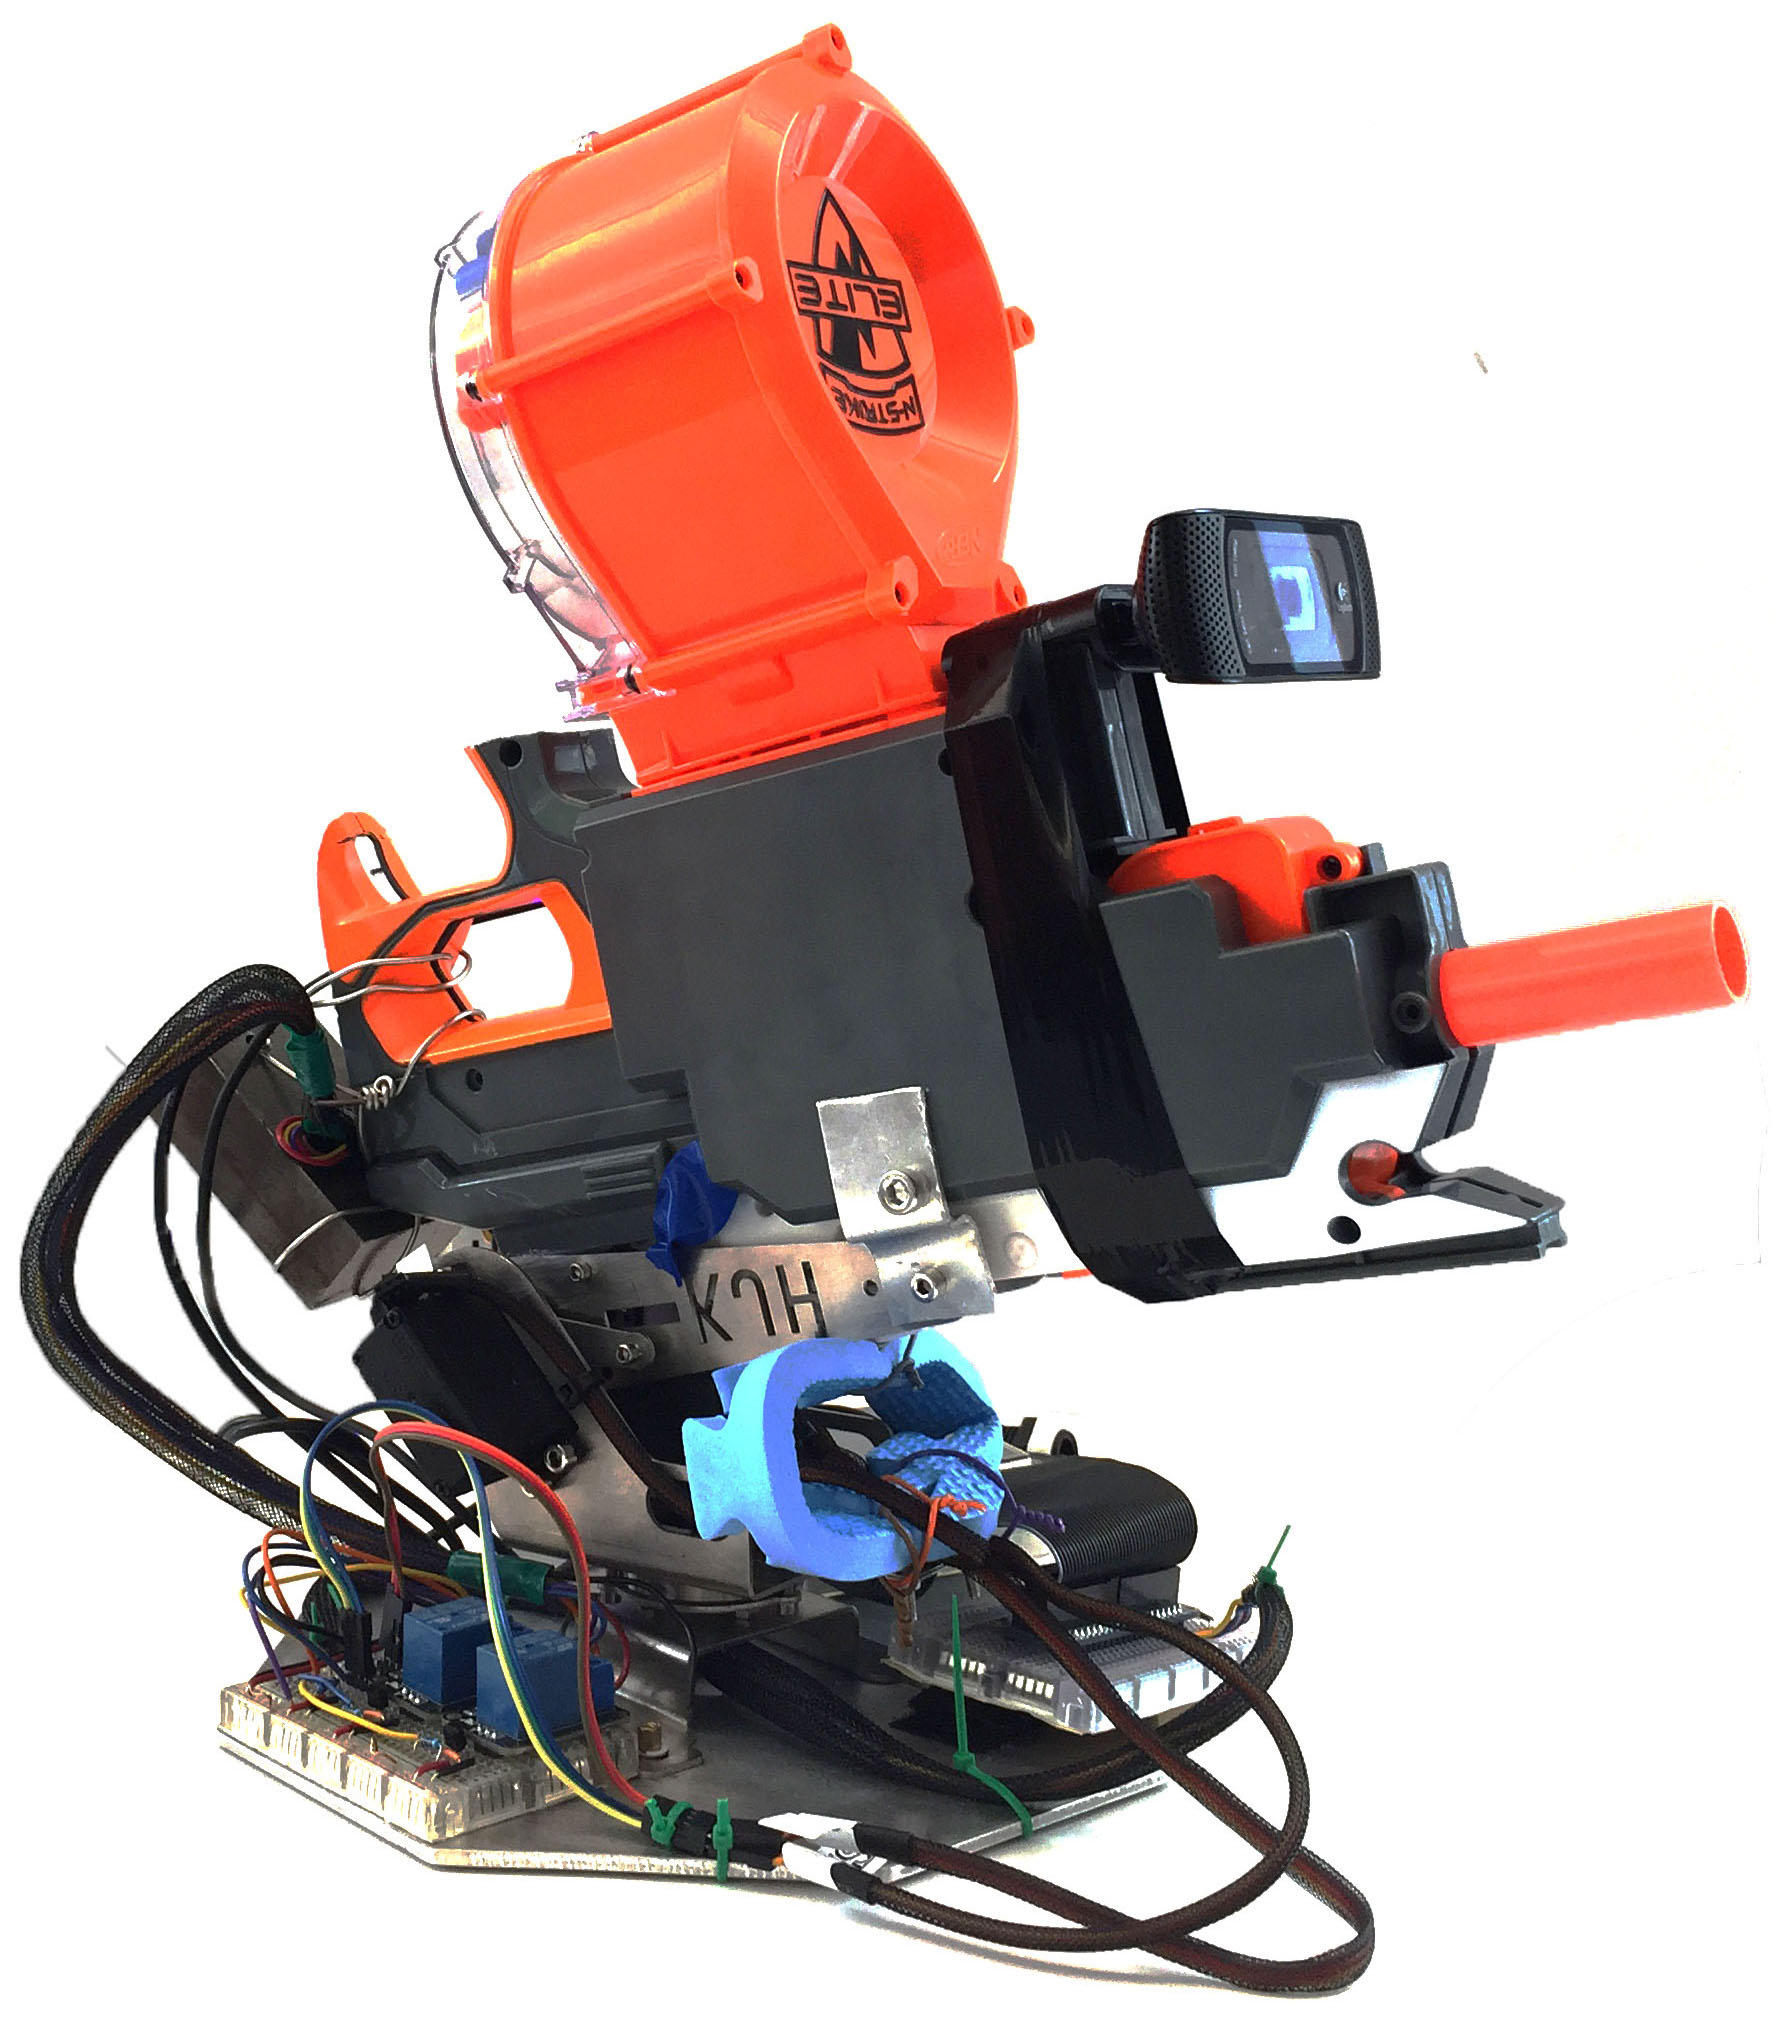
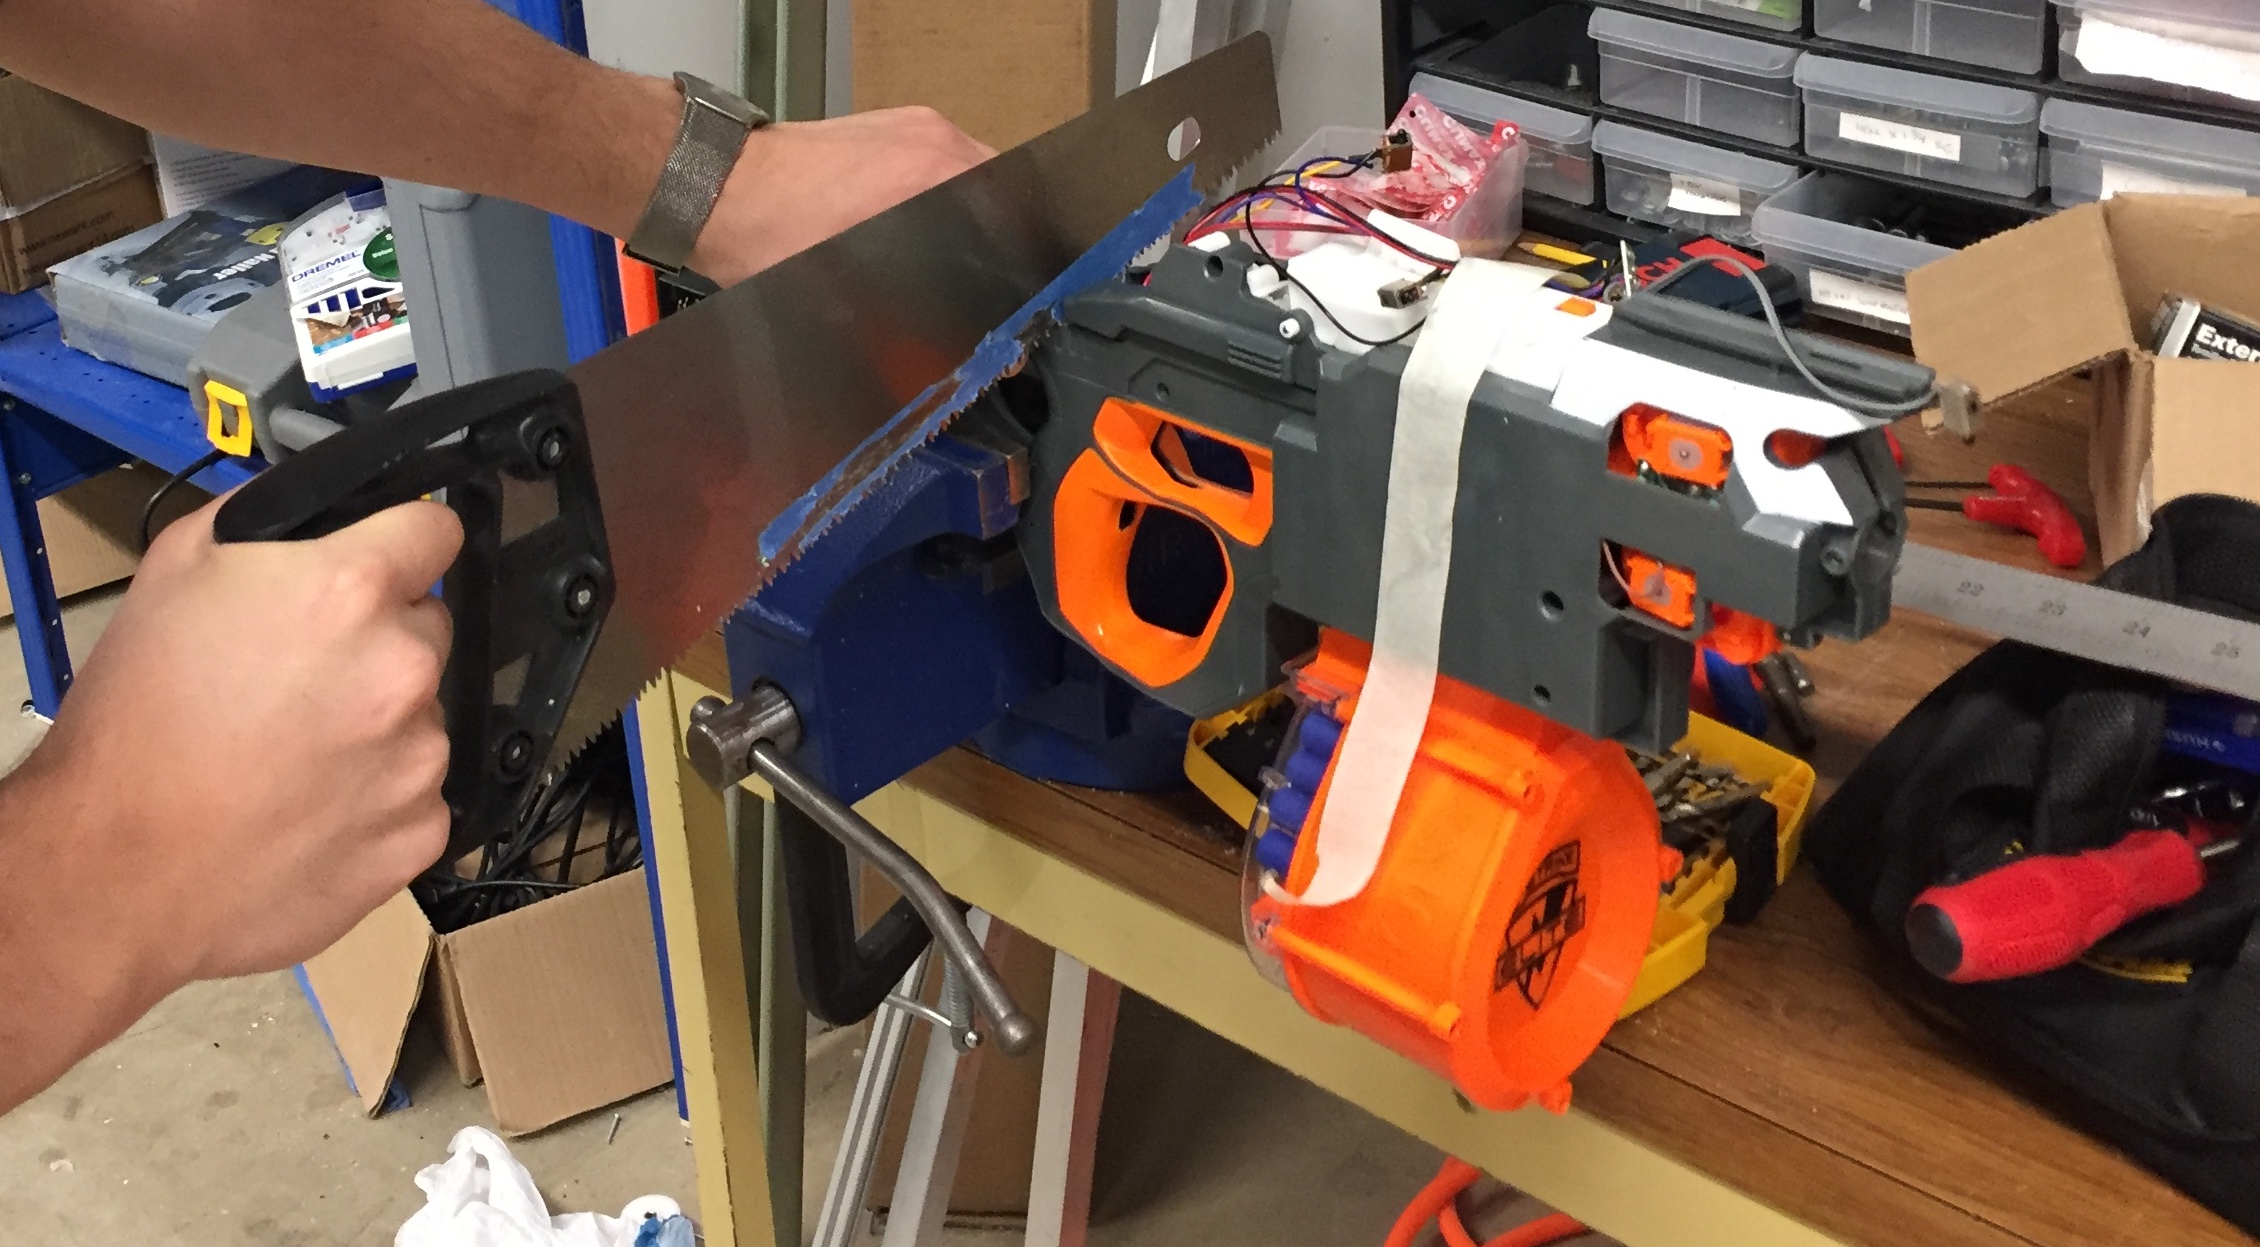
When designing the hardware for the system, we mainly focused on the subsystems so they could be integrated. The first thing we tackled was the Nerf gun. The Nerf gun needed to be fully automatic as we wanted the ability to continually fire at our targets. It also had to be small enough that we could reasonably find or construct a robot arm which could aim the gun. As always, we needed a low lead time so that we could begin hacking the system for remote firing. We settled on the Nerf N-Strike Elite HyperFire Blaster. As this is a larger Nerf gun, we to remove as much of it as possible to reduce the weight. This involved sawing off the entire battery pack which was replaced with a power supply and removing almost all of the cosmetic casing. The Nerf gun originally had two switches to control firing: the first one spins up flywheels and the second one feeds a dart through the flywheels. We replaced the switches that controlled both of these functions with long wires attached to relays. This allowed us to fire the dart from a relays controlled by the Raspberry Pi.
With the smaller Nerf gun, we then had to mount it to a two degree of freedom robotic arm. We decided to use a scrap robotic arm that we had lying around the Cornell Cup lab. After dismantling all of the features that we did not need, we attached the gun to the system. This was a quick and easy way to aiming the gun. To interface with the robotic arm we needed to simply control two position servos.
Nerf Gun Deconstruction
Camera
As the system is based upon computer vision, we needed a reliable camera that could be attached to the barrel of the gun. We first investigated the 8 Megapixel Pi camera. After plugging and unplugging the camera multiple times during testing, it stopped connecting to the system. As we had access to a Logitech C920 HD Pro Webcam, we decided to integrate it into our system instead of the Pi camera. This camera interfaces over USB to the Raspberry Pi so it was easy to wire and mount to the system since we did not need a long ribbon cable. One problem we ran into when using the USB camera is that the OpenCV capture function has an internal 5 frame buffer. This meant that when we tried to get a image, it was out of date by the time we accessed it. The solution we came up with to get one current frame is to read 5 frames, throwing away the first 4 and only keeping the 5th frame. Another issue we encountered with the camera was that it would occasionally not turn on while our program was running, especially when it had been idle for some time; we did not come up with a permanent solution to this, however unplugging and replugging the camera and restarting the program usually worked.
Electrical System
The items that needed to be wired to the Raspberry Pi were the two servos to control the arm and the two relays to control the gun. All of this was powered by an external 5V supply. To control the servos, we simply connected them to one of the hardware PWM GPIO pins through a 1 kOhm resistor, in-addition to power and ground. For the relays, we used a transistor to drive a Tolako 5v Relay Module. These switches controlled the flywheel and trigger on the Nerf gun and together were responsible for the automatic firing of the system. To fire a Nerf dart, we first turn on the switch for the flywheel, which pulls a new dart from the cartridge and moves it into place in the barrel. Turning on the the trigger fires the dart, and then both switches are turned off.

System Schematic
Raspberry Pi with Pi TFT
The entire system was based around using a Raspberry Pi to control the servos and relays, access the camera feed, and run facial recognition. We used the Raspberry Pi 3 Model B kit from class. As we needed a method to interact with the system we decided to continue to use the Adafruit PiTFT - 320x240 2.8" TFT touchscreen interface.
Computer Vision Design/Testing
Facial Detection
The first step in programming our system was to set up the system to capture a picture and detect where the faces are inside of the image. To do this, we used OpenCV, a popular open source library for computer vision which has many pre-trained classifiers for object detection, and referenced an example using face detection from TheCodacus.com (referenced below). We chose to use the Haar cascade classifier for face detection, using the provided haarcascade_frontalface_default.xml file from OpenCV. It only works on gray scale images, so after capturing each image we convert them to grayscale with OpenCV. Then we ran the classifier which returned the location of a bounding box around each face. During testing, we displayed the image with this box on our screen and found that this classifier worked reasonably well to detect faces when the person is looking directly into the camera.
Facial Recognition - Collecting images
With the system able to detect faces, we then needed to train it to recognize who is in the photo. Before we could try running the system on our faces, we need to collect a data set for it to train with. To do this, we used the Haar cascade algorithm from before to detect a face in the frame. Instead of placing a box around the face, we cropped the image to just include the face and saved the images as a jpeg. We took 40 images, which we found to be accurate enough for our facial recognition algorithm and was still relatively quick to attain. We added a 100ms delay between camera captures so that we could get pictures of the subjects’ faces from different angles. The images were saved under a filename that both included the subject’s UserID and image number. This naming method allowed us to identify the subject in the next step.
Facial Recognition - Processing the Images
Now that we had a data set for each face, we needed to make a training algorithm which we can feed into our recognizer algorithm. To do this, we made a script that searches the folder with all of the saved images. It cycles through the folder to open each image, converting it to grayscale if it is not already grayscale. Then it converts the image into a numpy array. The script looks at the file name to identify who was in the photo. We then confirm that there is a face in the frame and add it to the list of faces along with the person's UserID. OpenCV can use this data to train on by saving it as a .yml file.
Facial Recognition - Recognizing Faces
With our .yml file we can now recognize faces in the live video feed. We decided to use the Local Binary Patterns Histogram method for our facial recognition algorithm. To recognize faces, we create a recognizer object in OpenCV and load the .yml file. We start by using the same algorithm to detect each face in the frame, crop down to just the face, and convert the image to grayscale. We then call the recognizer’s predict function on our processed image, which returns two values. The first one is the UserID of who it believes this face best matches and the second is how well it matches. Scores under a value of 50 are usually correct whereas ones greater then 50 indicate that it may not be the correct person. To confirm that it is identifying people correctly, we added a textbox to each person's face and printed their name in it. This showed when it was correctly recognizing the person and allowed us to track and recognize multiple people during testing.
At this point we needed to adjust out resolution to find the ideal between speed and accuracy. After experimentation we found that a resolution of 320x240 for each image was sufficient to recognize a face at around 5 feet away while tracking them at low speeds.
Integration
Target Tracking & Selection
Now that we can recognize faces in the current frame, we need to be able to select a target and adjust our servo positions so that the Nerf gun is centered at the target. In order to keep track of which subjects are targets and which are civilians, we create two arrays in our program. The targets array stores the UserIDs of all targets, with higher priority targets first (in a lower index). The civilians array stores the UserIDs of all civilians and is unordered. Therefore, once a face is recognized in the frame, its UserID is then searched in the target array. If the UserID is found, then this face belongs to a target and its index, which corresponds to its target priority, is extracted. If it is not found in the target array, then the face belongs to a civilian, and no action is taken. If there are multiple faces in the current frame that match targets, then the one with the minimum index in the target array, corresponding to the highest target priority, is selected, and the coordinates of its bounding rectangle are saved.
Servo Control
Now that our target has been identified, we need to be able to move the Nerf gun in the direction of the target. We do this by controlling the two servos in the robot arm base, one of which is responsible for panning in the horizontal direction, and the other which takes care of tilt in the vertical direction. We used position control servos, so the duration of the PWM signal determines the position the rotor will turn to. To generate the PWM signals that drive the servos, we decided to use the PiGPIO library, which utilizes the hardware PWM channels on the Raspberry Pi. At first, we tried using the RPi.GPIO PWM library, which generates the PWM signal in software and can use any GPIO pin. However, we were observing noticeable jitter in the servos and decided to switch to hardware PWM for more stability.
To generate the PWM signal, we need to specify a frequency and duty cycle. The servo expects 20 ms ‘off’ time, so the equations for the frequency and duty cycle are given below, where ‘pulse’ is ‘on’ time. Pulses of 1.5ms turn the motor to 90 degrees; shorter pulses move the servo to 0 degrees and longer pulses move towards 180 degrees. Pulse length is set based on how far off-center the target currently is from the reference point of the aiming system. The camera is mounted on the Nerf gun, and its center is aligned with the barrel. Therefore, we set the change in pulse width to be the difference between the current x and y coordinates of the center of the target face and (160, 120), the center of the frame. We limited the minimum and maximum pulse lengths for each servo to the range we found it could smoothly travel. We also limited the maximum change in pulse width in one time step so that the servo movement would not be too jerky.
pwm_freq = 1/(pulse+0.02)
pwm_dc = pulse/(pulse+0.02)*1000000
Once the target is roughly centered in the middle of the frame, we fire at the target by turning on and off the GPIO pins that control the flywheel and trigger relays.
User Interface
A touchscreen GUI displayed on the piTFT allows our users to train new subjects, set target priorities, and arm the system. Our user interface was implemented using a state machine to navigate through the different levels of the menu.
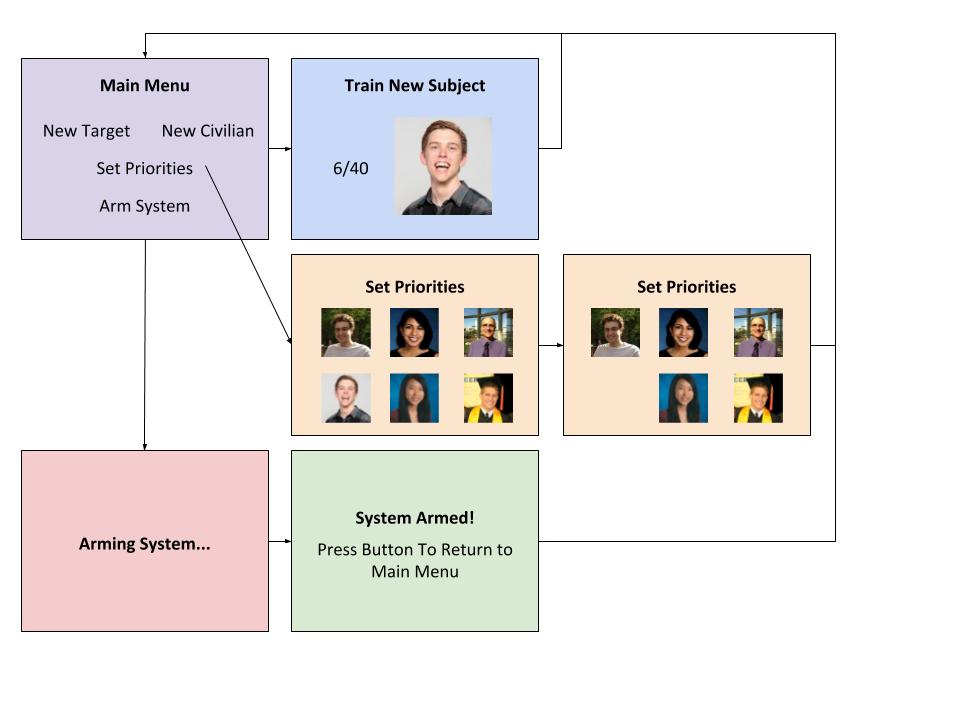
Main Menu

The main menu displays four touchscreen buttons as pictured below. This state monitors PyGame MOUSEBUTTON events for key presses and progresses to the next state depending on which button was selected. The user can exit the main menu and return to the command line by pressing a GPIO button on the side of the piTFT.
Train New Target or Civilian
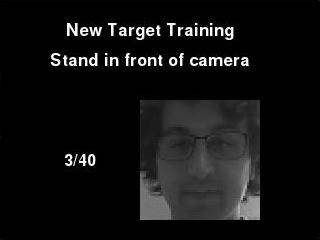
The menu pages for training a new target or civilian were nearly identical. In both cases, the touchscreen would instruct the subject to stand in front of the camera. We then start a live video feed. When a face is detected, the image is cropped, converted to grayscale, and saved as a jpeg with a UserID and sample number in the file. We take 40 samples, which we found was quick to attain and still sufficiently accurate for our facial recognition algorithm. We include a 100ms delay between camera reads in order to capture faces from different angles. The images are displayed on the piTFT screen along with the current sample number so that users can track progress through the training step as well as picture quality. Once the training step is done, the touchscreen returns to the main menu.
The only difference between selecting “Train New Target” and “Train New Civilian” is that training a target adds their UserID to the top of the target array whereas training a civilian adds their UserID to the civilian array. However, this status designation can be changed in the Set Priorities section of the menu.
Set Priorities
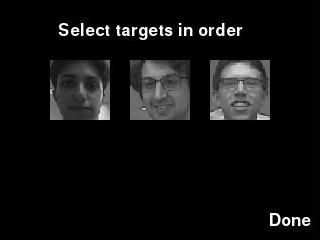
The Set Priorities menu page displays thumbnails of all subjects in the system and instructs the user to select targets in priority order. To select a subject as a target, the user simply presses on the associated thumbnail, and the subject is added to the target list and their thumbnail is removed from the current selection screen. When the user is finished selecting targets, they can press the “Done” button, which adds all remaining subjects to the civilian list and returns to the main menu. Our system currently handles up to six users, and anywhere from zero to all six subjects can be selected as targets.
Arm System
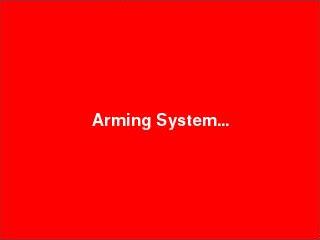

The Arm System menu option takes the user to a page a screen that displays “Arming System” while the system runs the facial recognition training script and performs a sweep of the both servos through their full range they will reach. Once these steps are complete, the next screen displays “System Armed” which indicates to the user know that the system is ready to aim and fire.
Result
We achieved all major goals we set out to accomplish in this project. Our finished system had an intuitive graphical user interface that allowed users to train new subjects, select and prioritize targets, and arm the system. It was able to detect all faces in the frame with a high degree of accuracy. It also performed facial recognition that was mostly accurate, although it would occasionally identify the wrong subjects. Facial recognition was somewhat sensitive to lighting and the angle of the target’s face in images. We found that re-training the system when in a new setting instead of reusing old photos helped a lot with the accuracy of facial recognition, as did and having subjects look straight at the camera. Overall, the system smoothly tracked targets in real time and for the most part, fired only at the chosen targets.
Further improvements we could make include extending the range of the system. Currently, the system performs well when targets are within in a range of roughly 5 feet. We were limited to camera resolution of 320x240 in order to achieve real-time performance, and facial recognition was not always accurate beyond this range. We could make our program multithreaded to distribute processing work across all four cores in order to handle higher resolution images and make our system even faster and more accurate. Additionally, we could add features to our system such as the ability to remove subjects and their associated pictures from the training set, continue tracking targets who turn away from the camera using body tracking, and also fix the sporadic camera issues.
Conclusion
Our project succeeded at using facial recognition to identify targets, rank them by priority, and then fire a dart at the highest priority target. Although facial recognition was not perfect, we were able to track slow moving targets that were within a range of roughly 5 feet and were looking directly at the camera. By optimizing our code to spread tasks across the Raspberry Pi’s cores, we could overcome the range and speed issue as a larger image could be processed faster.
Several important lessons we learned over the course of this project and may be of use for future students are that the Haar cascades classifier and Local Binary Patterns Histogram algorithm were easy to implement in OpenCV and relatively accurate for our purposes. We were stumped at first by the camera lag before we learned about the five frame internal buffer on the capture function; our way of circumventing this issue by throwing away four frames so that we always use a current frame seemed to work well but may not be effective if a higher frame rate is necessary. Additionally, we found that using hardware PWM through the PiGPIO library greatly improved the stability of our servos compared to software PWM.
Overall, our project achieved all of our major objectives and was a fun way to get experience implementing computer vision using OpenCV on the Raspberry Pi.
Work Distribution
Team
The majority of the work was done collaboratively. Daniel’s focus was biased towards the physical assembly and Divya’s focus was biased towards the software.

Divya Gupta
dg524@cornell.edu

Daniel Sachs
dds93@cornell.edu
Parts List
- Nerf N-Strike Elite - HyperFire Blaster $39.99
- Raspberry Pi - Provided in lab
- Adafruit PiTFT - 320x240 2.8" - Provided in lab
- Logitech C920 HD Pro Webcam - Borrowed from lab
- Robot Arm - Borrowed from lab
- Tolako 5v Relay Module - Borrowed from lab
- Transistors, Resistors and Wires - Provided in lab
Total: $39.99 + Parts scavenged from labs
References
Face Recognition – OpenCV Python - Dataset Generator
Face Recognition OpenCV - Training A Face Recognizer
Face Recognition Using OpenCV - Loading Recognizery
The pigpio library
How to clear frames from buffer with USB webcam?
ECE 5725 Course Material
Acknowledgments
We would like to thank our professor, Joe Skovira, and our lab TAs, Brendon and Joyce, for their constant support and guidance over the course of this project and semester.
Code Appendix
############################################################################## #### ECE 5725 Final Project: Autonomous Nerf Aiming System #### by Daniel Sachs & Divya Gupta ############################################################################## import time import cv2 import numpy as np import RPi.GPIO as GPIO import pigpio import sys import subprocess import pygame from pygame.locals import* import os from PIL import Image # Set up touchscreen os.putenv('SDL_VIDEODRIVER', 'fbcon') os.putenv('SDL_FBDEV', '/dev/fb1') os.putenv('SDL_MOUSEDRV', 'TSLIB') # Track mouse clicks on piTFT os.putenv('SDL_MOUSEDEV', '/dev/input/touchscreen') # Set up GPIO switchPin = 26 firePin = 6 AliveButton = 22 ArmedButton = 17 GPIO.setmode(GPIO.BCM) GPIO.setup(switchPin, GPIO.OUT) GPIO.setup(firePin, GPIO.OUT) GPIO.setup(AliveButton, GPIO.IN, pull_up_down=GPIO.PUD_UP) GPIO.setup(ArmedButton, GPIO.IN, pull_up_down=GPIO.PUD_UP) servos = [12,13] pwm_freq = 0 pwm_dc = 0 WHITE = 255, 255, 255 BLACK = 0, 0, 0 RED = 255, 0, 0 GREEN = 0, 128, 0 pig = pigpio.pi() pygame.init() pygame.mouse.set_visible(False) screen = pygame.display.set_mode((320,240)) # Create OpenCV classifier objects for detection, recognition face_cascade = cv2.CascadeClassifier('haarcascade_frontalface_alt.xml') recognizer = cv2.createLBPHFaceRecognizer() font = cv2.cv.InitFont(cv2.cv.CV_FONT_HERSHEY_SIMPLEX,1,1,0,1,1) cap = cv2.VideoCapture(0) ret, image = cap.read() time.sleep(0.1) state = 0 # Sweep both servos during warmup def servo_sweep(): # Panning servo for i in range(-25,75): pulse = (0.6 + i*0.3/100.0)/1000 pwm_freq = 1/(pulse+0.02) pwm_dc = pulse/(pulse+0.02)*1000000 pig.hardware_PWM(servos[1], pwm_freq, pwm_dc) time.sleep(0.03) for i in range(75,-25, -1): pulse = (0.6 + i*0.3/100.0)/1000 pwm_freq = 1/(pulse+0.02) pwm_dc = pulse/(pulse+0.02)*1000000 pig.hardware_PWM(servos[1], pwm_freq, pwm_dc) time.sleep(0.03) # Tilt servo for i in range(-200,75): pulse = (1.5 + i*0.3/100.0)/1000 pwm_freq = 1/(pulse+0.02) pwm_dc = pulse/(pulse+0.02)*1000000 pig.hardware_PWM(servos[0], pwm_freq, pwm_dc) time.sleep(0.02) for i in range(75,-60, -1): pulse = (1.5 + i*0.3/100.0)/1000 pwm_freq = 1/(pulse+0.02) pwm_dc = pulse/(pulse+0.02)*1000000 pig.hardware_PWM(servos[0], pwm_freq, pwm_dc) time.sleep(0.02) def getImagesAndLabels(path): #get the path of all the files in the folder imagePaths=[os.path.join(path,f) for f in os.listdir(path)] faceSamples=[] Ids=[] #loop through all the image paths and load the Ids and images for imagePath in imagePaths: if(os.path.split(imagePath)[-1].split(".")[-1]!='jpg'): continue #load image and convert to gray scale pilImage=Image.open(imagePath).convert('L') #converting PIL image into numpy array imageNp=np.array(pilImage,'uint8') #getting the Id from the image print(os.path.split(imagePath)[-1].split(".")[1]) Id=int(os.path.split(imagePath)[-1].split(".")[1]) #extract the face from the training image sample faces=face_cascade.detectMultiScale(imageNp) #append face and Id for (x,y,w,h) in faces: faceSamples.append(imageNp[y:y+h,x:x+w]) Ids.append(Id) return faceSamples,Ids def aim_fire(): i = -60 j = 25 Armed = True while Armed: # Returns to main menu if (not GPIO.input(ArmedButton)): Armed = False try: # Do five reads to empty buffer, throw away four trash = cap.grab() trash = cap.grab() trash = cap.grab() trash = cap.grab() ret, image = cap.read() time.sleep(0.1) if (image == None): continue # Resize to (320,240) and convert to grayscale image = cv2.resize(image, (320, 240)) gray = cv2.cvtColor(image, cv2.COLOR_BGR2GRAY) # Find faces in image faces = face_cascade.detectMultiScale(gray, 1.3, 5) facesIND = [] facesCOORD = [] for (x,y,w,h) in faces: cv2.rectangle(image,(x,y),(x+w,y+h),(255,0,0),2) # Call recognizer Id, conf = recognizer.predict(gray[y:y+h,x:x+w]) # Recognizes a face if (conf<50): try: # Find this UserID's index in target array if it exists facesIND.append(targets.index(Id)) # Save the coordinates of their face facesCOORD.append((x,y,w,h)) except: # If not a target, do nothing pass # If at least one target in frame if (facesIND != []): # Find the minimum index target (highest priority) targetfaceIND = facesIND.index(min(facesIND)) # Get their corresponding coordinates x = facesCOORD[targetfaceIND][0] y = facesCOORD[targetfaceIND][1] w = facesCOORD[targetfaceIND][2] h = facesCOORD[targetfaceIND][3] else: continue # If the target is approximately centered if (x < 160 and x+w > 160): # Start flywheel GPIO.output(switchPin, 1) time.sleep(0.15) # increase for faster firing speed # Start trigger GPIO.output(firePin, 1) time.sleep(0.2) GPIO.output(firePin, 0) GPIO.output(switchPin, 0) # Change in panning servo's PWM duration depends on # difference between current x position and center istp = round(.3*(160-(x+w/2))) # Limit minimum change when it is close if abs(istp) < 5: istp = 0 # Limit maximum change for jerkiness elif istp > 30: istp = 30 elif istp < -30: istp = -30 # Change in tilt servo's PWM duration depends on # difference between current y position and center jstp =round(.3*(120 -(y+h/2))) if abs(jstp) < 5: jstp = 0 elif jstp > 25: jstp = 25 elif jstp < -25: jstp = -25 # Make these changes in x and y position over 10 smaller steps istp = istp/10.0 jstp = jstp/10.0 for k in range(10): i = i +istp #round(.5*(160-(x+w/2))) if i > 75: i = 75 elif i< -200: i = -200 print(str(jstp)) j = j + jstp if j > 75: j = 75 elif j< -25: j = -25 # Set servos pulse = (1.5 + i*0.3/100.0)/1000 pwm_freq = 1/(pulse+0.02) pwm_dc = pulse/(pulse+0.02)*1000000 pig.hardware_PWM(servos[0], pwm_freq, pwm_dc) pulse = (.6 + j*0.3/100.0)/1000 pwm_freq = 1/(pulse+0.02) pwm_dc = pulse/(pulse+0.02)*1000000 pig.hardware_PWM(servos[1], pwm_freq, pwm_dc) time.sleep(.05) except KeyboardInterrupt: pig.hardware_PWM(servos[0], 0, 0) pig.hardware_PWM(servos[1], 0, 0) pig.stop() GPIO.cleanup() break pig.hardware_PWM(servos[0], 0, 0) pig.hardware_PWM(servos[1], 0, 0) # Create target and civilian arrays targets = [] civilians = [] currentId = 0 Alive = True while Alive: # Exit program, return to command line if (not GPIO.input(AliveButton)): Alive = False # STATE 0: Main Menu if (state == 0): # Monitor for button press for event in pygame.event.get(): if (event.type is MOUSEBUTTONDOWN): pos = pygame.mouse.get_pos() elif (event.type is MOUSEBUTTONUP): pos = pygame.mouse.get_pos() x,y = pos if (x<160 and y>60 and y<110): state = 1 elif (x>200 and y >60 and y<110): state = 2 elif (x>120 and x<240 and y>120 and y<150): state = 3 targets = [] civilians = [] elif (x>120 and x<240 and y>170 and y<210): state = 4 # Display buttons screen.fill(BLACK) my_font = pygame.font.Font(None,25) my_buttons = {'New Target':(70,90), 'New Civilian':(230,90), 'Set Priorities':(150,135), 'Arm System':(150,180)} for my_text,text_pos in my_buttons.items(): text_surface = my_font.render(my_text, True, WHITE) rect = text_surface.get_rect(center=text_pos) screen.blit(text_surface,rect) pygame.display.flip() # STATE 1: New Target elif (state == 1): # Display buttons screen.fill(BLACK) my_font = pygame.font.Font(None,25) my_buttons = {'New Target Training':(150,30), 'Stand in front of camera':(150,60)} for my_text,text_pos in my_buttons.items(): text_surface = my_font.render(my_text, True, WHITE) rect = text_surface.get_rect(center=text_pos) screen.blit(text_surface,rect) pygame.display.flip() # Find next available UserID for k in range(1,8): try: filename = "dataSet/User."+ str(k)+'.'+ str(1) + ".jpg" print(filename) img = pygame.image.load(filename) except: break # Add to targets array at highest priority targets.insert(0,k) Id = str(k) sampleNum = 0 # Take 40 images notBailOut = True while notBailOut: if (not GPIO.input(ArmedButton)): notBailOut = False trash = cap.grab() trash = cap.grab() trash = cap.grab() trash = cap.grab() ret, image = cap.read() time.sleep(0.1) if (image == None): continue image = cv2.resize(image, (320, 240)) gray = cv2.cvtColor(image, cv2.COLOR_BGR2GRAY) faces = face_cascade.detectMultiScale(gray, 1.3, 5) x_,y_,w_,h_ = 0,0,0,0 for (x,y,w,h) in faces: cv2.rectangle(image,(x,y),(x+w,y+h),(255,0,0),2) x_,y_,w_,h_=x,y,w,h sampleNum +=1 # Save as jpeg with userID and sampleNum in filename filename = "dataSet/User."+Id +'.'+ str(sampleNum) + ".jpg" cv2.imwrite(filename, gray[y_:y_+h_,x_:x_+w_]) #Always show this text screen.fill(BLACK) my_font = pygame.font.Font(None,25) my_buttons = {'New Target Training':(150,30), 'Stand in front of camera':(150,60)} for my_text,text_pos in my_buttons.items(): text_surface = my_font.render(my_text, True, WHITE) rect = text_surface.get_rect(center=text_pos) screen.blit(text_surface,rect) # Display current sample number text_surface = my_font.render(str(sampleNum) + "/40", True, WHITE) rect = text_surface.get_rect(center=(80,160)) screen.blit(text_surface,rect) # Show last image taken on screen image_pygame = pygame.image.load(filename) image_pygame = pygame.transform.scale(image_pygame, (120,120)) rect_pygame = image_pygame.get_rect(center = (200,160)) screen.blit(image_pygame, rect_pygame) pygame.display.flip() #wait for 100 miliseconds if cv2.waitKey(100) & 0xFF == ord('q'): break # break if the sample number is morethan 20 elif sampleNum>=40: break # Return to main menu state = 0 # STATE 2: New Civilian elif (state == 2): screen.fill(BLACK) my_font = pygame.font.Font(None,25) my_buttons = {'New Civilian Training':(150,30), 'Stand in front of camera':(150,60)} for my_text,text_pos in my_buttons.items(): text_surface = my_font.render(my_text, True, WHITE) rect = text_surface.get_rect(center=text_pos) screen.blit(text_surface,rect) pygame.display.flip() # Find next available UserID for k in range(1,7): try: filename = "dataSet/User."+ str(k)+'.'+ str(1) + ".jpg" print(filename) img = pygame.image.load(filename) except: print("k: " + str(k)) break # Add to civilians array civilians.append(k) Id = str(k) sampleNum = 0 # Take 40 images notBailOut = True while notBailOut: if (not GPIO.input(ArmedButton)): notBailOut = False trash = cap.grab() trash = cap.grab() trash = cap.grab() trash = cap.grab() ret, image = cap.read() time.sleep(0.1) if (image == None): continue image = cv2.resize(image, (320, 240)) gray = cv2.cvtColor(image, cv2.COLOR_BGR2GRAY) faces = face_cascade.detectMultiScale(gray, 1.3, 5) x_,y_,w_,h_ = 0,0,0,0 for (x,y,w,h) in faces: print("detect " + str(sampleNum)) cv2.rectangle(image,(x,y),(x+w,y+h),(255,0,0),2) x_,y_,w_,h_=x,y,w,h sampleNum +=1 # Save as jpeg with userID and sampleNum in filename filename = "dataSet/User."+Id +'.'+ str(sampleNum) + ".jpg" cv2.imwrite(filename, gray[y_:y_+h_,x_:x_+w_]) screen.fill(BLACK) my_font = pygame.font.Font(None,25) my_buttons = {'New Target Training':(150,30), 'Stand in front of camera':(150,60)} for my_text,text_pos in my_buttons.items(): text_surface = my_font.render(my_text, True, WHITE) rect = text_surface.get_rect(center=text_pos) screen.blit(text_surface,rect) # Display current sample number text_surface = my_font.render(str(sampleNum) + "/40", True, WHITE) rect = text_surface.get_rect(center=(80,160)) screen.blit(text_surface,rect) # Show last image taken on screen image_pygame = pygame.image.load(filename) image_pygame = pygame.transform.scale(image_pygame, (120,120)) rect_pygame = image_pygame.get_rect(center = (200,160)) screen.blit(image_pygame, rect_pygame) pygame.display.flip() #wait for 100 miliseconds if cv2.waitKey(100) & 0xFF == ord('q'): break # break if the sample number is morethan 20 elif sampleNum>=40: break # Return to main menu state = 0 # STATE 3: Set Priorities elif (state == 3): # Display buttons on screen screen.fill(BLACK) my_font = pygame.font.Font(None,25) my_buttons = {'Select targets in order':(150,30), 'Done':(290,220)} for my_text,text_pos in my_buttons.items(): text_surface = my_font.render(my_text, True, WHITE) rect = text_surface.get_rect(center=text_pos) screen.blit(text_surface,rect) # Columns and rows for thumbnails cols = [80, 160, 240] rows = [90, 160] height = 60 cols_left = [50,130,210] cols_right = [110,190,270] rows_up = [60,130] rows_down = [120,190] # Display all thumbnails that have not been chosen yet for i in range(0,2): for j in range(0,3): if (not ((i*3+j+1) in targets)): try: filename = "dataSet/User." + str(i*3+j+1) + ".1.jpg" img = pygame.image.load(filename) img = pygame.transform.scale(img, (height, height)) rect = img.get_rect() rect.center = (cols[j],rows[i]) screen.blit(img, rect) if (not ((i*3+j+1) in civilians)): civilians.append(i*3+j+1) except: pass # Monitor for button presses for event in pygame.event.get(): if (event.type is MOUSEBUTTONDOWN): pos = pygame.mouse.get_pos() elif (event.type is MOUSEBUTTONUP): pos = pygame.mouse.get_pos() x,y = pos if (x>260 and y>210): # Add remaining to civilian array, return to main menu state = 0 elif (not (1 in targets) and (1 in civilians) and x>cols_left[0] and x<cols_right[0] and y>rows_up[0] and y<rows_down[0]): targets.append(1) civilians.pop(civilians.index(1)) elif (not (2 in targets) and (2 in civilians) and x>cols_left[1] and x<cols_right[1] and y>rows_up[0] and y<rows_down[0]): targets.append(2) civilians.pop(civilians.index(2)) elif (not (3 in targets) and (3 in civilians) and x>cols_left[2] and x<cols_right[2] and y>rows_up[0] and y<rows_down[0]): targets.append(3) civilians.pop(civilians.index(3)) elif (not (4 in targets) and (4 in civilians) and x>cols_left[0] and x<cols_right[0] and y>rows_up[1] and y<rows_down[1]): targets.append(4) civilians.pop(civilians.index(4)) elif (not (5 in targets) and (5 in civilians) and x>cols_left[1] and x<cols_right[1] and y>rows_up[1] and y<rows_down[1]): targets.append(5) civilians.pop(civilians.index(5)) elif (not (6 in targets) and (6 in civilians) and x>cols_left[2] and x<cols_right[2] and y>rows_up[1] and y<rows_down[1]): targets.append(6) civilians.pop(civilians.index(6)) pygame.display.flip() # STATE 4: ARMING SYSTEM elif (state == 4): # Display text screen.fill(RED) text_surface = my_font.render("Arming System...", True, WHITE) rect = text_surface.get_rect(center=(160,120)) screen.blit(text_surface,rect) pygame.display.flip() # Run and load trainer faces, Ids = getImagesAndLabels('dataSet') recognizer.train(faces, np.array(Ids)) recognizer.save('trainner/trainner.yml') recognizer.load('trainner/trainner.yml') # Sweep servos to warmup servo_sweep() time.sleep(.1) state = 5 # STATE 5: SYSTEM ARMED, run aim_fire elif (state == 5): screen.fill(GREEN) my_font = pygame.font.Font(None,25) my_buttons = {'System Armed':(160,120), 'Press Button 17 to return to Main Menu':(160,60)} for my_text,text_pos in my_buttons.items(): text_surface = my_font.render(my_text, True, WHITE) rect = text_surface.get_rect(center=text_pos) screen.blit(text_surface,rect) pygame.display.flip() aim_fire() state = 0 pig.hardware_PWM(servos[0], 0, 0) pig.hardware_PWM(servos[1], 0, 0) pig.stop() GPIO.cleanup()