The Raspberry Pi Music Assistant
A tool to make any musician's practice more productive.
5/16/2018
Project by Jon Tsai (jt765) & Alexander Wood-Thomas (adw75)
Demonstration Video
Introduction
The Raspberry Pi Music Assistant is a device that utilizes a Raspberry Pi to implement three useful musical practice tools. These include a metronome, tuner, and recorder, each of which is created completely through software. The RPi Music Assistant is controlled completely through its touch screen interface, and it also uses a microphone and speakers for audio input and output.

Project Objective:
Create a helpful tool for musicians to practice and improve. It should include:- A metronome to maintain consistent tempo.
- A tuner to adjust instruments and keep accurate intonation.
- A recording and playback feature to allow musicians to listen to themselves play and find ways to improve.
Design and Testing
Our project can be divided into four major parts: menu display and navigation, the metronome, the tuner, and the recorder. In terms of hardware, Figure 1 shows the components used and connections among them for the device, and Figure 2 shows the actual physical setup of the device. We used a Raspberry Pi, a piTFT display, a USB microphone, and external speakers/headphones.
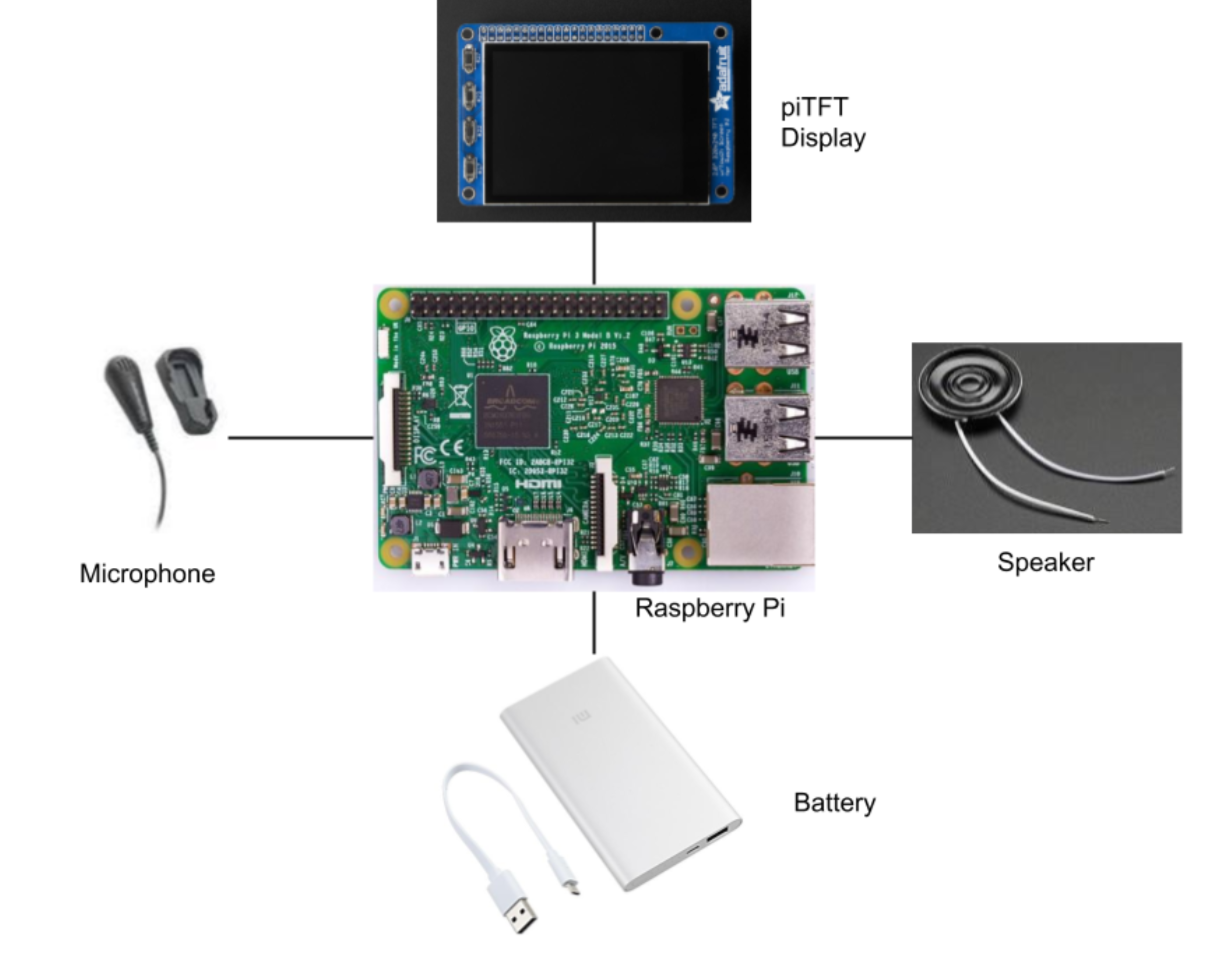
Figure 1. An initial diagram for planning the required hardware. Other than the Pi and PiTFT screen, the project only requires a USB microphone and speakers.
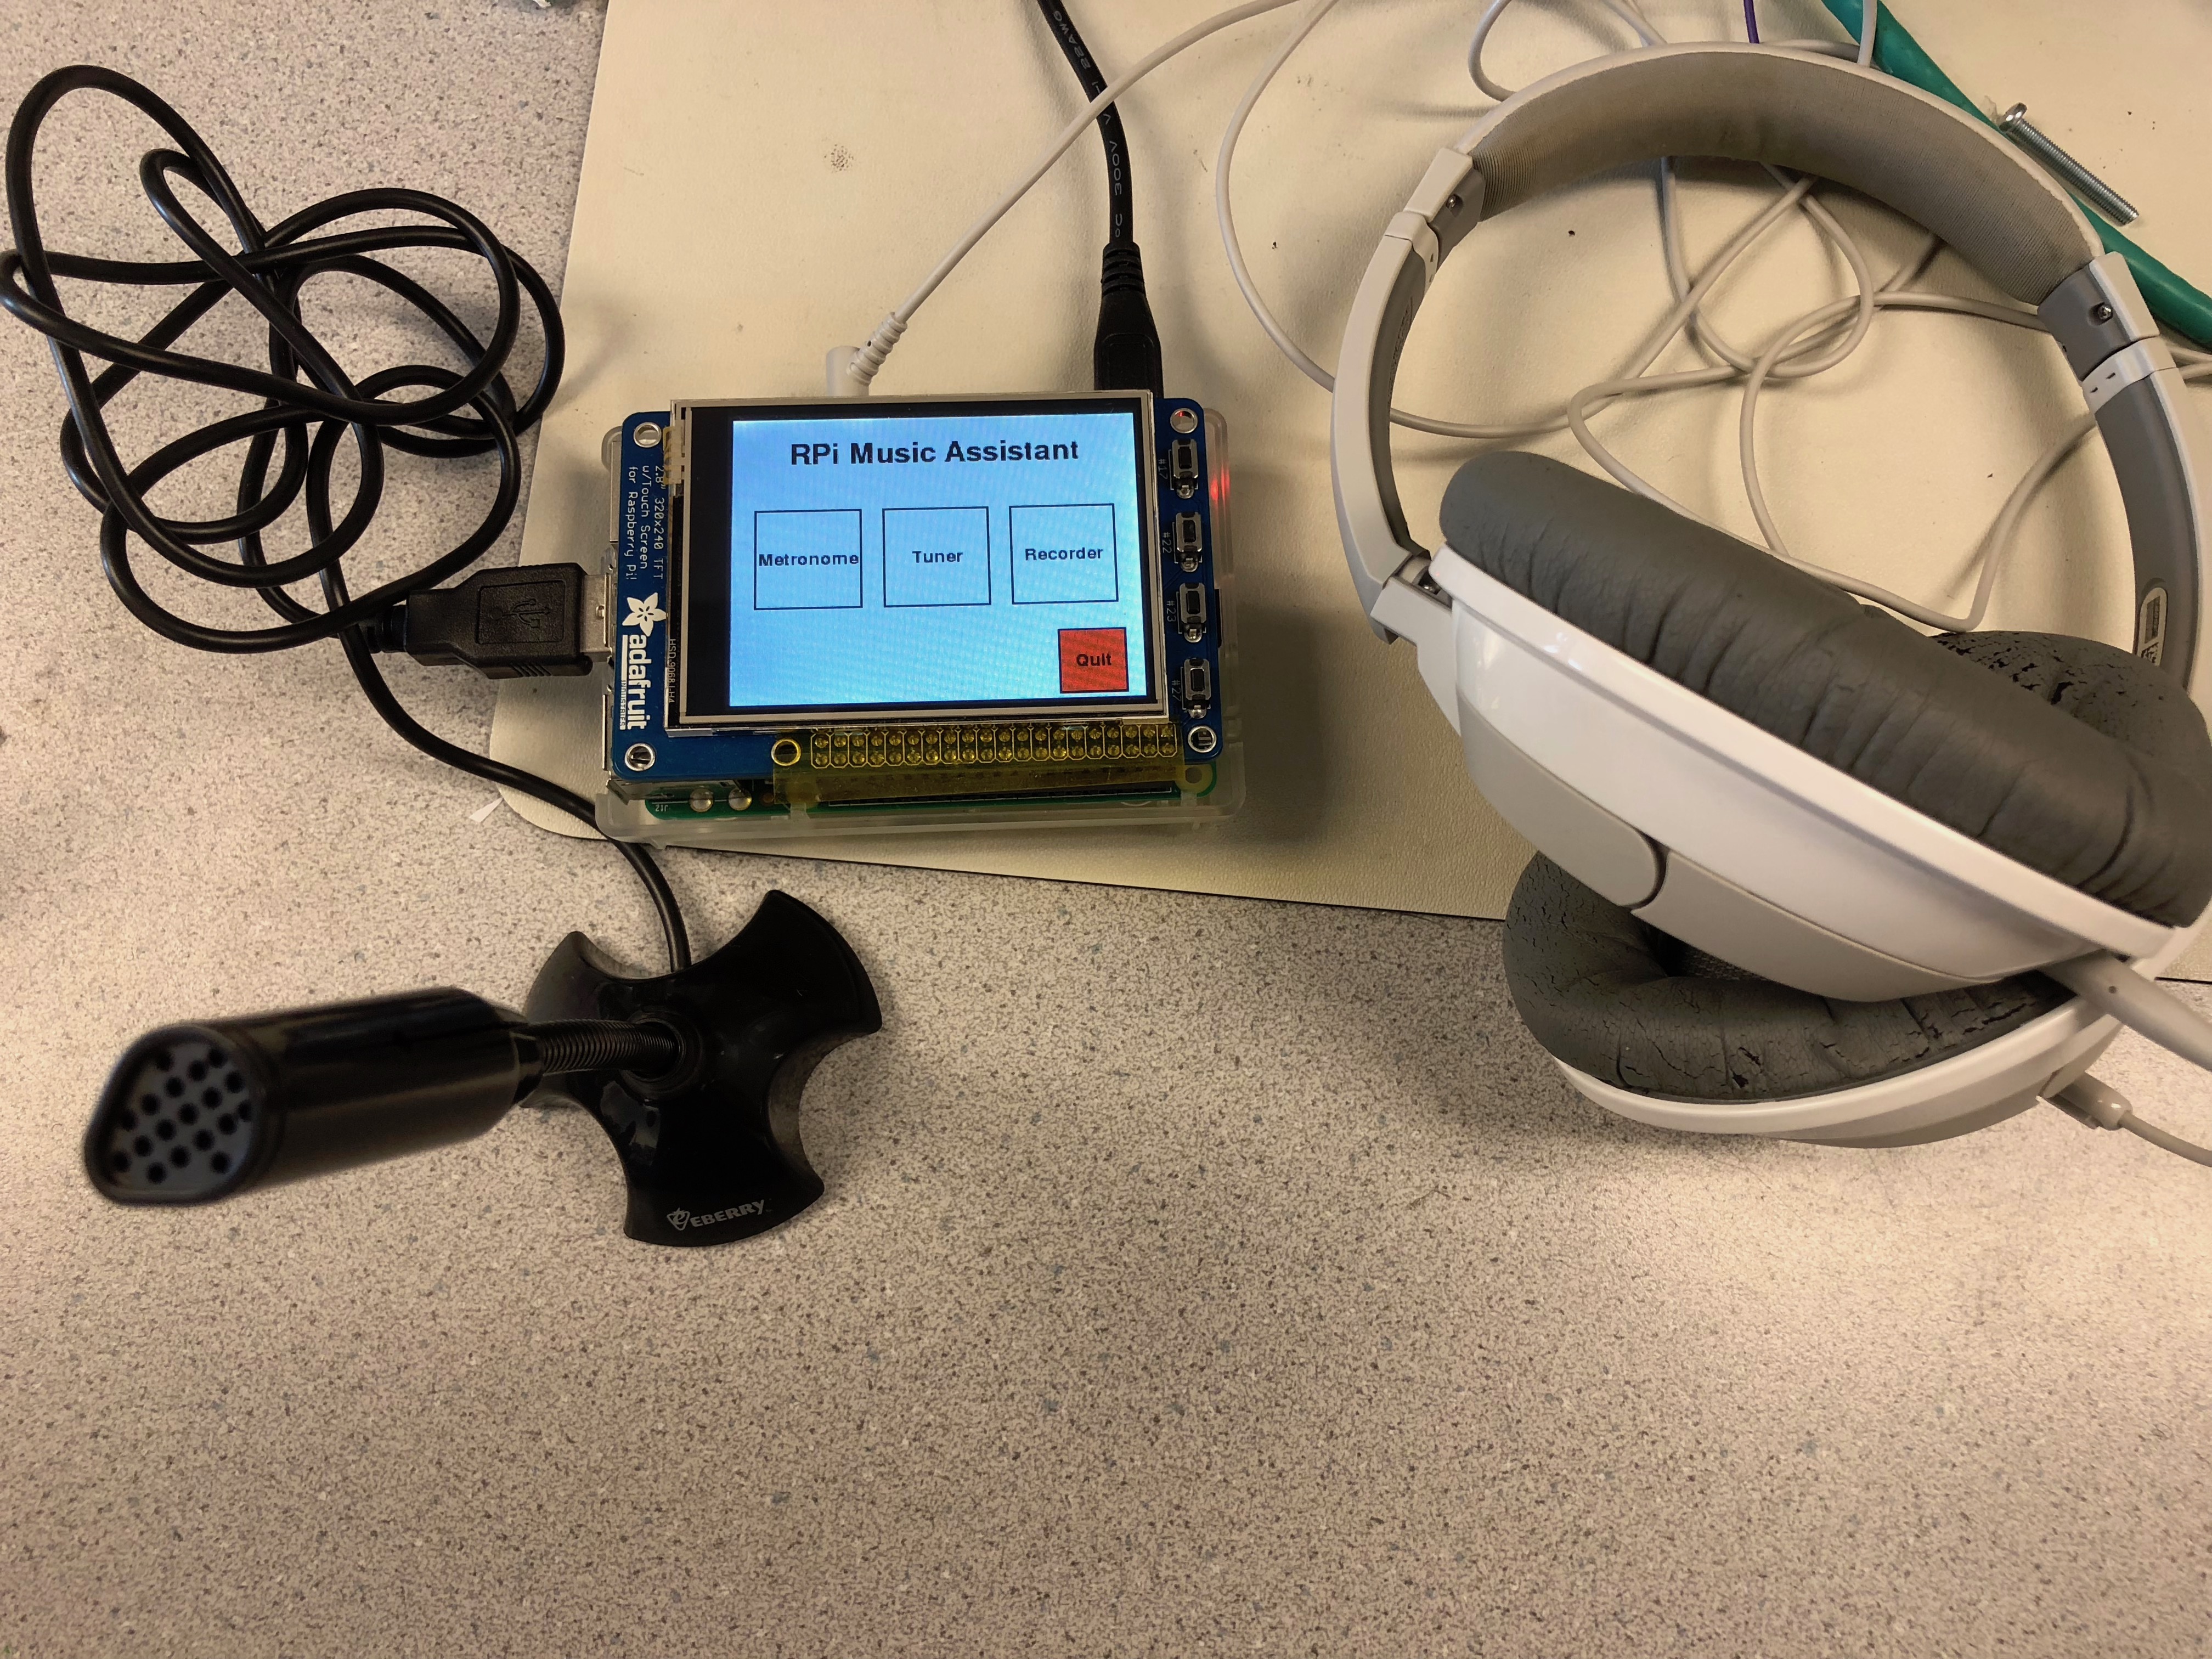
Figure 2. Physical setup of device.
1. Menu Display and Navigation
The pygame library was used for creating the various menu screens and touchscreen buttons that allowed for control by the user. The initial designs for these screens are shown in Figure 3. A different file was created to handle the functionality for each screen, and they are called on by an overall controlling file that manages the navigation between each menu. For each menu, the program will check for when the user taps on the touchscreen and determine which button was pressed if any. If a button was pressed, then another action will occur based on the button's functionality. When the RPi Music Assistant boots up, it starts at the main menu which contains touchscreen buttons for each of the musical tools and quitting out of the application. The main menu screen on the device is shown in Figure 4.
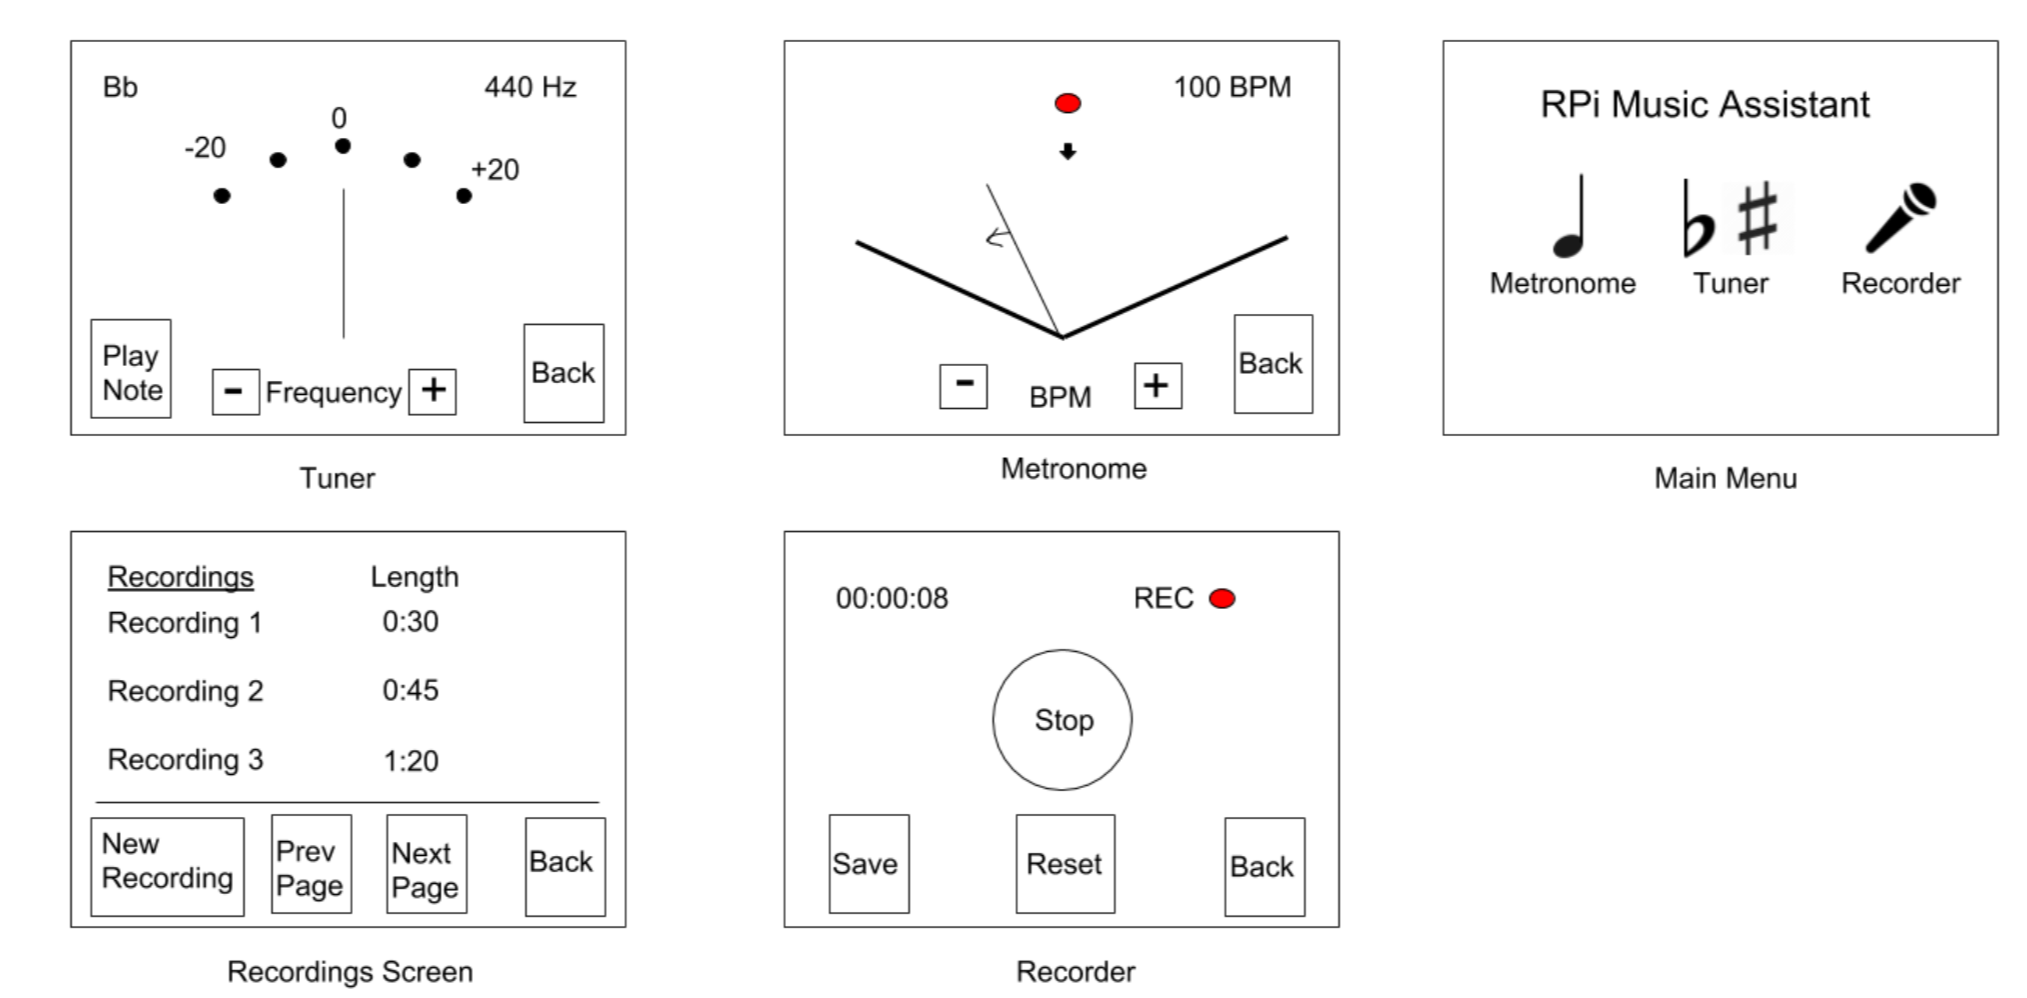
Figure 3. Initial concept sketches for the different screens of the music assistant. Concept sketches helped guide GUI development.
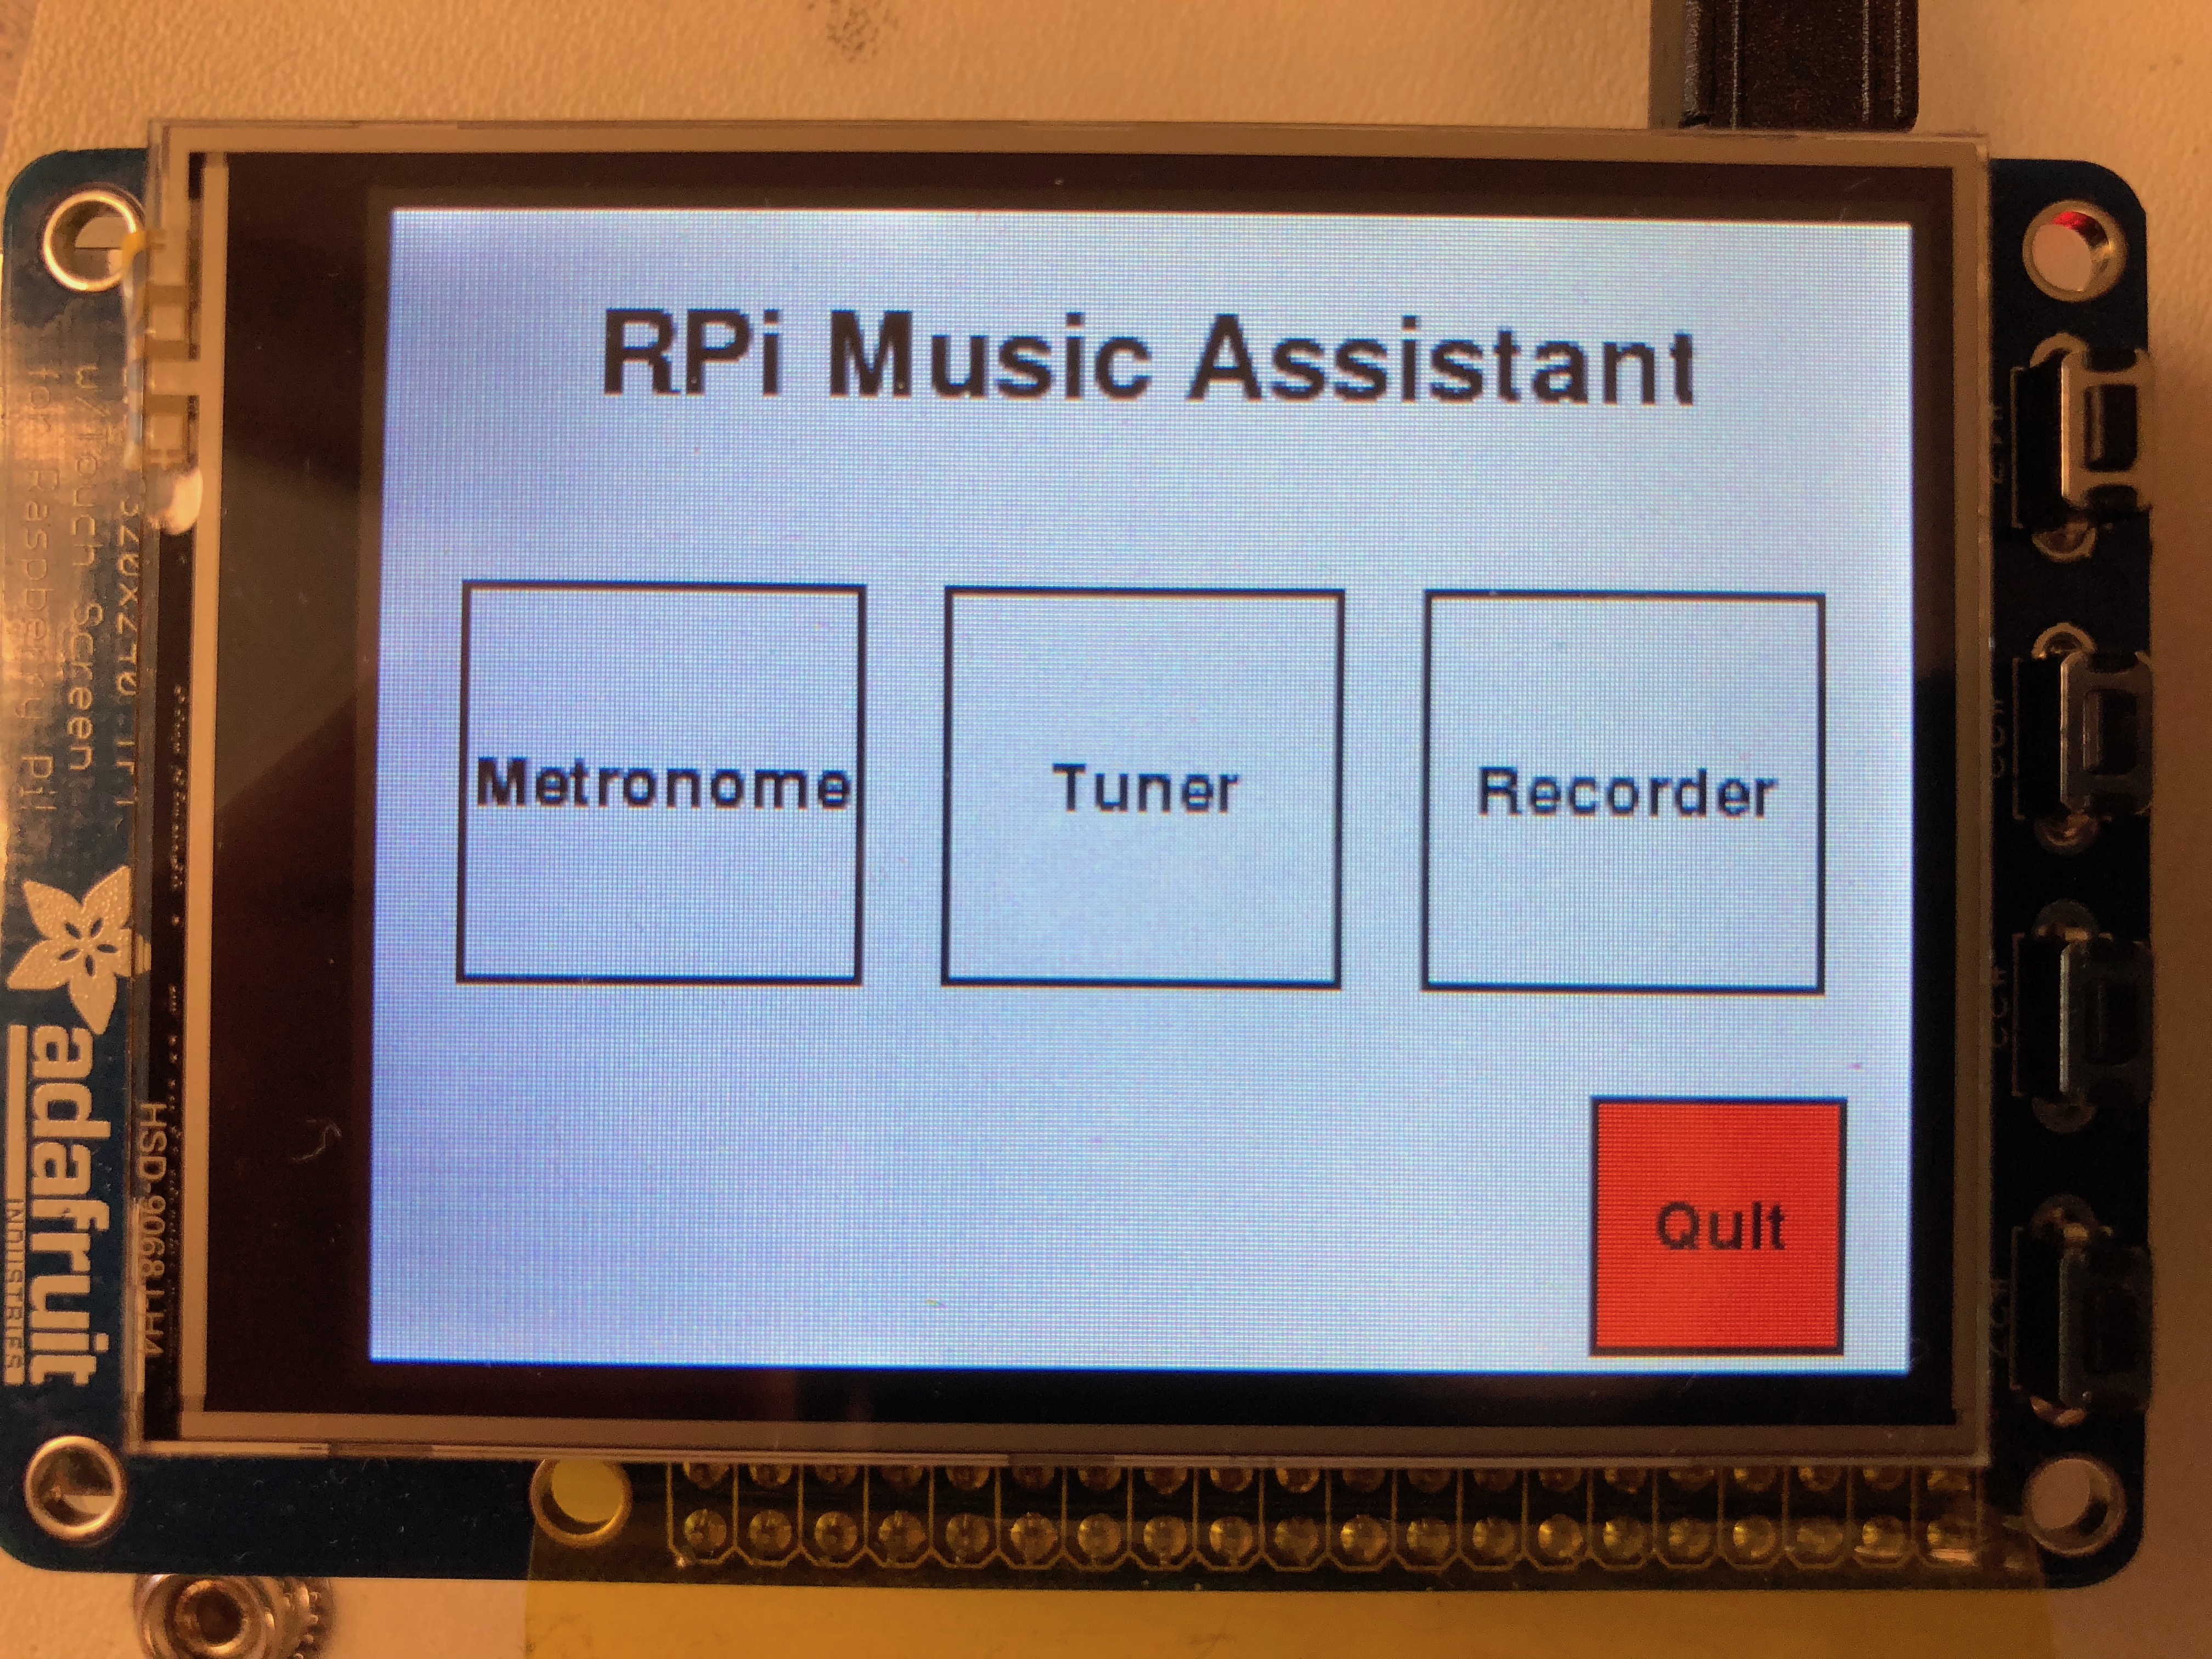
Figure 4. Main menu screen. Contains buttons for each of the music tools.
2. Metronome
The metronome provides visual and audio cues at a constant pace, and this helps a musician maintain a consistent tempo when practicing. The standard used for the tempo is beats per minute (bpm), which can be adjusted by the user through onscreen buttons. The menu for the metronome contains three buttons, for returning to the main menu, increasing the bpm, and decreasing the bpm. Other visual elements include the current bpm setting, a blinking red circle, and a line that bounces left and right. The completed metronome tool is shown in Figure 5.
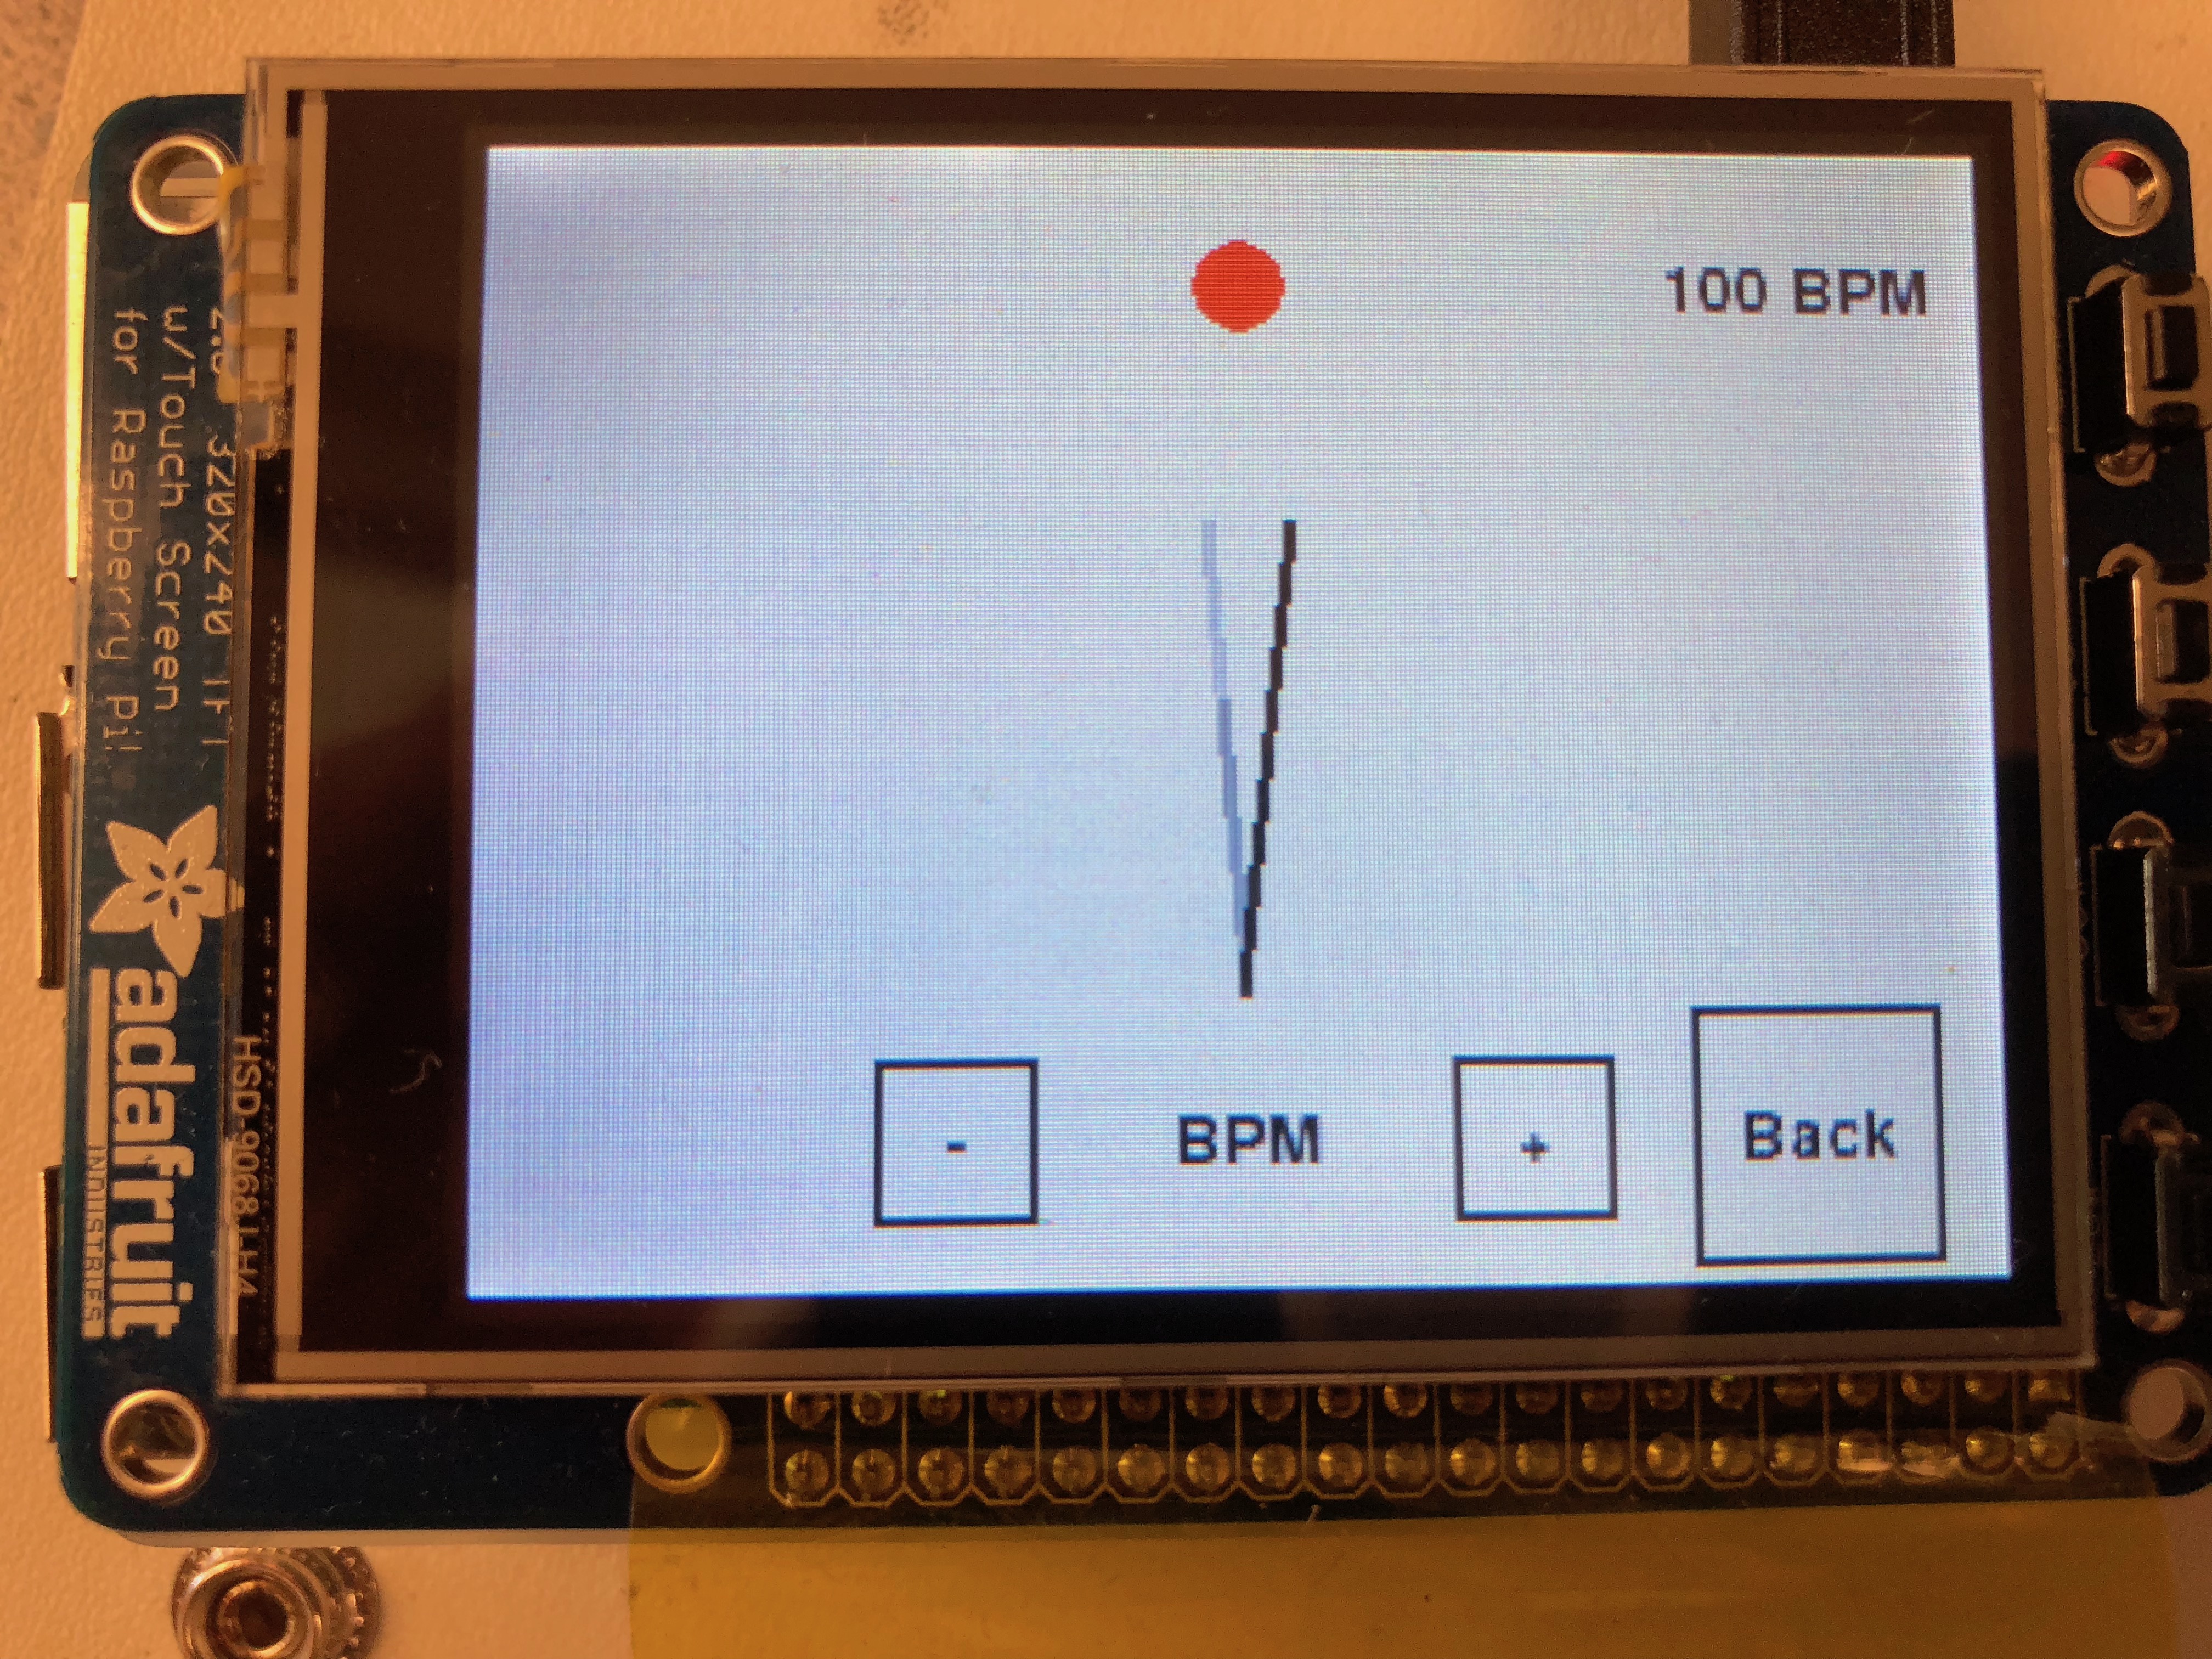
Figure 5. Metronome menu screen. The line bounces left and right and the red dot blinks according to the bpm rate.
The bpm is maintained as a global variable in the metronome file, so when either of the bpm buttons are pressed, this value is updated accordingly and redisplayed on the screen. We decided to have the bpm change in increments of 5 to reach the desired bpm more quickly and also because most music uses bpm that is a multiple of 5. To have the blinking circle and bouncing line follow the timing of the given bpm, we used the time library and set display behavior based on the bpm value. First, we determined how many seconds correspond to one beat based on the bpm. For the blinking red circle, we set it so that at the beginning of each beat, it would show up on the display for 0.1 seconds and then disappear for the remainder of the beat duration. Generally, most music will be well under 300 bpm which corresponds to a beat duration of 0.2 seconds, so we did not worry about cases where the red circle would display for longer than the beat duration. Additionally, at the start of every beat, we would play an audio file that contained a simple percussive wood block sound. At the same time as displaying the red circle each beat, we would use a subprocess call with aplay to play the sound file, giving the audio cue for every beat.
Displaying the line that would bounce left and right was more challenging to do. The pendulum is drawn with a PyGame Line object and is redrawn at 60 frames per second to produce the animation. The end positions of the pendulum relative to the base point are defined according to equations 1 and 2.
We first defined the angle of the line as a sine function of time (equation 3). A sine function for the angle results in a smooth motion of the ticker.

We decided that the smooth motion wasn't as visually useful, and instead decided to use a constant angular rate with a triangular wave function for the angle. A triangular wave is more complex and less intuitive to implement analytically, but we did so successfully with equation 4.

Once we implemented the movement of the ticker, we noticed that the ticker and the blinking circle were not synced together, even though they both followed the bpm correctly. We realized that this was because the ticker and circle used different time variables which were reset different amounts, so to fix this problem, we set both of them to use the same time counter. To test the metronome, we observed the ticker and circle to confirm that they follow the bpm and repeated this for different bpm values. Other than having to synchronize the two visual elements, we were able to progress through this portion of the project smoothly.
3. Tuner
The tuner is used to play a specified note or listen to the sound received through the microphone and indicate whether it is in tune or not. The tuner screen contains buttons to change the note to be played, to play the note, to listen for the user's sound, and return to the main menu. The completed tuner screen is given in Figure 6, while Figure 7 shows the tuner when listening for input.
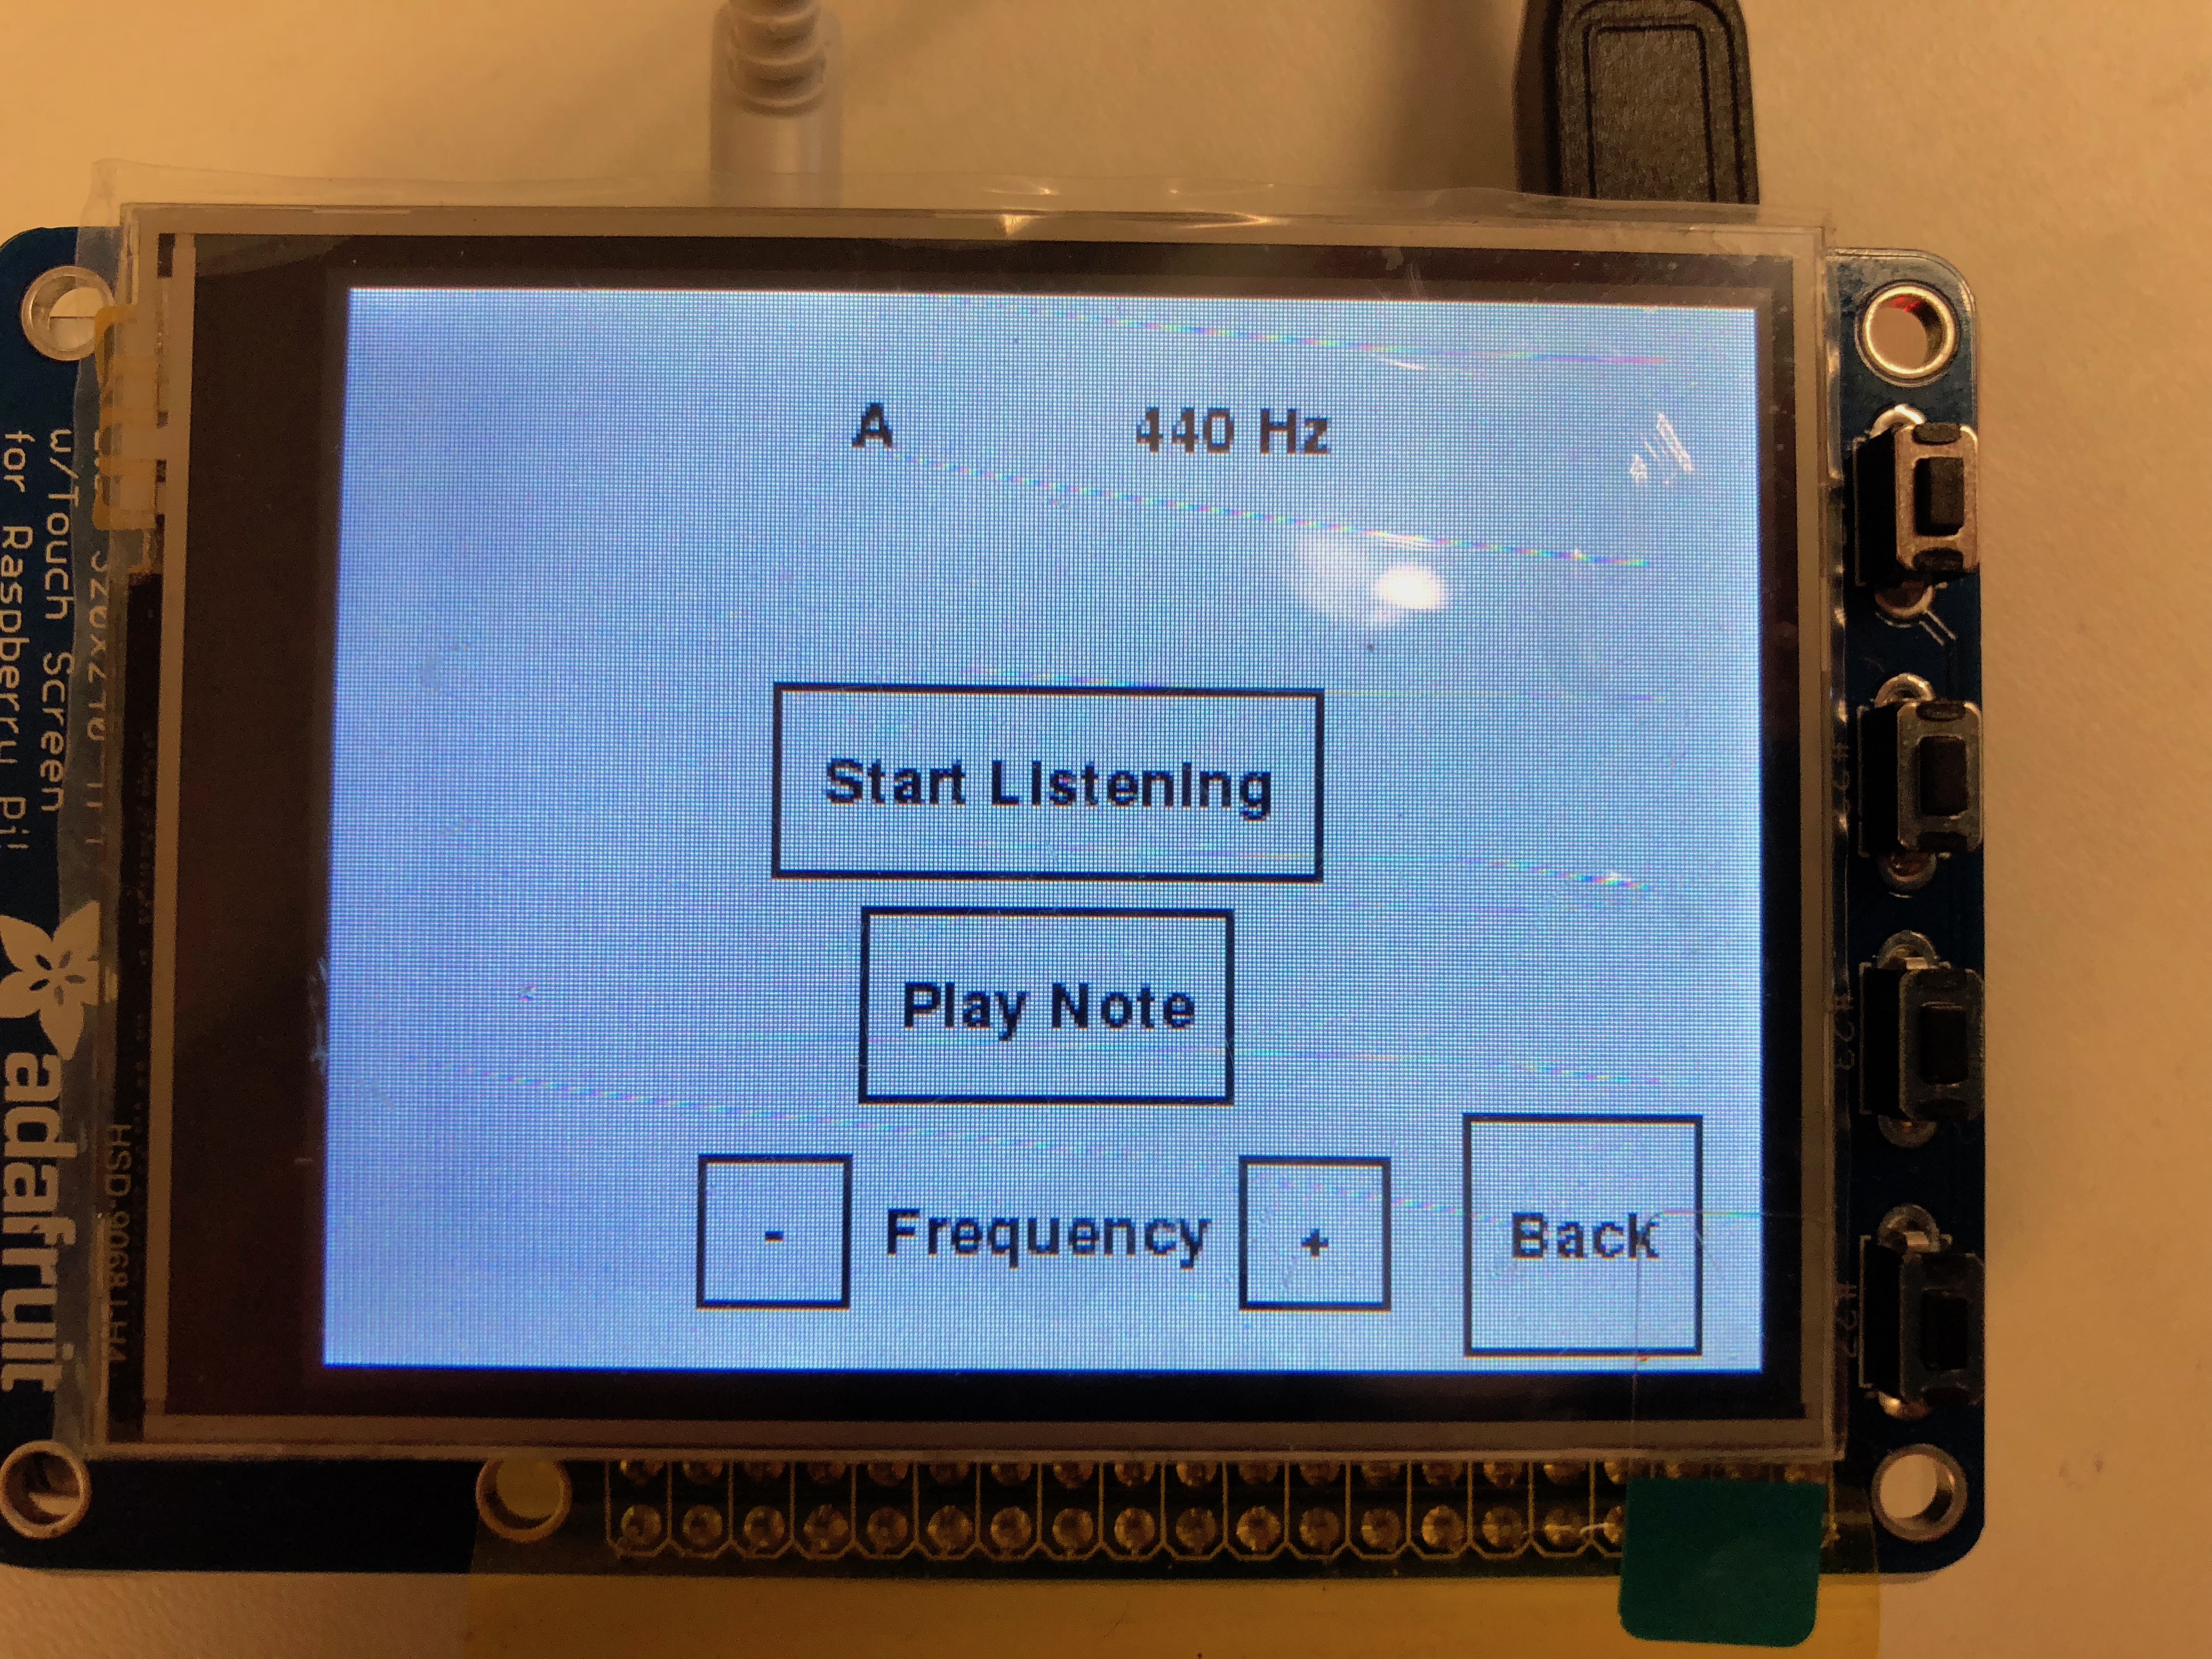
Figure 6. Tuner screen. Can play a selected note and indicate how in tune the note being received is.
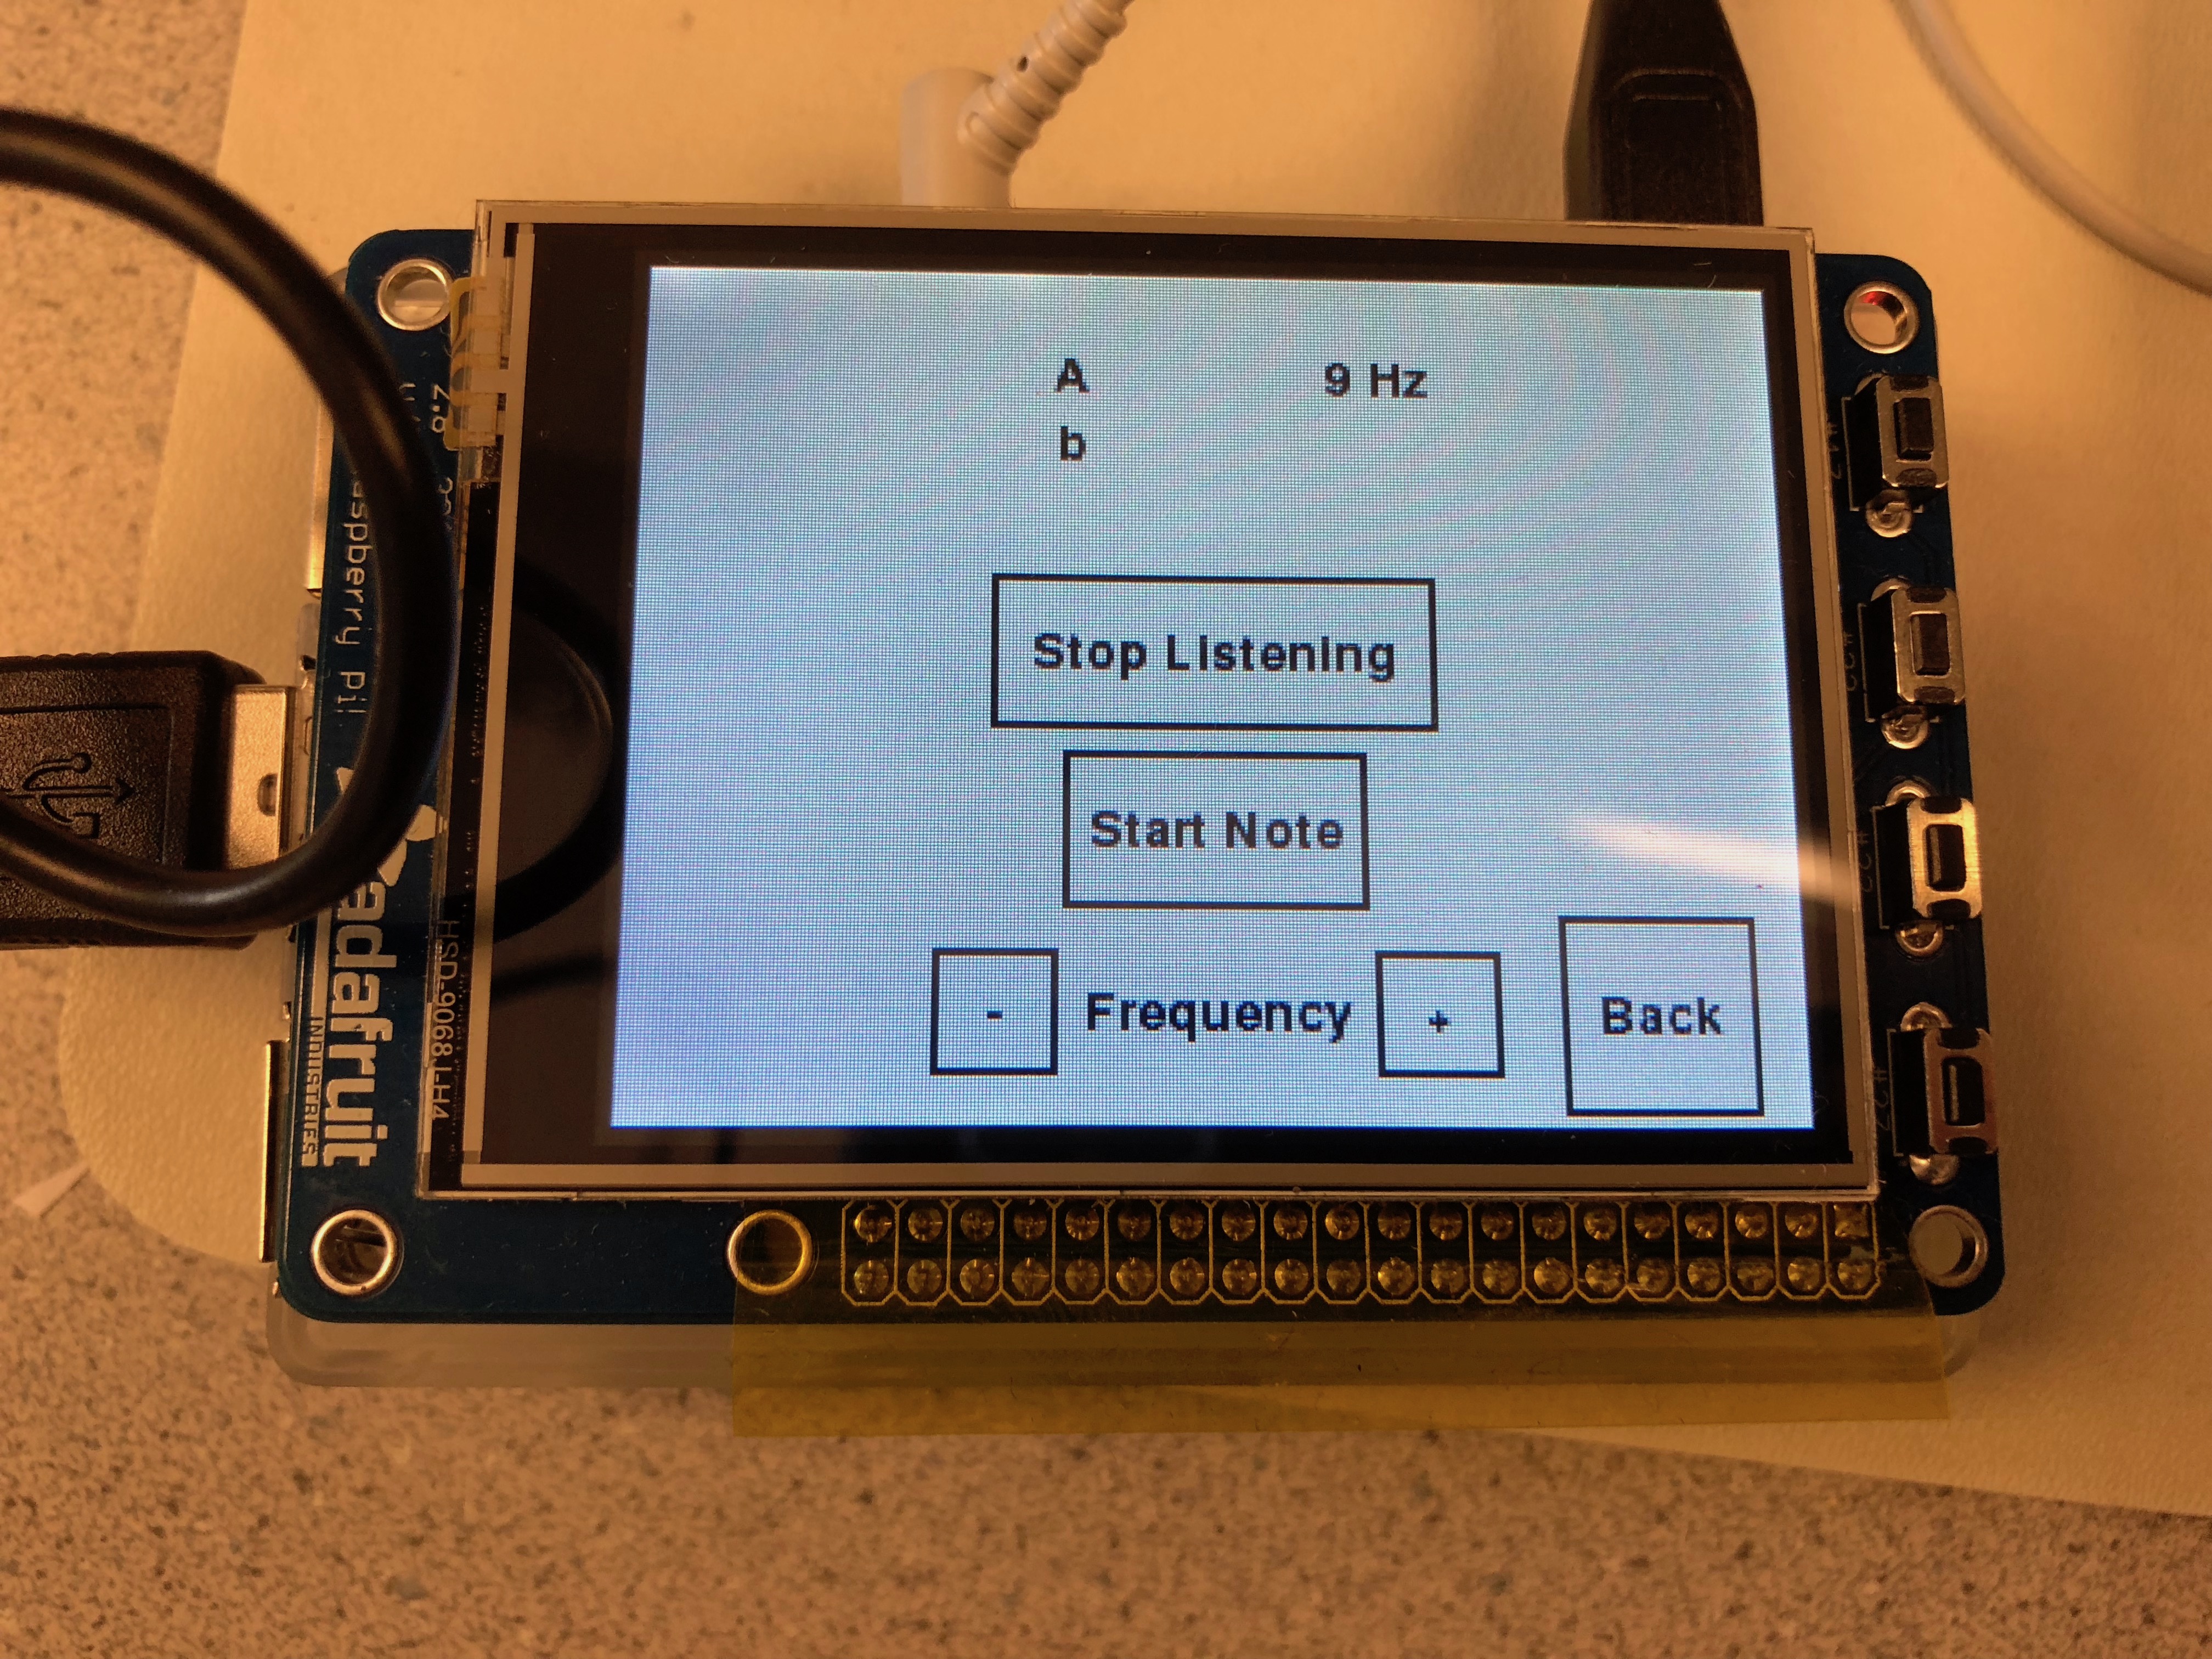
Figure 7. Tuner listening screen. The symbol underneath the note in the top left indicates if the input is flat or sharp.
In order to play different notes, we had to store a list of notes and their frequencies in the tuner file and then call on a specific index of these lists to match the note to be played. Additionally, for the listening functionality, we needed to determine what note was being received in order to decide if its intonation was flat or sharp. To do this, we set thresholds for each note so that if the frequency received was between a certain range, we would know what note it was. The thresholds were simply set as the average frequency between two consecutive notes. To play a given note, we decided to output a sine wave with frequency equal to the specified note's frequency.
It took multiple attempts at different approaches to create a clean sounding tone. Initial attempts used the PyAudio library to play a fixed frequency, by feeding sine data in chunks to an output stream. This resulted in extremely choppy sound, which didn't produce any recognizable frequency. Continued research and multiple attempts at implementing example code were fruitless for the first couple days of attempts. Our final attempt used the PyGame library's audio functionality. The Note class extends a PyGame Sound object, which already has functions to start and stop playing sound. On instantation, the Sound object is created with a buffer of sound data for one period of the tone. Once the Sound object is created, we can start and stop playback on command with built in PyGame functions.
To use the tuner to detect frequency, it has to be placed in "listening mode." Listening mode continually pulls from a 8000 sample per second PyAudio stream in chunks of 4096 samples. This effectively analyzes half second chunks of sound at a time. It first uses a numpy Hanning filter to smooth the data, and then performs a Fast Fourier Transform (FFT) on the data (also with numpy). It considers only the lower half of computed frequency amplitudes to reject any high frequency noise, finds the max amplitude, and then returns the corresponding frequency bin.
4. Recorder
The recorder consists of two parts: displaying the list of recordings, and making a new recording. The recording list screen displays recordings stored on the device three at a time and contains buttons for scrolling between pages of recordings, moving to a new screen to make a recording, and returning to the main menu. Additionally, when one of the recordings is touched, the recording will play, and three additional buttons for deleting, stopping, and pausing the recording will show. The completed recording list screen is shown in Figure 8, with the playback buttons being shown in Figure 9.
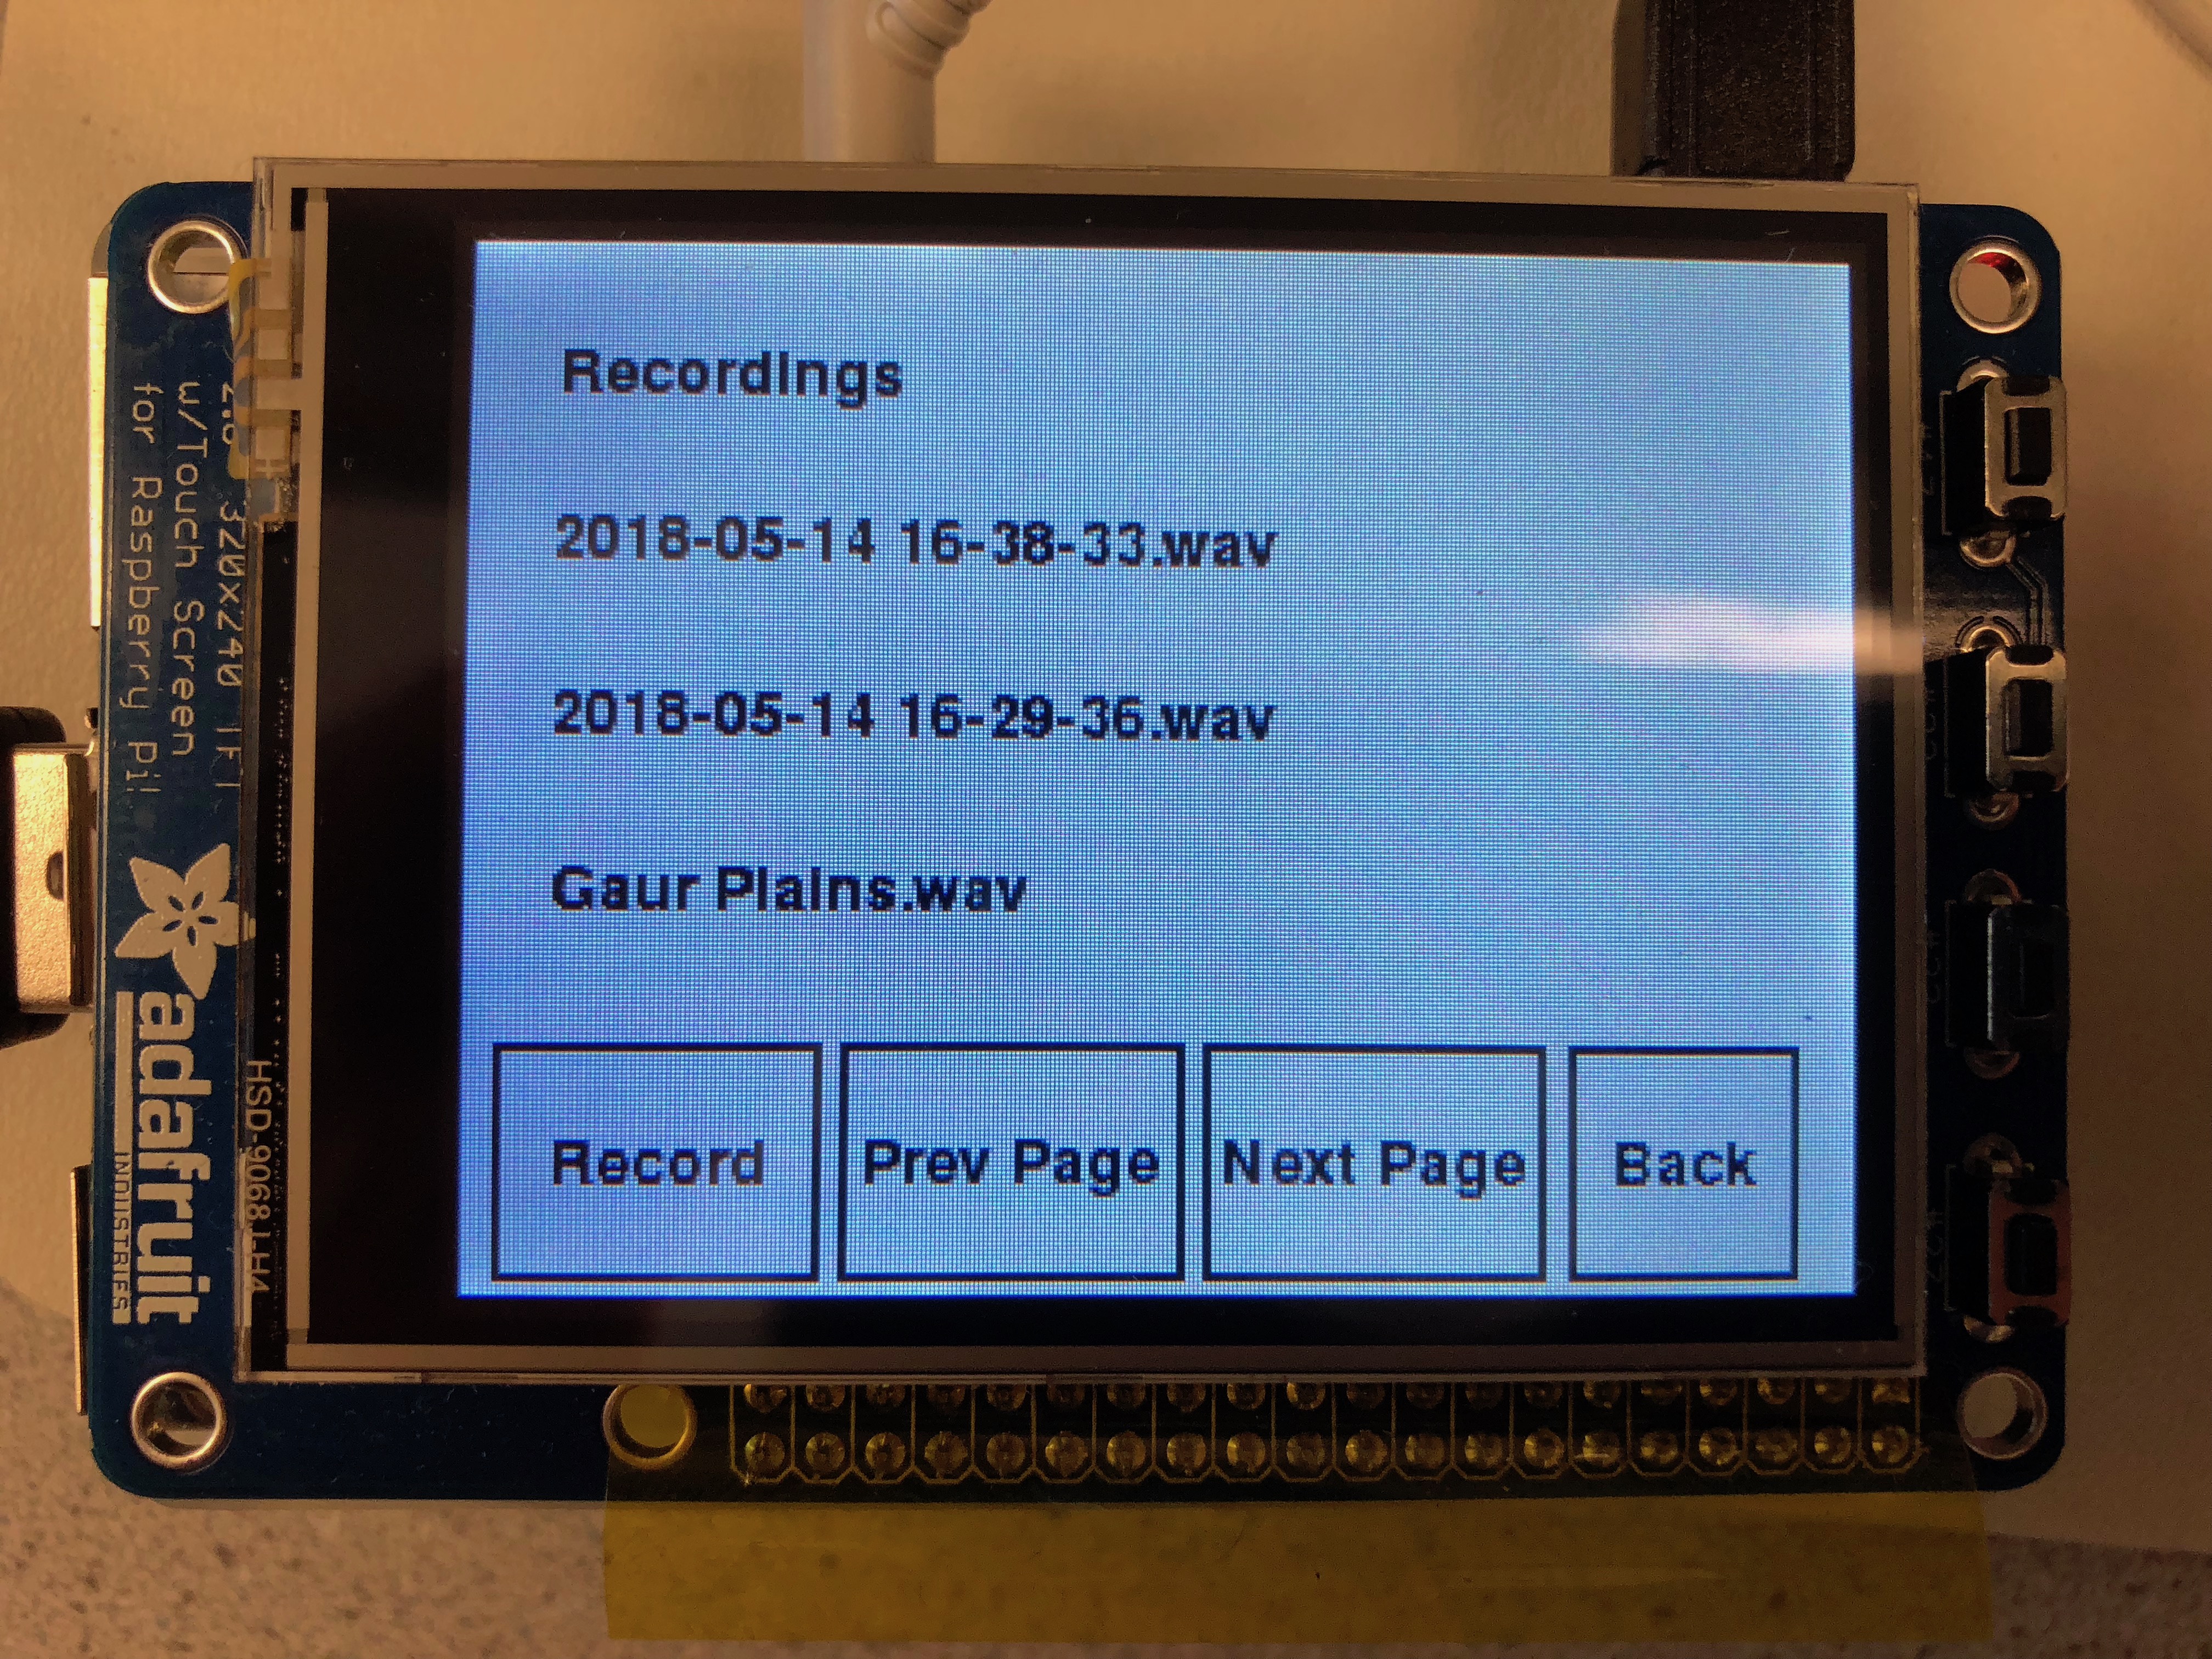
Figure 8. Recording list screen. Shows all recordings on the device and can play a selected one.
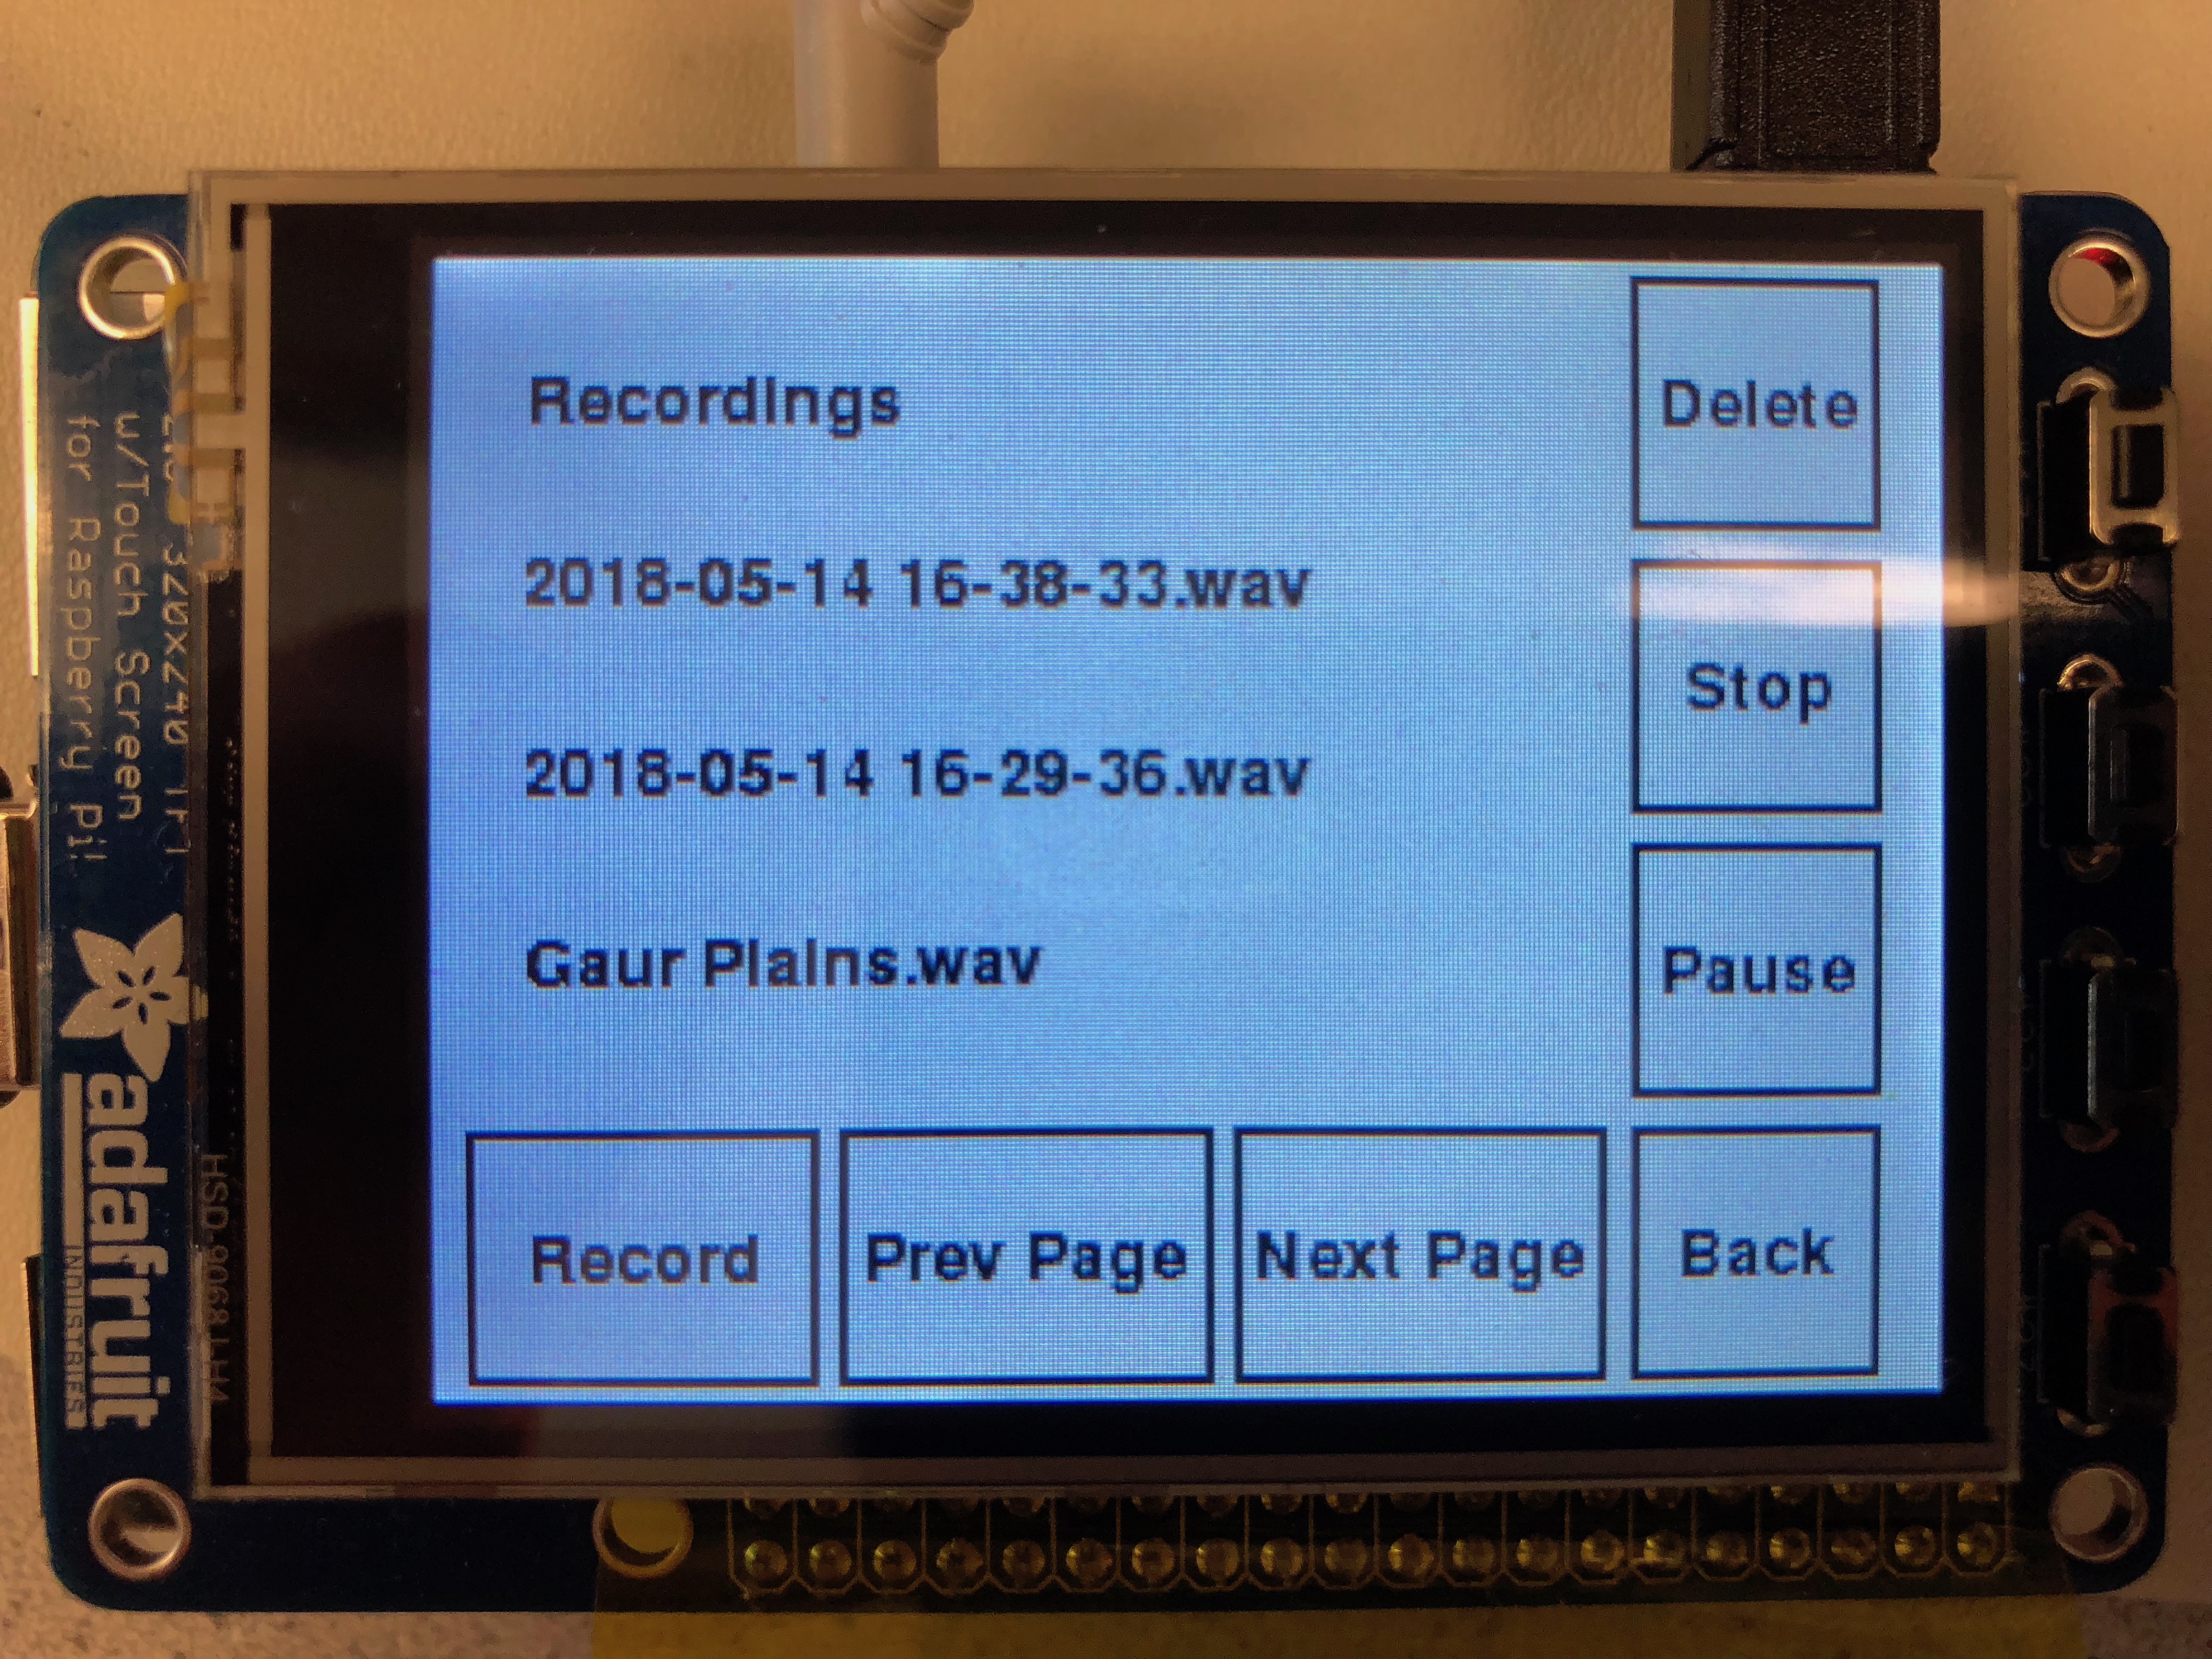
Figure 9. Recording list playback screen. Can delete, stop, or pause the file that is playing.
The recordings are stored in a local directory on the device and are shown three at a time on the screen. After obtaining the list of files in the directory through the function "os.listdir()", we used a global variable to keep track of which page of recordings to display. For the three recordings to be shown, we created a pygame screen button for each and flipped them onto the display. Then, if a recording's button was tapped by the user, we would call a function to create and display the delete, stop, and pause buttons, and then play the file.
The recordings are all made to be in .wav format, so we opened the file using the "wave.open()" function. Then, we used the PyAudio library to handle playback of the recording. This works by opening a stream based on the channels, frame rate, chunk size, and format of the opened file, and then reading the file's data based on the chunk size. To produce the sound, the data is continuously written to the stream until the file has completed playing. In order to control the playback of the file, while the data is written to the stream, we also have to check for any button presses. If "Stop" is pressed, then we stop writing to the stream, if "Delete" is pressed, we also stop writing to the stream and then delete the file, and if "pause" is pressed, we enter a while loop to prevent writing to the stream. Here, the pause button changes to a "Play" button, and if this button is pressed, then we exit this while loop and continue writing. When the stream is paused, the "Stop" and "Delete" buttons still can be pressed. Once writing to the stream has finished, we redisplay the recording list and remove the extra playback buttons.
To test the recording list screen, we created several recordings that were stored on the device and also inserted a song to test the audio quality. When we first completed this part, the audio quality of the playback was extremely choppy to the point of the tempo being inaccurate as well. We noticed this was the case because when playing the test song, it almost sounded like it was slowed down. Upon examining our code, we realized that we had not set the chunk size for the playback stream, and that resulted in the poor audio quality. We set it to a value of 8192, and that improved the playback significantly, although it was not perfectly seamless. However, with this, we encountered a new problem: when playing the recordings, some of it was cut off at the end. It turns out that this was also related to the chunk size that was set. The chunk size represents the number of frames in each chunk that the audio signal is split into, so we figured out that the end of the files were cut off because there were not enough frames to make a complete chunk. So, we set the chunk size to be the minimum of 8192 and 10% of the total number of frames in the file. In the case of small files, this will ensure that the entire file will be played, and in the case of large files, the chunk size will not be set too large. Fixing these problems significantly improved the audio playback quality of our recorder.
The recorder screen is shown in Figure 10. When making a new recording, there are only two buttons, one for starting the recording and the other for returning to the recording list menu. Once the "Start" button is pressed, the audio received from the microphone starts to be recorded, and the display on the screen will show a "Stop" button, the duration of the recording and a blinking red dot. This is shown in Figure 11. Once the "Stop" button is pressed, the recording stops and then writes and saves a file to the directory containing all of the recordings. The file name is simply made to be the date and time that the recording was taken.
The PyAudio library was used again in this case to record the audio. We create an input stream of a certain polling rate (8000 samples/second), which saves the data to an array in memory in chunks (every 1024 samples). Once recording ends, the python wave library is used to save the data to a wav file. It saves it as a mono-channel audio file, with the same sample rate the file was recorded with.
Playback in the recording list happens conversely. The wave library is used to open a WAV file and load the data to a buffer. The buffer is then directed to a PyAudio output stream in chunks until there is no data left or if the user presses a button.
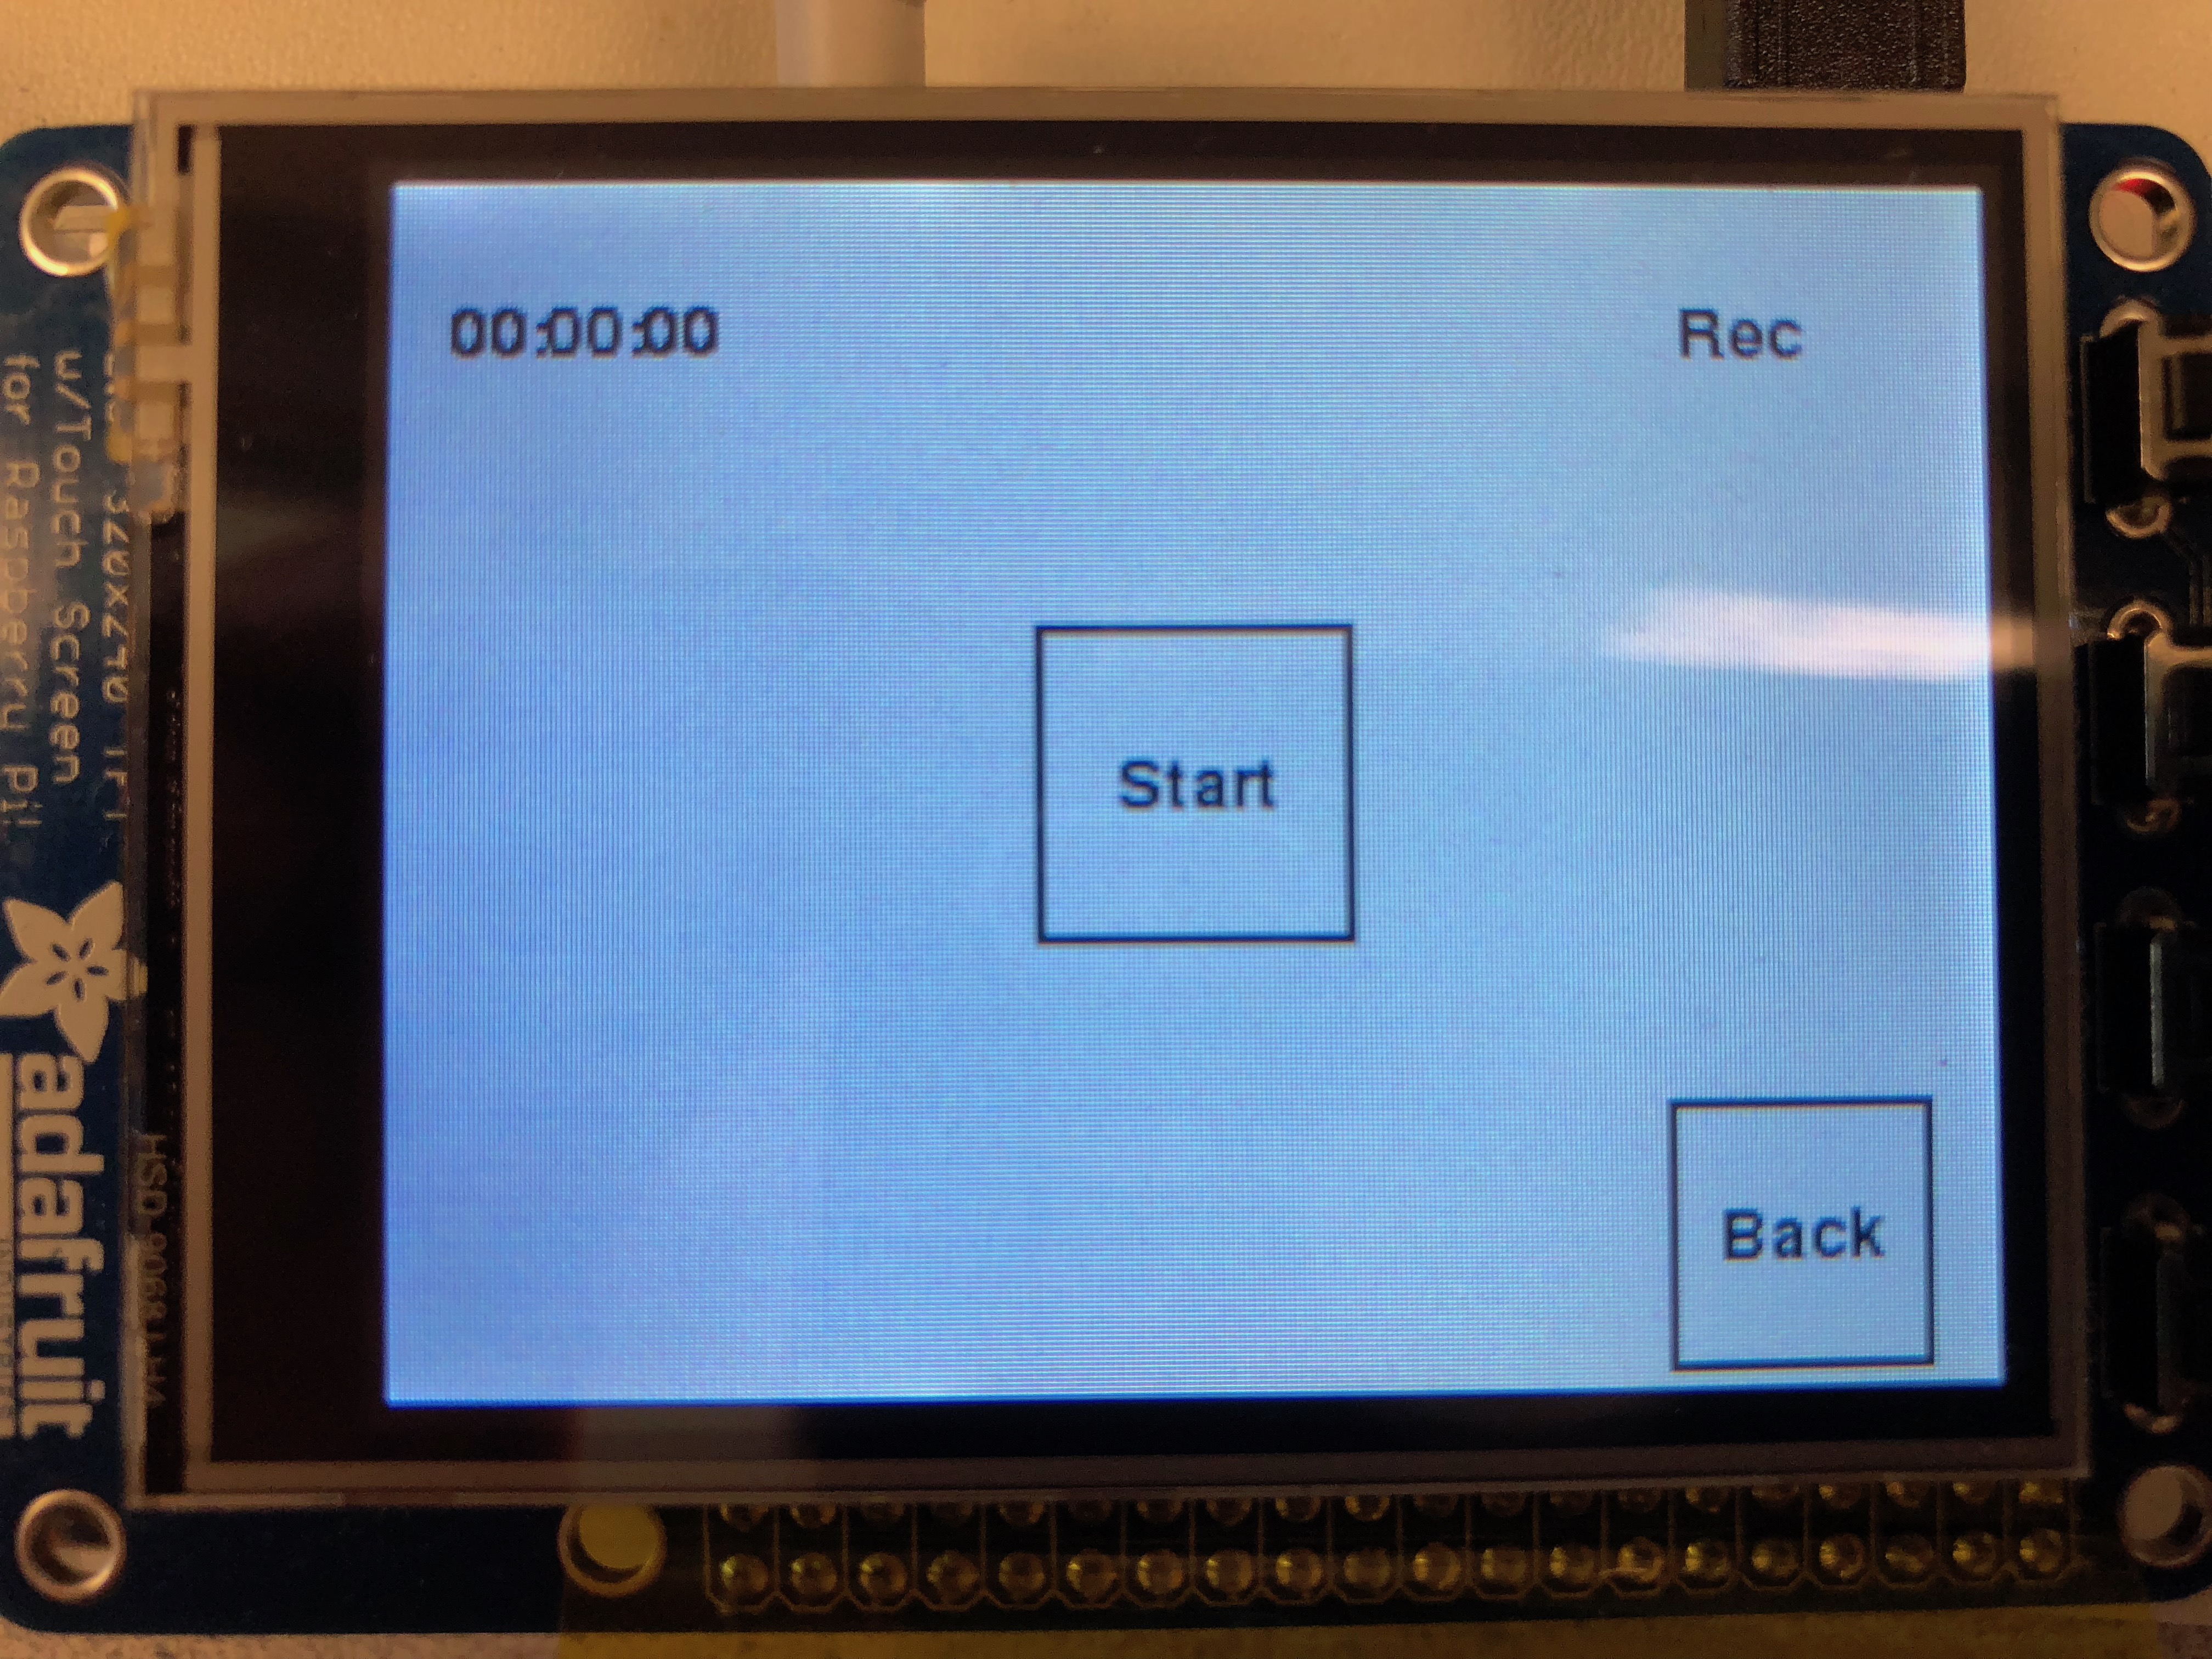
Figure 10. Recorder screen. Allows user to make a recording that is then saved to the device.
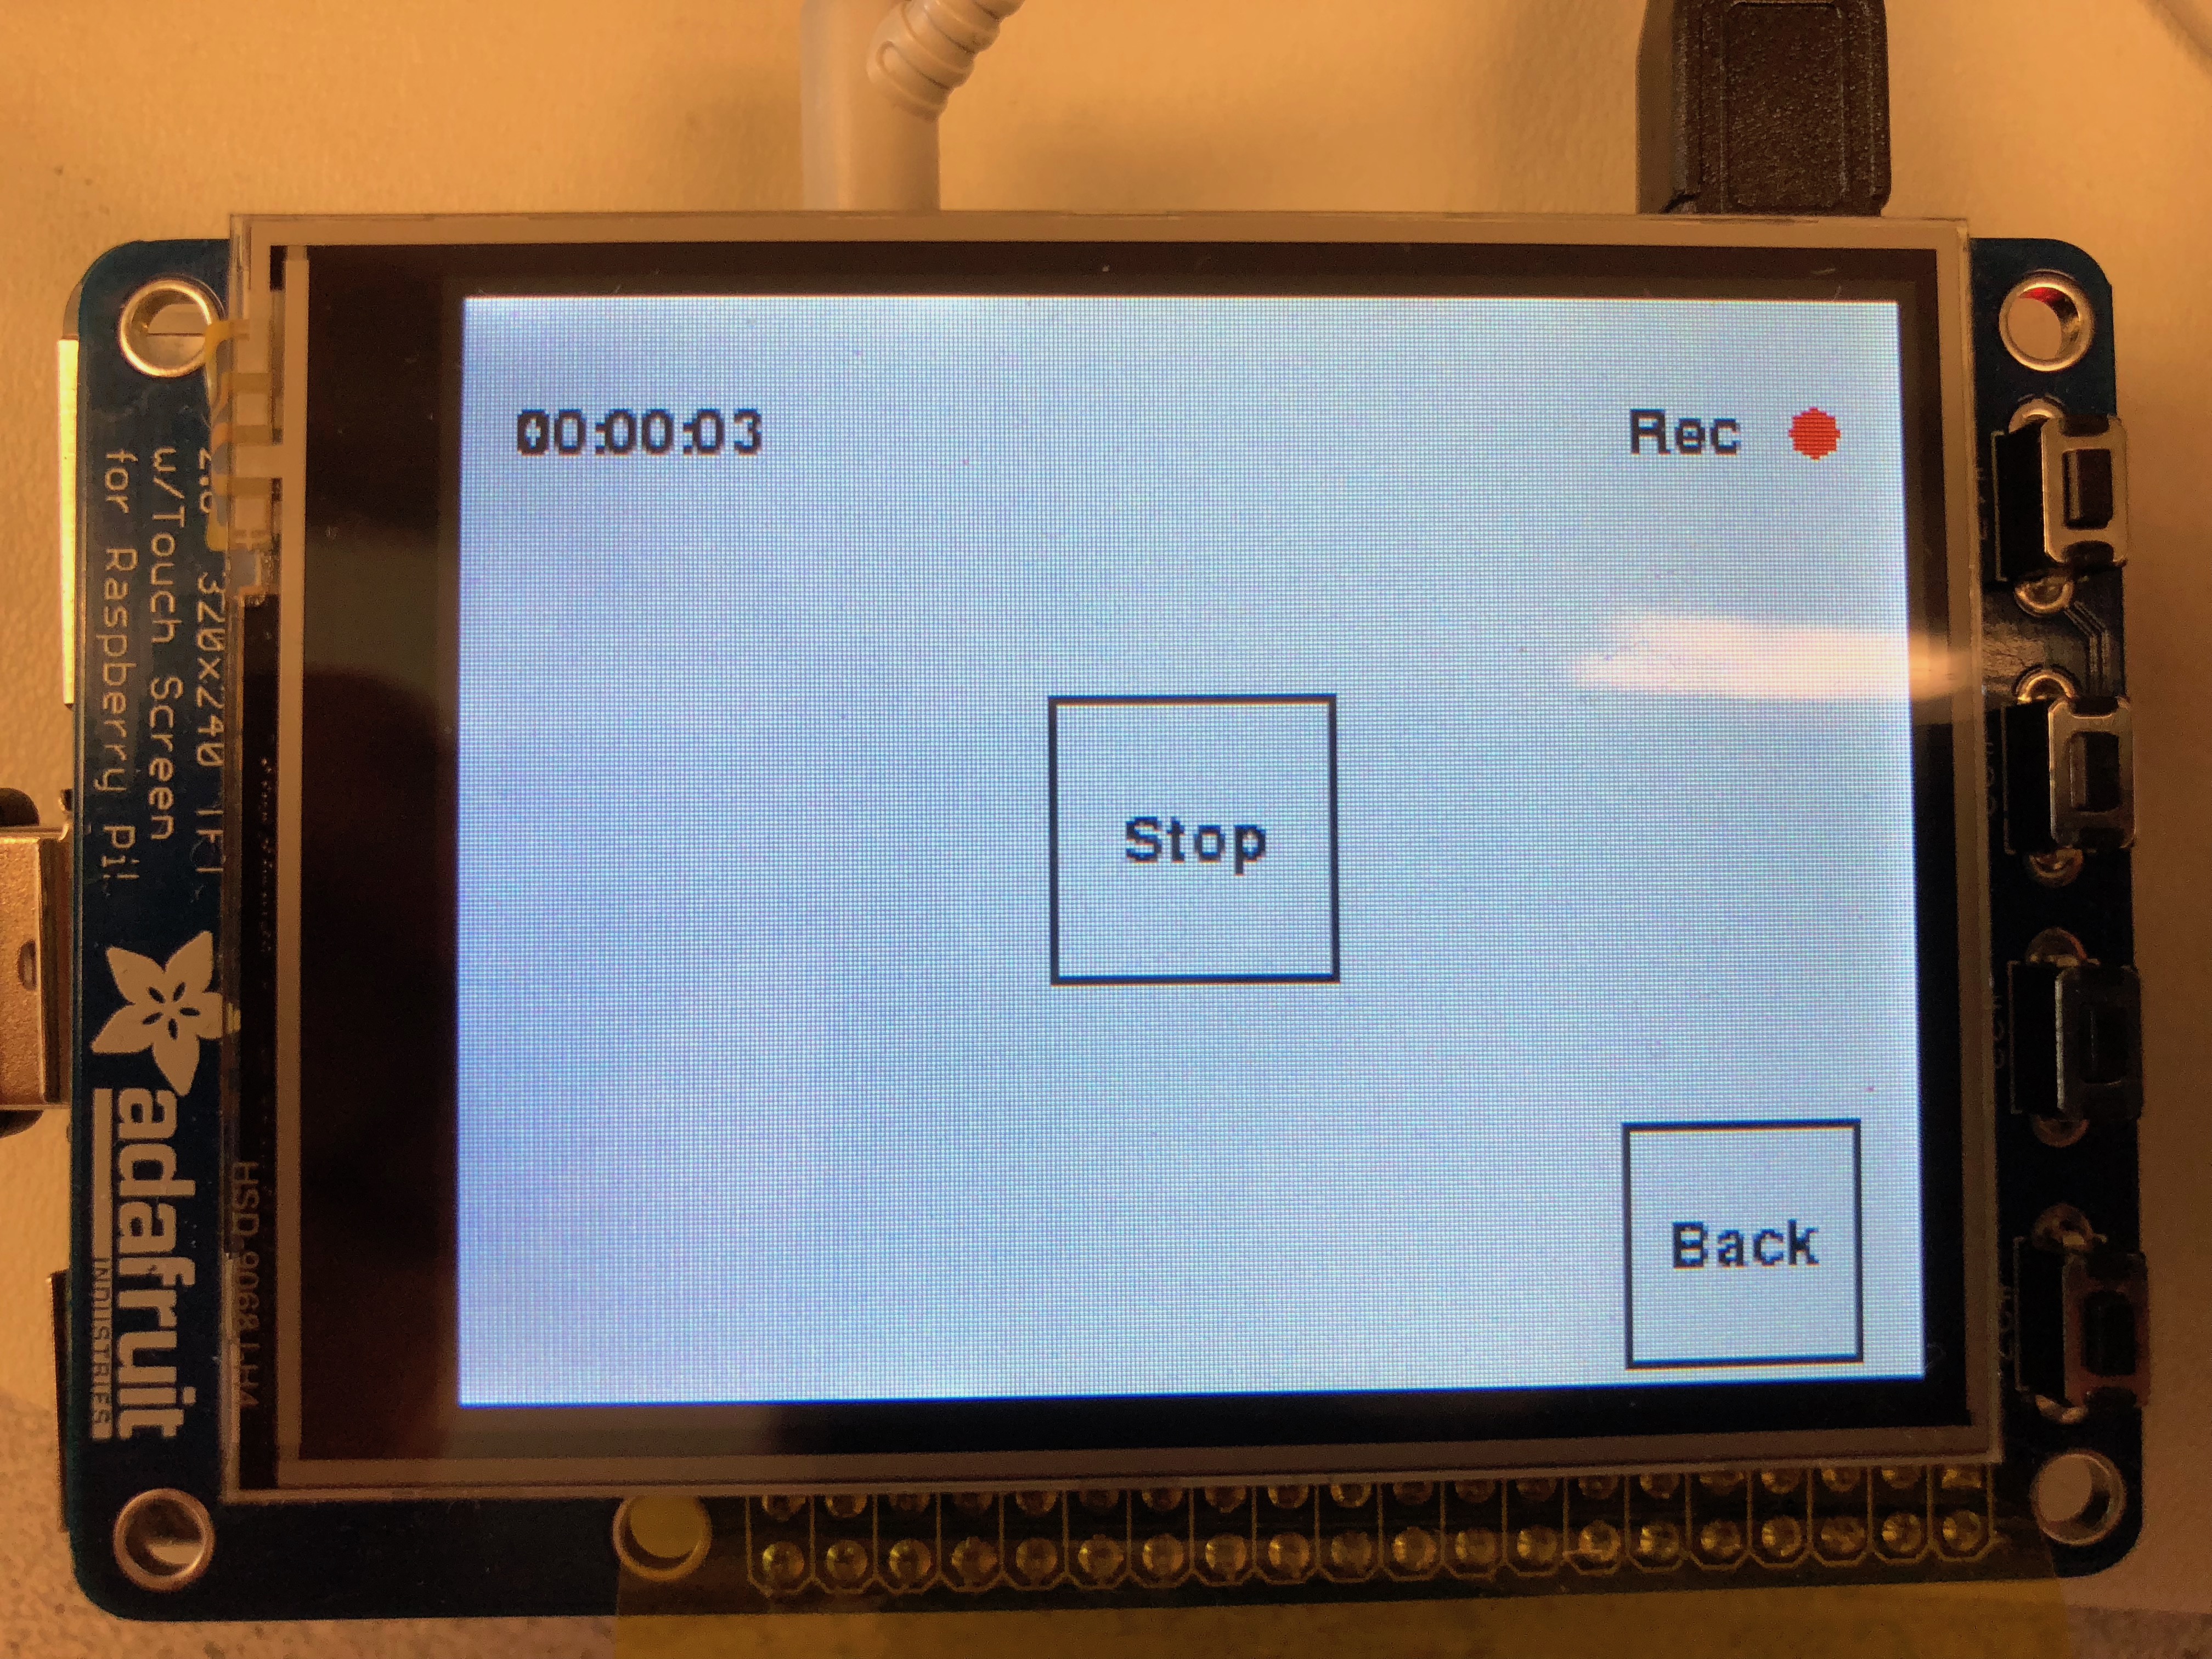
Figure 11. Recorder screen while making a new recording.
Results
We were able to successfully implement all of the originally intended functionality of the music assistant, including a metronome, tuner, and recording device. In particular the metronome and certain aspects of the tuner worked exceptionally. The metronome was able to provide an easily adjustable, accurate tempo for long periods of time. It also gave clear audio and visual feedback with the simulated pendulum, blinking dot, and crisp wooden tick sound. The tuner was able to accurately produce fixed frequency notes with no distortion or noise. It could also detect the peak frequency of a computer generated pure tone within 1 Hz.
Having high accuracy for detecting these frequencies was a great result, but this was only the case in ideal scenarios. The microphone we used had both low sensitivity and high noise. This meant that tones had to be played at high volume and very close to the microphone. This meant that it was also difficult to pinpoint the frequency of a voice note, because of the lower volume and overtones of human voice.
The recording list display also worked well. It clearly displayed all previous recordings in the file structure by navigating through files in a simple page-based format. These recordings could be easily played, paused, stopped, or deleted. The main issue with the recorder was in making the recordings: just as with the tuner, the low-quality microphone made recordings quiet and low quality. It was also difficult to keep track of recordings: they were automatically named based on system date and time, to give unique names and order the files. This worked well in general, but had issues when the RPi was disconnected from WiFi because of the lack of an onboard clock.
Conclusions
For our project, we were able to successfully make the device that we had designed and include all of the functionality that we intended for it. The metronome can provide audio and visual cues to help the user maintain a given tempo, and the tuner can tell the user how accurate their intonation is. Although the audio input for the tuner does seem to pick up a lot of background noise, the tuner has very high accuracy when determining the frequency of the input. The recorder tool allows the user to make new recordings and also listen to any of them that are stored on the device. The quality of the audio playback of the recordings is good, although it is not completely smooth. Overall, despite some features not working as perfectly as we would have liked, the result of our project is a useful and helpful tool to assist musicians in their practice.
Future Work
If we had more time to work on the project, we would focus on expanding the functionality of each music tool to improve the value of the RPi Music Assistant. For the metronome, we could add a time signature setting that dictates what type of note corresponds to a beat and how many beats per measure. We would need to have two different sound files, one to play for the first beat of each measure, and the other for the rest of the beats in the measure. This feature in particular would be useful for novice musicians who may still need to get used to performing in different time signatures. In the tuner, we currently only indicate whether the note being received is sharp or flat, but it does not give a very good sense of how out of tune it is. There exists a logarithmic unit called cent to describe the tone difference between notes on a linear scale. This unit is defined such that two adjacent notes will be 100 cents different, so this could be a useful type of measure to indicate to the user how in tune their note is. It would also be helpful to have a visual line similarly to the metronome that would shift further left or right depending on how flat or sharp the note being received is. Finally, for the recorder tool, we could have some sample background music files for the user to practice playing with. This would be very useful especially for cases like in jazz where improvisation is very prominent. With the background music, a user could freely practice whatever melodies they think of and hear how it would fit in with an actual band. We would also try to adjust the recorder so that you could play one of these background music files while making the recording. This would give the user a much better idea of how their own music fits in with others. These are just a few ideas that we could use to extend the project, and we think that there is a lot of potential for such a device to encompass even more features.
Work Distribution
Alexander
adw75@cornell.edu
Wrote audio input/output code including: metronome tick, tone generation and frequency detection, and recording and playback. Animated the metronome. In the report, described the design and implementation of these elements, in addition to setting up the website and writing the results section, parts list, references, and code appendix.
Jon
jt765@cornell.edu
Designed GUI, user interface, and feature list. Created general code architecture and created the recording list. Provided all relevant musical knowledge. In the report, wrote the introduction, parts of design and testing, conclusion, and future work.
Parts List
- Raspberry Pi $35.00
- PiTFT Screen $34.95
- USB Microphone $5.00 (provided in lab)
- External speakers or headphones - Provided in lab
Total: $64.95
References
BootstrapPyGame Documentation
PyAudio Documentation
Scott W. Harden's Project in Real Time Audio Visualization.
PyGame example for constant frequency sound generation.
Code Appendix
# controller.py
# Alexander Wood-Thomas, Jon Tsai
# adw75, jt765
# Final Project, 5/13/18
#   -manages all of the functionality of the RPi Music Assistant, using the
#    functions defined in each screen's file

import pygame # Import pygame graphics library
import os # for OS calls
from pygame.mixer import Sound, get_init, pre_init
os.putenv('SDL_VIDEODRIVER','fbcon') # Display on piTFT
os.putenv('SDL_FBDEV','/dev/fb1')
os.putenv('SDL_MOUSEDRV', 'TSLIB')
os.putenv('SDL_MOUSEDEV', '/dev/input/touchscreen')
pygame.init()
pre_init(44100, -16, 1, 1024)

import RPi.GPIO as GPIO
from pygame.locals import *
import numpy as np
from main_menu import main_init
from metronome import metro_init
from tuner import tuner_init
from recording_list import rec_list_init
from recorder import record_init

GPIO.setmode(GPIO.BCM)
GPIO.setup(27, GPIO.IN, pull_up_down=GPIO.PUD_UP)

# quit button
def GPIO27_callback(channel):
    GPIO.cleanup()
    exit()

# check button clicks
def click_in_button(button, click):
    x,y = click
    if x < button.right and x > button.left and y > button.top and y < button.bottom:
        return True
    return False

# add quit button
GPIO.add_event_detect(27, GPIO.FALLING, callback=GPIO27_callback)

# initialize and define constants
pygame.init()
pygame.mouse.set_visible(False)
size = width, height = 320, 240
black = 0, 0, 0
white = 255, 255, 255
red = 255, 0, 0
green = 0, 255, 0

screen = pygame.display.set_mode(size)

# menu navigation
while True:
    # Display main menu
    navi = main_init(screen)

    if (navi == 0):
        # Exit out of the program
        GPIO.cleanup()
        exit()
    elif (navi == 1):
        # Open metronome
        metro_init(screen)
    elif (navi == 2):
        # Open tuner
        tuner_init(screen)
    else:
        # Open recordings list
        new_rec = rec_list_init(screen)

        # Check if making new recording
        while (new_rec):
            # Open recorder
            record_init(screen)

            # Go back to recordings list
            new_rec = rec_list_init(screen)

GPIO.cleanup()
# gui_functions.py
# Alexander Wood-Thomas, Jon Tsai
# adw75, jt765
# Final Project, 5/13/18

# This file defines functions to help with displaying the GUI

import pygame
from pygame.locals import *
import numpy as np

# constant color definitions for use in GUI objects
black = 0, 0, 0
white = 255, 255, 255
red = 255, 0, 0
green = 0, 255, 0

# two standard fonts
my_font = pygame.font.SysFont("FreeMono, Monospace", 12) # large font for home screen buttons
button_font = pygame.font.Font(None, 21)


# Modular function for displaying a button. It displays a button with a single
# line of text. Arguments include center position, size, font color, and font size.
# Returns a rect object for click detection.
def show_button(screen, text, loc, size, color, font_size):

text_surface = font_size.render(text, True, black)
button_text = text_surface.get_rect(center=loc)
button_area = Rect((0,0), size)
button_area.center = loc

border_area = button_area.copy()
border_size = 4
border_area.width = border_area.width+border_size
border_area.height = border_area.height+border_size
border_area.center = button_area.center

pygame.draw.rect(screen, black, border_area)
pygame.draw.rect(screen, color, button_area)

screen.blit(text_surface, button_text)
pygame.display.flip()

return button_area

# Takes a button Rect object and a click coordinate. Returns true if the click
# is on the button.
def click_in_button(button, click):
x,y = click
if x < button.right and x > button.left and y > button.top and y < button.bottom:
  return True
return False
# main_menu.py
# Alexander Wood-Thomas, Jon Tsai
# adw75, jt765
# ECE5725 Final Project, 5/13/18
#   -contains all functionality for the main menu of the RPi Music Assistant

import pygame # Import pygame graphics library
import os # for OS calls
import RPi.GPIO as GPIO
from pygame.locals import *
import numpy as np
from gui_functions import *

title_font = pygame.font.Font(None,36)

# displays the main menu
# returns an integer depending on which menu to transition to
def main_init(screen):
    screen.fill(white)

    metro_button = show_button(screen, "Metronome", (60,120), (80,80), white, button_font)
    tuner_button = show_button(screen, "Tuner", (160, 120), (80,80), white, button_font)
    rec_button = show_button(screen, "Recorder", (260,120), (80,80), white, button_font)
    quit_button = show_button(screen, "Quit", (280,210), (50,50), red, button_font)

    text_surface = title_font.render("RPi Music Assistant", True, black)
    title_button = text_surface.get_rect(center=(160,30))
    screen.blit(text_surface,title_button)

    pygame.display.flip()       # display workspace on screen

    # Check for button presses
    while True:
        for action in pygame.event.get():
            if (action.type is MOUSEBUTTONUP):
                pos = pygame.mouse.get_pos()
                if click_in_button(quit_button, pos):
                    # Quit the program
                    print "Button pressed. Exiting the program"
                    #GPIO.cleanup()
                    return 0
                if click_in_button(metro_button, pos):
                    # Load the metronome
                    #metro_init(screen)
                    print "Metronome"
                    return 1
                if click_in_button(tuner_button, pos):
                    # Load the tuner
                    #tuner_init(screen)
                    print "Tuner"
                    return 2
                if click_in_button(rec_button, pos):
                    # Load the recorder
                    #rec_list_init(screen)
                    print "Recorder"
                    return 3
# metronome.py
# Alexander Wood-Thomas, Jon Tsai
# adw75, jt765
# ECE5725 Final Project, 5/13/18
#   -displays the metronome tool for RPi Music Assistant. Provides visual
#    and audio output for metronome functionality, with buttons to change
#    beats per minute (bpm) rate

import pygame # Import pygame graphics library
import RPi.GPIO as GPIO
from pygame.locals import *
import numpy as np
import time
from gui_functions import *
import pyaudio
import math
from itertools import izip
import subprocess

bpm = 100 # initial beats per minute

# display the initial screen
def metro_init(screen):
    global bpm

    angle = 0 # angle for bouncing line

    screen.fill(white)

    # Render and display all visual elements
    minus_button = show_button(screen, "-", (100,210), (30,30), white, button_font)

    text_surface = button_font.render("BPM", True, black)
    change_BPM = text_surface.get_rect(center=(160,210))
    screen.blit(text_surface, change_BPM)

    plus_button = show_button(screen, "+", (220,210), (30,30), white, button_font)

    back_button = show_button(screen, "Back", (280,210), (50,50), white, button_font)

    text_surface = button_font.render(str(bpm) + " BPM", True, black)
    bpm_button = text_surface.get_rect(center=(280,30))
    screen.blit(text_surface, bpm_button)

    pygame.display.flip()       # display workspace on screen

    start = time.time()
    tick_start = time.time()

    ticking = False

    cmd = 'aplay -q /home/pi/final_project/metronome.wav &'

    # Check for button presses
    while True:
        time.sleep(0.016)
        for action in pygame.event.get():
            if (action.type is MOUSEBUTTONUP):
                pos = pygame.mouse.get_pos()
                if click_in_button(back_button, pos):
                    # Return to main menu
                    return True
                if click_in_button(minus_button, pos):
                    # Decrease the bpm
                    bpm = bpm - 5
                    update_bpm(screen, bpm)
                if click_in_button(plus_button, pos):
                    # Increase the bpm
                    bpm = bpm + 5
                    update_bpm(screen, bpm)

        # display blinking dot and play a beat at the bpm rate
        current_time = time.time()
        frequency = bpm/60.0/2
        tick_freq = bpm/60.0

        period_time = (current_time - start) % (1.0/tick_freq)
        if (period_time < 0.1) and not ticking:
            pygame.draw.circle(screen, red, (160,30), 10)
            subprocess.call(cmd, shell=True)
            ticking = True

        # erase the dot after 0.1 sec
        if (period_time >= 0.1) and ticking:
            pygame.draw.circle(screen, white, (160,30), 10)
            ticking = False

        t = current_time - start - 1/4.0/frequency
        angle = math.pi/4* (1-4*abs(round(t*frequency)-t*frequency))

        pygame.draw.rect(screen, white, (60, 80, 200, 100))
        start_pos = np.array((160, 180))
        L = 100
        end_pos = start_pos + L*np.array((math.sin(angle), -math.cos(angle)))
        pygame.draw.line(screen, black, start_pos, end_pos, 3)
        pygame.display.flip()

    return True

# updates the display to show the new bpm rate
def update_bpm(screen, bpm):
    bpm_rect = pygame.Rect(0,0,60,20)
    bpm_rect.center = (280,30)
    pygame.draw.rect(screen,white,bpm_rect)

    text_surface = button_font.render(str(bpm) + " BPM", True, black)
    bpm_button = text_surface.get_rect(center=(280,30))
    screen.blit(text_surface, bpm_button)

    pygame.display.flip()
# recorder.py
# Alexander Wood-Thomas, Jon Tsai
# adw75, jt765
# ECE5725 Final Project, 5/13/18
#   -Recorder tool for RPi Music Assistant. Can record the sounds received
#    by the micrphone and save as a file

import pygame # Import pygame graphics library
import os # for OS calls
from pygame.locals import *
import numpy as np
from gui_functions import *
import pyaudio
import wave
import datetime
import time

# display the recorder screen
def record_init(screen):
    screen.fill(white)

    # Render and display all visual elements
    start_button = show_button(screen, "Start", (160,120), (60,60), white, button_font)
    back_button = show_button(screen, "Back", (280,210), (50,50), white, button_font)


    text_surface = button_font.render("Rec", True, black)
    rec_button = text_surface.get_rect(center=(270,30))
    screen.blit(text_surface, rec_button)

    text_surface = button_font.render("00:00:00", True, black)
    time_button = text_surface.get_rect(center=(40,30))
    screen.blit(text_surface, time_button)

    pygame.display.flip()       # display workspace on screen

    # Check for button presses
    while True:
        for action in pygame.event.get():
            if (action.type is MOUSEBUTTONUP):
                pos = pygame.mouse.get_pos()
                if click_in_button(back_button, pos):
                    # Return to recordings list
                    print "Back"
                    return True
                if click_in_button(start_button, pos):
                    # Start the recording
                    print "Start"
                    start_recording(screen)


    #GPIO.cleanup()

# begin recording audio and save to file
def start_recording(screen):
    # change the display
    stop_button = show_button(screen, "Stop", (160,120), (60,60), white, button_font)
    text_surface = button_font.render("Rec", True, black)
    rec_button = text_surface.get_rect(center=(270,30))
    screen.blit(text_surface, rec_button)
    pygame.display.flip()

    audio = pyaudio.PyAudio()
    RATE = 8000
    CHUNK = 1024

    stream = audio.open(format=pyaudio.paInt16,channels=1,rate=RATE,input=True,frames_per_buffer=CHUNK)
    frames = []

    recording = True
    start = time.time()

    # record audio
    while True and recording:
        data = stream.read(CHUNK)
        frames.append(data)

        current = time.time()

        # update visual elements
        if (current - start) % 1 < 0.5:
            pygame.draw.circle(screen,red, (300, 30), 6)
            pygame.draw.rect(screen,white,(20,10,80,30))
            rec_time = rec_duration(int(current - start))
            text_surface = button_font.render(rec_time, True, black)
            time_button = text_surface.get_rect(center=(40,30))
            screen.blit(text_surface, time_button)
        else:
            pygame.draw.circle(screen,white, (300, 30), 6)

        pygame.display.flip()

        # check for stop button press
        for action in pygame.event.get():
            if (action.type is MOUSEBUTTONUP):
                pos = pygame.mouse.get_pos()
                if click_in_button(stop_button, pos):
                    recording = False

    print("Finished Recording.")

    # stop and write to file
    stream.stop_stream()
    stream.close()
    audio.terminate()

    now = datetime.datetime.now()
    filename = now.strftime("/home/pi/final_project/recordings/%Y-%m-%d %H-%M-%S.wav")

    waveFile = wave.open(filename, 'wb')
    waveFile.setnchannels(1)
    waveFile.setsampwidth(audio.get_sample_size(pyaudio.paInt16))
    waveFile.setframerate(RATE)
    waveFile.writeframes(b''.join(frames))
    waveFile.close()

    # reset screen
    start_button = show_button(screen, "Start", (160,120), (60,60), white, button_font)
    pygame.draw.circle(screen,white, (300, 30), 6)
    pygame.draw.rect(screen,white,(20,10,80,30))
    text_surface = button_font.render("00:00:00", True, black)
    time_button = text_surface.get_rect(center=(40,30))
    screen.blit(text_surface, time_button)
    pygame.display.flip()

# determine the hours, minutes, and seconds of the given length of time
def rec_duration(time_len):
    hrs = time_len / 3600
    mins = (time_len % 3600) / 60
    sec = time_len % 60

    duration = '%02.0f:%02.0f:%02.0f' % (hrs, mins, sec)
    return duration
# recording_list.py
# Alexander Wood-Thomas, Jon Tsai
# adw75, jt765
# ECE5725 Final Project, 5/13/18
#   -Displays recordings stored on device. Can play the recordings,
#    and can also make new recordings

import pygame # Import pygame graphics library
import RPi.GPIO as GPIO
import os
from pygame.locals import *
import numpy as np
from recorder import record_init
from gui_functions import *
import subprocess
import wave
import pyaudio
import time
import math

page = 0 # page of recordings to display
rec_list = [] # array for files
rec_buttons = [] # array for files' display buttons
last_page = 0 # last page of files

# display initial screen
def rec_list_init(screen):
    screen.fill(white)
    global page
    global rec_list
    global rec_buttons
    global last_page

    # Render and display all visual elements
    new_button = show_button(screen, "Record", (45,210), (70, 50), white, button_font)

    prev_button = show_button(screen, "Prev Page", (125,210), (75, 50), white, button_font)


    next_button = show_button(screen, "Next Page", (208,210), (75, 50), white, button_font)


    back_button = show_button(screen, "Back", (280,210), (50, 50), white, button_font)

    text_surface = button_font.render("Recordings", True, black)
    rec_button = text_surface.get_rect(center=(60,30))
    screen.blit(text_surface, rec_button)

    rec_list = os.listdir("/home/pi/final_project/recordings")
    rec_buttons = show_recordings(screen,page)
    last_page = int(math.ceil(len(rec_list) / 3.0) - 1)

    pygame.display.flip()       # display workspace on screen

    # Check for button presses
    while True:
        for action in pygame.event.get():
            if (action.type is MOUSEBUTTONUP):
                pos = pygame.mouse.get_pos()
                if click_in_button(back_button, pos):
                    # Return to main menu
                    print "Back"
                    return False
                if click_in_button(new_button, pos):
                    # Go to recording screen
                    print "Make new recording"
                    return True
                if click_in_button(prev_button, pos):
                    # Go to previous page of recordings
                    print "Prev Page"
                    page = max(0,page - 1)
                    rec_buttons = show_recordings(screen,page)
                if click_in_button(next_button, pos):
                    # Go to next page of recordings
                    print "Next page"
                    page = min(last_page,page + 1)
                    rec_buttons = show_recordings(screen,page)
                for i in range(len(rec_buttons)):
                    if rec_buttons[i] and click_in_button(rec_buttons[i], pos):
                        filename = '/home/pi/final_project/recordings/'+str(rec_list[page*3+i])
                        play_file(screen,filename, page)

# display the recordings onto the screen
def show_recordings(screen,page):
    pygame.draw.rect(screen,white,pygame.Rect(0,40,320,130))

    global rec_list
    rec_list = os.listdir("/home/pi/final_project/recordings")
    num_rec = len(rec_list)

    x_pos = 20
    y_pos = 60
    recording_buttons = []

    for i in range(page*3, page*3+3):
        if i < num_rec:
            text_surface = button_font.render(rec_list[i], True, black)
            txt_button = text_surface.get_rect(topleft=(x_pos,y_pos+40*(i%3)))
            txt_button.height = 40
            screen.blit(text_surface, txt_button)
            recording_buttons.append(txt_button)
        else:
            recording_buttons.append(False)

    global last_page
    last_page = int(math.ceil(len(rec_list) / 3.0) - 1)

    pygame.display.flip()
    return recording_buttons

# play the selected file
def play_file(screen, filename, page):
    # open the file for reading
    wf = wave.open(filename, 'rb')
    chunk = min(wf.getnframes() / 10,8192)

    # create an audio object
    p = pyaudio.PyAudio()

    # open stream based on the wave object which has been input.
    stream = p.open(format =
		    p.get_format_from_width(wf.getsampwidth()),
		    channels = wf.getnchannels(),
		    rate = wf.getframerate(),
                    frames_per_buffer = chunk,
		    output = True)

    # read data (based on the chunk size)
    data = wf.readframes(chunk)

    # display the play control buttons
    stop_button = show_button(screen, "Stop", (280,90), (50, 50), white, button_font)
    pause_button = show_button(screen, "Pause", (280,150), (50,50), white, button_font)
    delete_button = show_button(screen, "Delete", (280, 30), (50,50), white, button_font)

    # play stream (looping from beginning of file to the end)
    playing = True
    delete = False
    while data != '' and playing:
	# writing to the stream is what *actually* plays the sound.
	stream.write(data)
	data = wf.readframes(chunk)

        # check for the playing buttons being pressed
        for action in pygame.event.get():
            if (action.type is MOUSEBUTTONUP):
                pos = pygame.mouse.get_pos()
                if click_in_button(stop_button, pos):
                    # Return to main menu
                    playing = False
                if click_in_button(delete_button, pos):
                    playing = False
                    delete = True
                if click_in_button(pause_button, pos):
                    paused = True
                    time.sleep(0.5)
                    pause_button = show_button(screen, "Play", (280,150), (50,50), white, button_font)
                    while paused:
                        time.sleep(0.1)
                        for act in pygame.event.get():
                            if (act.type is MOUSEBUTTONUP):
                                position = pygame.mouse.get_pos()
                                if click_in_button(pause_button, position):
                                    paused = False
                                    pause_button = show_button(screen, "Pause", (280,150), (50,50), white, button_font)
                                if click_in_button(stop_button,position):
                                    paused = False
                                    playing = False
                                if click_in_button(delete_button,position):
                                    paused = False
                                    playing = False
                                    delete = True

    # cleanup stuff.
    stream.close()
    p.terminate()
    pygame.draw.rect(screen, white, pygame.Rect(245,0,80,177))

    global rec_buttons

    if delete:
        cmd = 'rm "' + filename + '"'
        print(cmd)
        subprocess.call(cmd,shell=True)
        rec_buttons = show_recordings(screen,page)

    pygame.display.flip()
# tuner.py
# Alexander Wood-Thomas, Jon Tsai
# adw75, jt765
# ECE5725 Final Project, 5/13/18
#   -Tuner tool for RPi Music Assistant. Shows how in tune the note being
#    received on the micrphone is, and can play a note for reference
# frequency detection code is courtesy of Scott Harden's open source project in
# real time audio visualization in Python: https://www.swharden.com/wp/2016-07-19-realtime-audio-visualization-in-python/

import pygame # Import pygame graphics library
import RPi.GPIO as GPIO
from pygame.locals import *
import numpy as np
import time
from gui_functions import *
import pyaudio
import math
from itertools import izip
from tone_player import Note

frequency = 440 # initial note frequency
note = "A" # initial note
note_ind = 39 # initial note index
note_freqs = [4186.01, 3951.07, 3729.31, 3520, 3322.44,
                3135.96, 2959.96, 2793.83, 2637.02, 2489.02,
                2349.32, 2217.46, 2093, 1975.53, 1864.66,
                1760, 1661.22, 1567.98, 1479.98, 1396.91, 1318.51,
                1244.51, 1174.66, 1108.73, 1046.5, 987.77, 932.33,
                880, 830.61, 783.99, 739.99, 698.46, 659.26, 622.25,
                587.33, 554.37, 523.25, 493.88, 466.16, 440, 415.31,
                392, 370, 349.23, 329.63, 311.13, 293.67, 277.18,
                261.63, 246.94, 233.08, 220, 207.65, 196, 185,
                174.61, 164.81, 155.56, 146.83, 138.59, 130.81,
                123.47, 116.54, 110, 103.83, 98, 92.5, 87.31,
                82.41, 77.78, 73.42, 69.3, 65.41, 61.74, 58.27,
                55, 51.91, 49, 46.25, 43.65, 41.2, 38.89, 36.71,
                34.65, 32.7, 30.87, 29.14, 27.5]
note_thrsh = [4068.54, 3840.19, 3624.66, 3421.22, 3229.2,
                3047.96, 2876.9, 2715.43, 2563.02, 2419.17,
                2283.39, 2155.23, 2034.27, 1920.1, 1812.33,
                1710.61, 1614.6, 1523.98, 1438.45, 1357.71,
                1281.51, 1209.59, 1141.7, 1077.62, 1017.13,
                960.05, 906.16, 855.3, 807.3, 761.99, 719.22,
                678.86, 640.75, 604.79, 570.85, 538.81,
                508.57, 480.02, 453.08, 427.65, 403.65,
                380.99, 359.61, 339.43, 320.38, 302.4,
                285.42, 269.4, 254.28, 240.01, 226.54,
                213.83, 201.83, 190.5, 179.81, 169.71,
                160.19, 151.2, 142.71, 134.7, 127.14,
                120.01, 113.27, 106.91, 100.91, 95.25,
                89.9, 84.86, 80.09, 75.6, 71.36, 67.35,
                63.57, 60, 56.64, 53.46, 50.46, 47.62,
                44.95, 42.43, 40.05, 37.8, 35.68, 33.68,
                31.79, 30, 28.32, 0]
notes_list = ["C", "B", "Bb", "A", "Ab", "G", "F#", "F", "E", "Eb", "D", "C#"]

# displays and sets up the tuner menu
def tuner_init(screen):
    global frequency
    global note
    global note_ind
    screen.fill(white)

    # Render and display all visual elements
    listen_button = show_button(screen, "Start Listening", (160, 110), (120,40), white, button_font)
    play_button = show_button(screen, "Play Note", (160,160), (80,40), white, button_font)
    minus_button = show_button(screen, "-", (100,210), (30,30), white, button_font)

    text_surface = button_font.render("Frequency", True, black)
    freq_button = text_surface.get_rect(center=(160,210))
    screen.blit(text_surface, freq_button)

    plus_button = show_button(screen, "+", (220,210), (30,30), white, button_font)
    back_button = show_button(screen, "Back", (280,210), (50,50), white, button_font)

    text_surface = button_font.render(note, True, black)
    note_button = text_surface.get_rect(center=(120,30))
    screen.blit(text_surface, note_button)

    text_surface = button_font.render(str(frequency) + " Hz", True, black)
    hertz_button = text_surface.get_rect(center=(200,30))
    screen.blit(text_surface, hertz_button)

    pygame.display.flip()       # display workspace on screen

    # Check for button presses
    while True:
        for action in pygame.event.get():
            if (action.type is MOUSEBUTTONUP):
                pos = pygame.mouse.get_pos()
                if click_in_button(back_button, pos):
                    # Return to main menu
                    print "Back"
                    return True
                if click_in_button(listen_button, pos):
                    print "Listening"
                    start_listening(screen)
                    update_freq(screen,frequency)
                if click_in_button(play_button, pos):
                    # Play the specified note
                    print "Play note"
                    play_note(screen, frequency)
                if click_in_button(minus_button, pos):
                    # Decrease the frequency of the note to play
                    print "-"
                    note_ind = min(note_ind+1,len(note_thrsh)-1)
                    frequency = note_freqs[note_ind]
                    update_freq(screen, frequency)
                if click_in_button(plus_button, pos):
                    # Increase the frequency of the note to play
                    print "+"
                    note_ind = max(note_ind-1,0)
                    frequency = note_freqs[note_ind]
                    update_freq(screen, frequency)

# update the frequency display
def update_freq(screen, freq):
    freq_rect = pygame.Rect(200,30,80,20)
    freq_rect.center = (200,30)
    pygame.draw.rect(screen,white,freq_rect)

    text_surface = button_font.render("%4.0f Hz" % freq, True, black)
    freq_button = text_surface.get_rect(center=(200,30))
    screen.blit(text_surface, freq_button)

    index = get_note(freq)
    note = notes_list[index % len(notes_list)]
    note_rect = pygame.Rect(0,0,40,20)
    note_rect.center = (120,30)
    pygame.draw.rect(screen,white,note_rect)

    note_surface = button_font.render(note, True, black)
    note_button = note_surface.get_rect(center=(120,30))
    screen.blit(note_surface, note_button)

    freq_true = note_freqs[index]
    margin = 0.1
    tune_symbol = ' '
    if (freq - freq_true > 0):
        freq_step = 10
        try:
            freq_step = note_freqs[index-1]-note_freqs[index]
        except:
            freq_step = 200.0
        if (freq-freq_true)/freq_step > margin:
            tune_symbol = '#'
    elif (freq - freq_true < 0):
        freq_step = 10
        try:
            freq_step = note_freqs[index]-note_freqs[index+1]
        except:
            freq_step = 1.6
        if (freq-freq_true)/freq_step < -margin:
            tune_symbol = 'b'

    tune_rect = pygame.Rect(0,0,40,20)
    tune_rect.center = (120, 50)
    pygame.draw.rect(screen,white,tune_rect)
    sharp_surface = button_font.render(tune_symbol, True, black)
    sharp_text = sharp_surface.get_rect(center=(120,50))
    screen.blit(sharp_surface, sharp_text)

    pygame.display.flip()

# listen for the note to be tuned
# frequency detection courtesy of Scott Harden's project in real time audio visualization
# in Python https://www.swharden.com/wp/2016-07-19-realtime-audio-visualization-in-python/
def start_listening(screen):

    listen_button = show_button(screen, "Stop Listening", (160, 110), (120,40), white, button_font)

    CHUNK = 4096 # number of data points to read at a time
    RATE = 8000 # time resolution of the recording device (Hz)

    p=pyaudio.PyAudio() # start the PyAudio class
    stream=p.open(format=pyaudio.paInt16,channels=1,rate=RATE,input=True,
                  frames_per_buffer=CHUNK) #uses default input device

    listening = True
    # create a numpy array holding a single read of audio data
    while listening:
        for action in pygame.event.get():
            if (action.type is MOUSEBUTTONUP):
                pos = pygame.mouse.get_pos()
                if click_in_button(listen_button,pos):
                    listening = False

        data = np.fromstring(stream.read(CHUNK),dtype=np.int16)
        data = data * np.hanning(len(data)) # smooth the FFT by windowing data
        fft = abs(np.fft.fft(data).real)
        fft = fft[:int(len(fft)/2)] # keep only first half
        freq = np.fft.fftfreq(CHUNK,1.0/RATE)
        freq = freq[:int(len(freq)/2)] # keep only first half
        freqPeak = freq[np.where(fft==np.max(fft))[0][0]]+1
        print("peak frequency: %d Hz"%freqPeak)
        update_freq(screen,freqPeak)

    listen_button = show_button(screen, "Start Listening", (160, 110), (120,40), white, button_font)
    # close the stream gracefully
    stream.stop_stream()
    stream.close()
    p.terminate()

# plays a note at the frequency specified
def play_note(screen, freq):

    play_button = show_button(screen, "Stop Note", (160,160), (80,40), white, button_font)
    playing = True
    tone = Note(freq)
    tone.play(-1)
    while playing:
        time.sleep(0.2)
        for action in pygame.event.get():
            if (action.type is MOUSEBUTTONUP):
                pos = pygame.mouse.get_pos()
                if click_in_button(play_button,pos):
                    playing = False
    tone.stop()
    play_button = show_button(screen, "Start Note", (160,160), (80,40), white, button_font)

# determine what note is being received
# the frequency must be greater than 0
def get_note(freq):
    for i in range(len(note_thrsh)):
        if freq > note_thrsh[i]:
            return i
    return "Not valid"
# tone_player.py
# Alexander Wood-Thomas, Jon Tsai
# adw75, jt765
# ECE5725 Final Project, 5/13/18
#
# Note class courtesy of hortonew: https://pythonexample.com/code/pygame-play-sound-sample/
#
# Run with the following command:
#   python pygame-play-tone.py

from array import array
from time import sleep

import pygame
from pygame.mixer import Sound, get_init, pre_init

class Note(Sound):
    def __init__(self, frequency, volume=.1):
        self.frequency = frequency
        Sound.__init__(self, buffer=self.build_samples())
        self.set_volume(volume)

    def build_samples(self):
        period = int(round(get_init()[0] / self.frequency))
        samples = array("h", [0] * period)
        amplitude = 2 ** (abs(get_init()[1]) - 1) - 1
        for time in xrange(period):
            if time < period / 2:
                samples[time] = amplitude
            else:
                samples[time] = -amplitude
        return samples