Pangorometer
PANGOROMETER A PANGOLIN ACCELEROMETER
WILDLIFE CONSERVATION TECHNOLOGY FOR A SCALY MAMMAL, BEHAVIOR AND MOVEMENTS WITH ACCELEROMETER DATA
Priya S Balasubramanian, psb79@cornell.edu
Objective - Creating a wildlife tag for the pangolin, an endangered scaly mammal. This project describes an initial prototype for a novel method of data collection using an accelerometer to observe movements, behaviors, and activities of the pangolin. The corresponding activity level data can be used in a myriad of studies. Therefore this project is named the Pangorometer, or a Pangolin Accelerometer, with the hope that this will not only record activity levels of the pangolin using acceleration data, but also accelerate the conservation of the species. Will the Pangorometer be the next potential prospect in the race to save pangolins from extinction?

A Pangolin?
apangolin
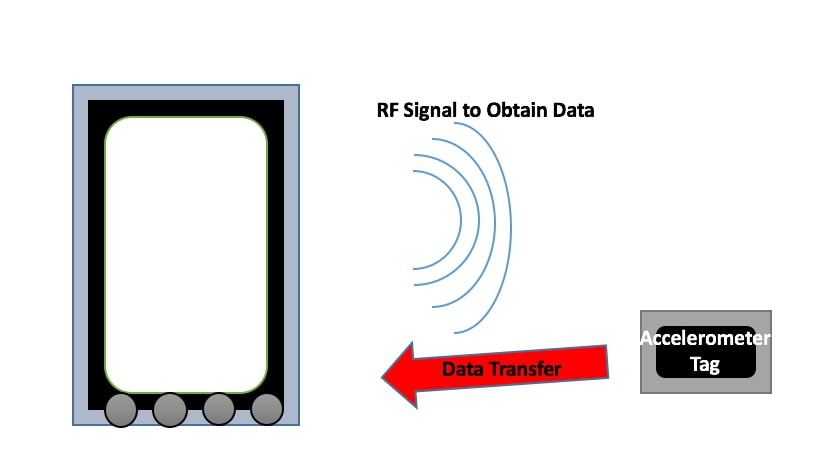
A pangolin is an endangered species in need various protections due to poaching and trafficking of this mammal for food and other goods. This project is an initial prototype for a pangolin tag that uses an accelerometer to track the movements of the pangolin. While most of these wildlife tracking tags make use of GPS or RF for location information, this tag will demonstrate a new method for observing the behaviors of the pangolin, using an Arduino Uno to attach to an accelerometer to record activity levels, and subsequently recording these outputs both on tag using a memory card and then on the raspberry pi via serial data tranfer with bluetooth communication and data organization using an sqlite3 database. The battery life is conserved by using a light sensor such as a photoresistor to switch on or off the bluetooth connection between both the Raspberry Pi and Arduino tag. Eventually, this prototype will be developed into a smaller scale tag, with an accelerometer, on tag memory, and RF communications with a base station to store data, and a variety of other features.
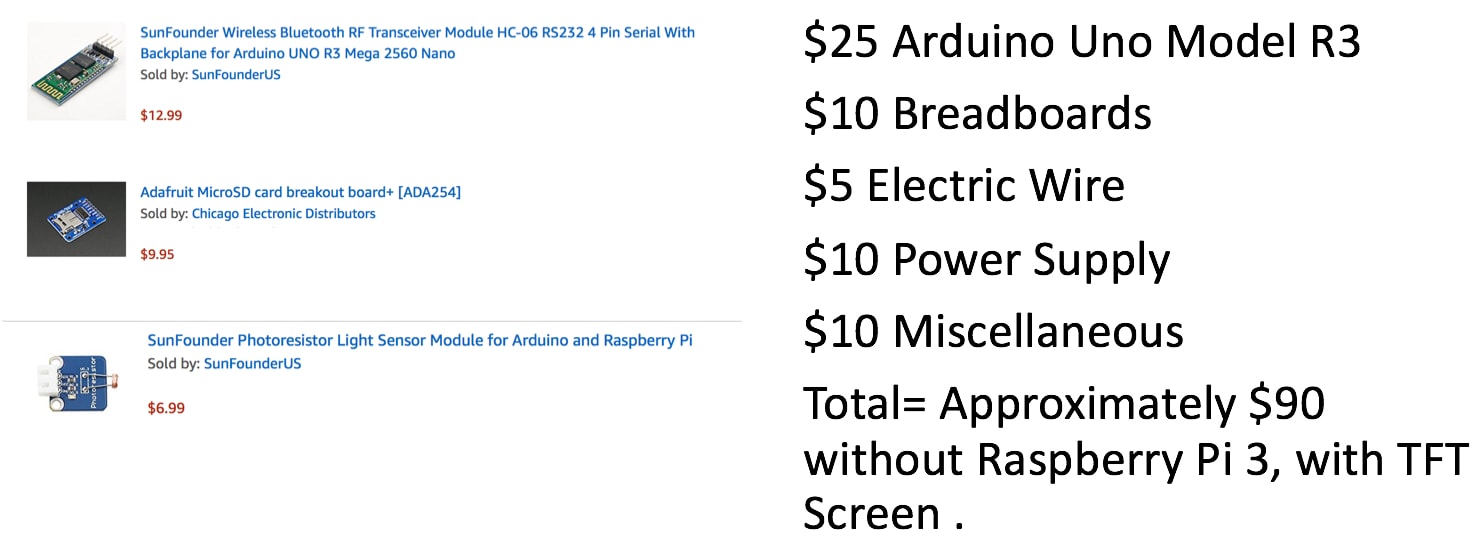
Parts, Components, and Costs
How To?
howto
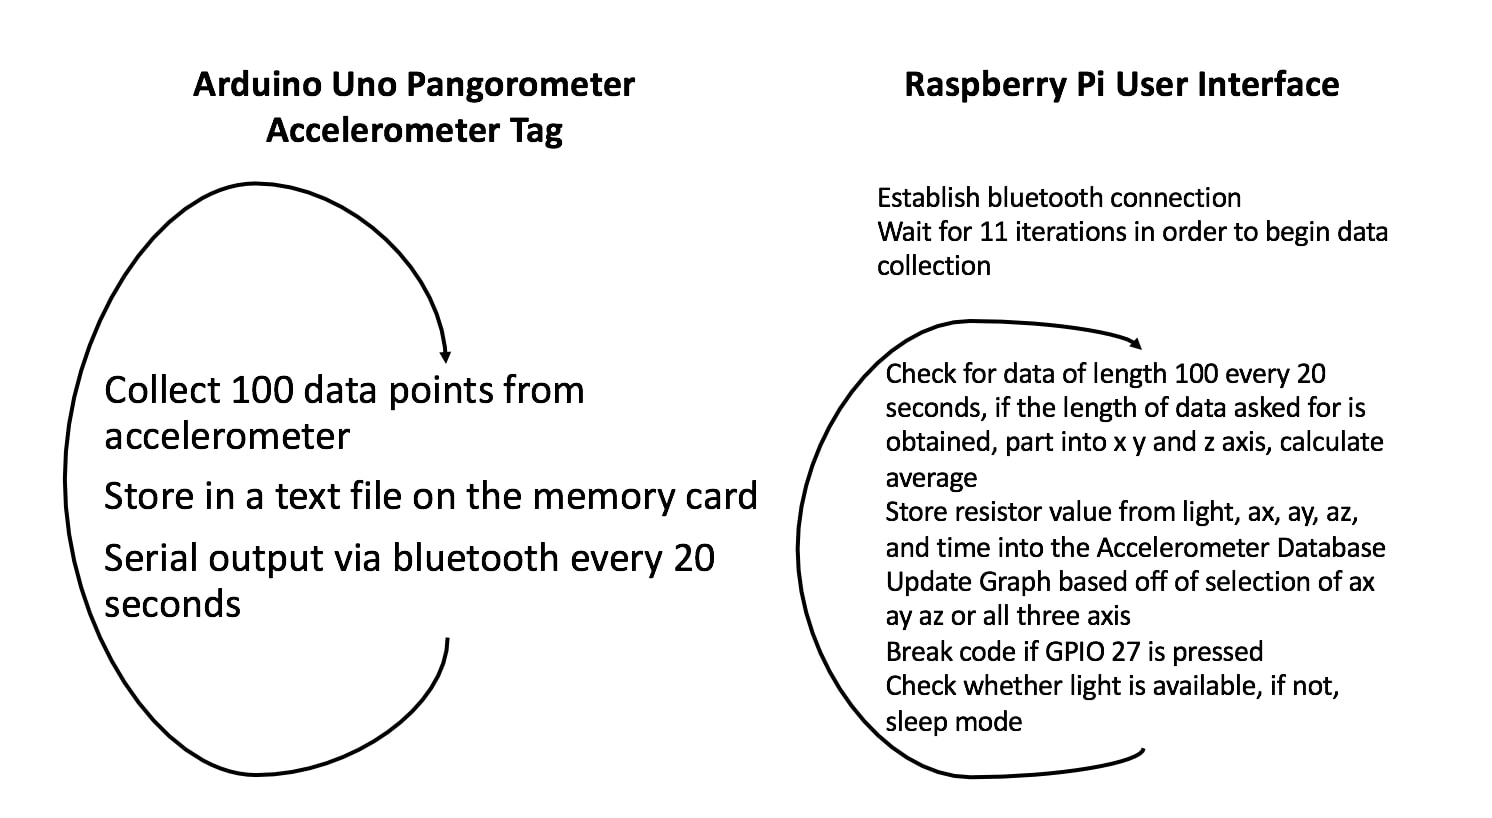
This project has two components, one being the Arduino Uno tag and the other being the Raspberry Pi base station. The accelerometer, memory card, and bluetooth module are attached to the Arduino Uno, so the testing component involved establishing each of these outputs in this sequence to make sure that the proper data collection is established. To begin with, the accelerometer was tested for functionality by reading the outputs through the Arduino Uno serial output interface. While this is important in the future, the actual precision of the accelerometer was not tested given that this is an initial prototype. Rather, the following were accounted for 1. Does the accelerometer have a constant reading when leveled? 2. Does the output of the accelerometer change with movement? After setting up the accelerometer connections with the Arduino Uno, outputs were written to the memory card and observed. On the Raspberry Pi, check that the connection is established with the bluetooth module using the hcitool with the bluetooth toolbox for python, and establish connections between the Raspberry Pi and Arduino Uno. The figure below shows an overview of how the two devices operate in parralel to eventually connect for the transfer of outputs.
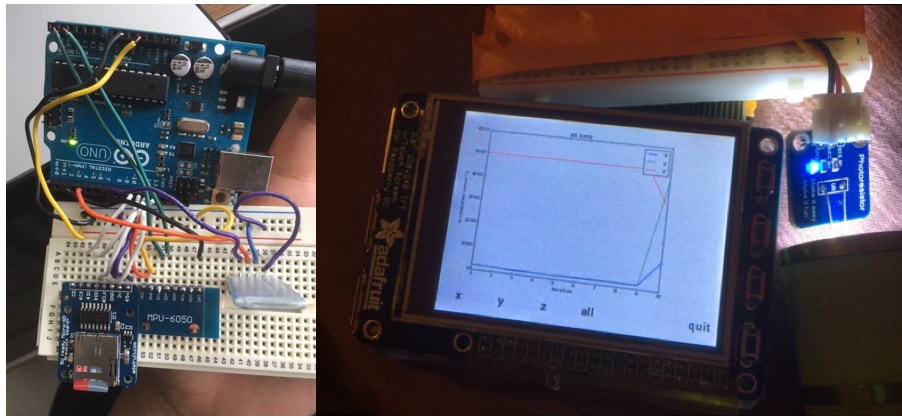
The connections used in this setup are shown in the figure below, with the analog pins (descending numeric order top down) of the Arduino shown on the right, along with the power supply and ground, and the digital pins shown on the left (ascending numeric order top down). All inputs are supplied with the 5V power supply, though it is recommended to drive the bluetooth on 3V, I found that the bluetooth module was not sufficiently powered with that input.
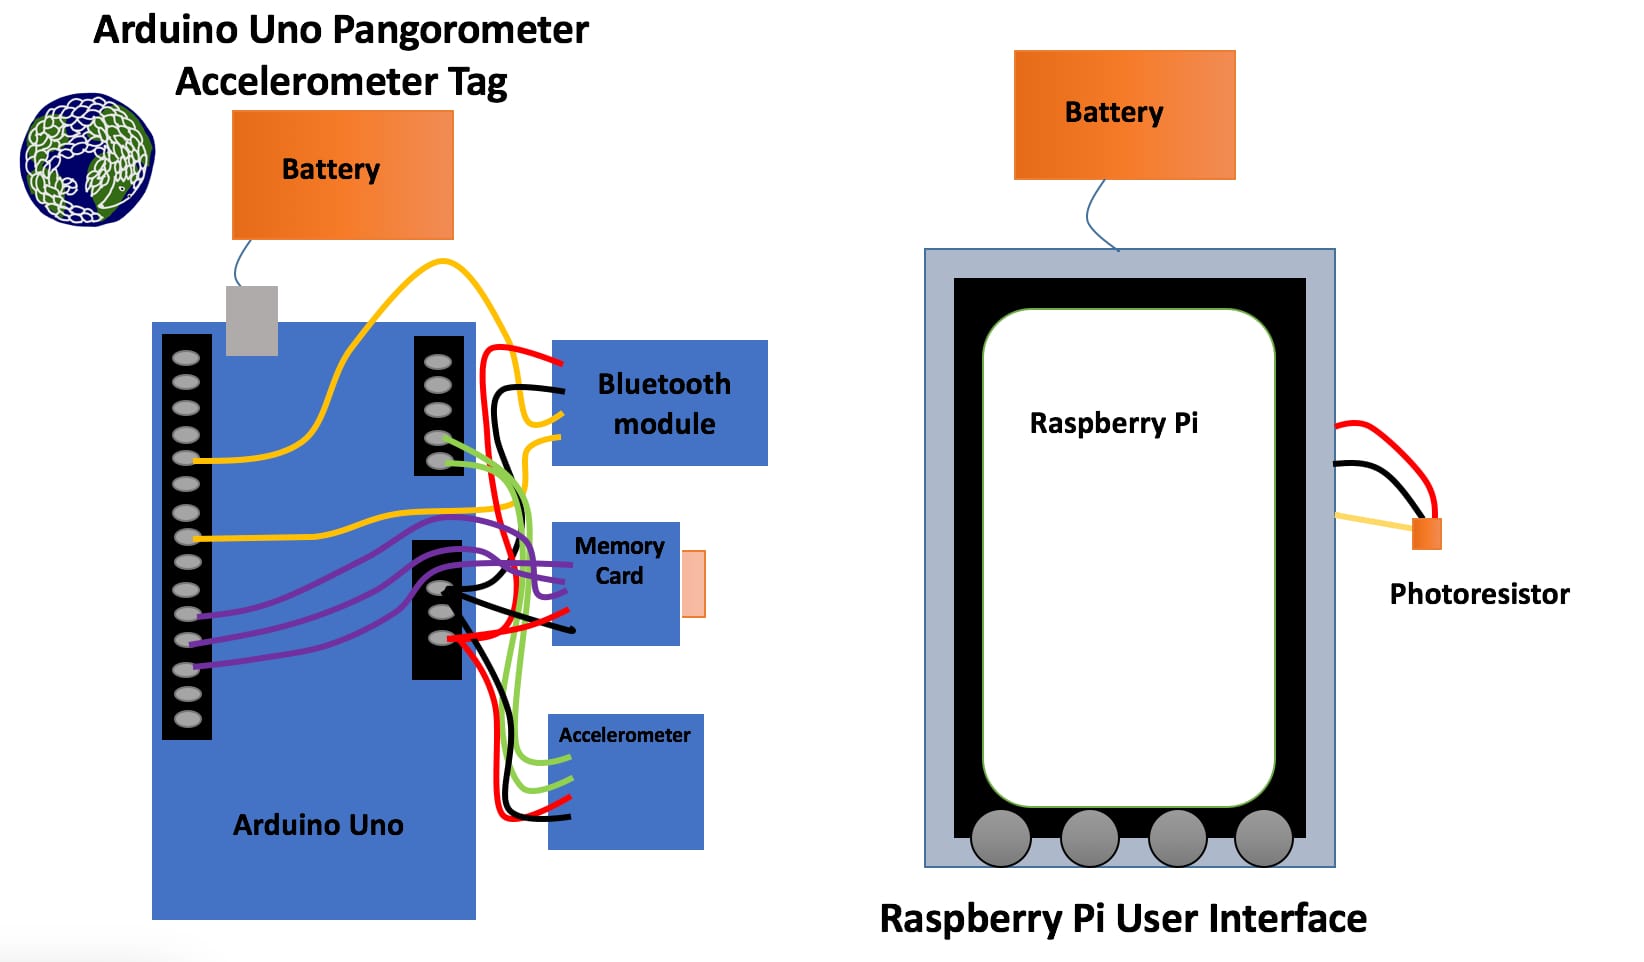
The figure below shows the end results, with the Arduino accelerometer tag and Raspberry Pi base station in two separate parts. The photoresistor module may be connected to any available General Purpose Input/Output GPIO pin (5) of the Raspberry Pi, and the input to the RPi is binary, so with some light intensity, the input to the Raspberry Pi is 1, otherwise it is 0. The Arduino receives analog serial inputs from the accelerometer, and writes to the memory card via serial interface.
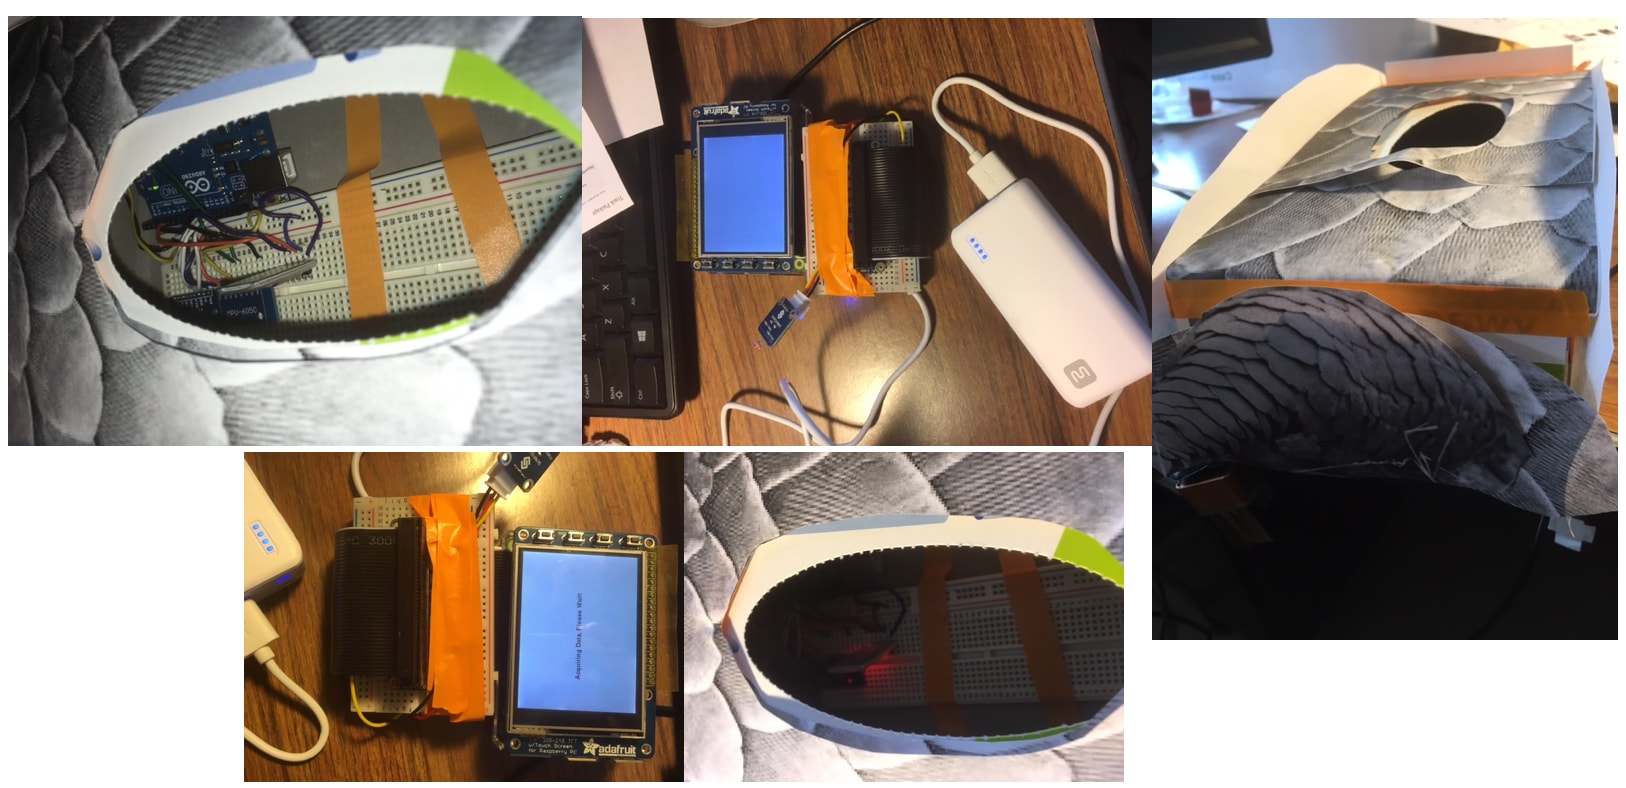
The final output is an accelerometer tag, shown on the left, communicating with the Raspberry Pi and allowing for a graphical interface, shown on the right of the image below.
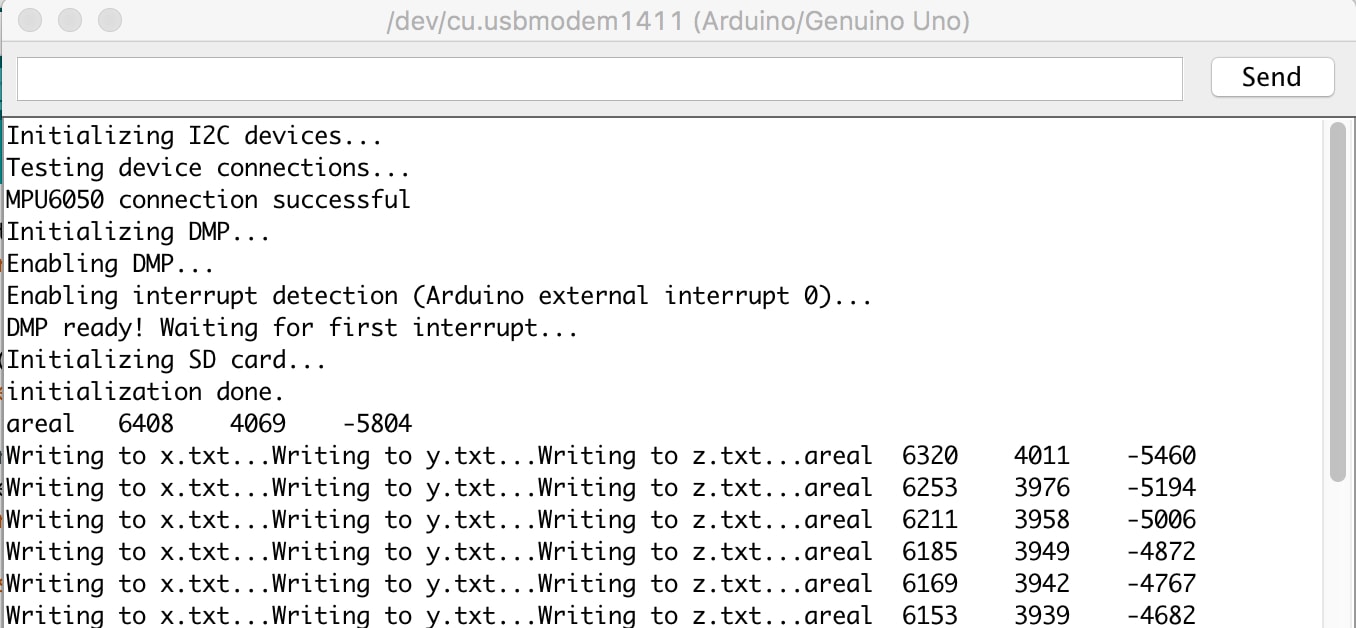
The testing for the accelerometer tag is shown in the figure below, using the Arduino IDE serial monitor to obtain the outputs. The accelerometer position is changed, and the outputs are observed, and the 20 second time between samples is also noted using this serial monitor. In order to interface the accelerometer, memory card, and bluetooth module, SerialSoftware.h, MPU6050.h, and I2Cdev.h libraries were incorporated in to the code used to program the Arduino. Please note that either, many samples can be collected at once with a 20 second wait time before transmitting the data, or the time between collections can be spaced regularly within the 20 seconds. This is something that the user can decide upon, and it is also indicated in the code section.
The video below describes some standard testing performed to ensure that, once the connection is established between the Arduino and Raspberry Pi, that the accelerometer data is outputted with some time lapse due to the sample rate being 20 seconds. Also shown is the success of the photoresistor at switching off the bluetooth module for 20 seconds each iteration that there is no light available. A Pangolin is nocturnal, so this type of feature could be very important in conserving battery life, if the connection is broken when there is light available in the environment.
The video below demonstrates the method to confirm that the Raspberry Pi is showing the data of the most recent iteration of the graph on the screen by showing the outputs of the terminal window to show that, when the coordinates are entered on the pygames screen due to a click or press, this is observed on the output of the terminal given strings that are programmed to display on the terminal or python command window upon press or click. This method of testing assures that the most recent data is being refreshed on the graph, which is important to confirm that the serial communications and data collection is in tact.
The last testing performed before the final project demonstration ensures that the bluetooth connects upon booting the Raspberry Pi, which is established by adding a pause to the python script. This is important in ensuring that the bluetooth module is able to establish connectivity without attempting to connect too early in the boot sequence. The following video below demonstrates that this has been successfully performed. Also incorporated is a GPIO pin, corresponding to a TFT Screen Button, that allows for the code to break and connection between the tag and base station to be broken temporarily.
results
Results
The previous videos from the testing section show the overall system results in parts as they are being tested, however the database is another component of data organization that has yet to be detailed. As such, the below video shows a portion of the database, which is setup using sqlite3 python library with outputs stored on disk, or rather on the memory card. The demonstration of outputs section shows the overall outputs of the Pangorometer. Using this database, the outputs can be listed in order of ascending acceleration, descending acceleration, and also in the order of time. A final demonstration is available in the Demonstration of Outputs Section.
futuredirections
Conclusions and Future Directions
This project demonstrates an initial prototype for the Pangorometer, with further prototypes leading to a smaller scale version that can be used for wildlife conservation. There were many interesting points learned in this process. A few to note, 1. include pause in your code when automatically connecting to bluetooth. Otherwise it is not possible to connect while booting the system, 2. Check length of data being transferred via bluetooth, 3. There is a lot involved in turning a prototype like this into a usable tag, 4. Raspberry Pi is not the best interface, especially touchscreen for graphical outputs, 5. Remember the file path for the database when running the python script during the boot sequence. These were perhaps the most common errors, complaints, and system failures experienced. Future Directions include automated changing of time between samples, more extensive database structuring, incorporating other inputs, condensing code on the Arduino for more potential sensors, quantifying battery consumption and minimizing battery use, maximizing sample outputs and and lessening data transfer events, making the overall design smaller and more efficient.
References
ref
1. The following libraries and sample code for the modules purchased to interface with the Arduino
SD.h package,MPU6050_6Axis_MotionApps20.h,SoftwareSerial.h,I2Cdev.h
2. The following libraries and sample code used for the Raspberry Pi python scripts
Sqlite3, pygames
3. Idris, Ivan. Instant Pygame for Python Game Development How-to. Birmingham, UK: Packt Publishing, 2013.
4. Fletcher, Martin. "Pangolins: why this cute prehistoric mammal is facing extinction." The Telegraph. Telegraph Media Group, 31 Jan. 2015. Web. 18 May 2017.
5. Paul Hilton, WildAid, http://voices.nationalgeographic.com/2015/02/20/poachers-of-pangolins/
6. Photographers, International League of Conservation. "Poachers of Pangolins." National Geographic Society Blogs. N.p., 30 Apr. 2015. Web. 20 Oct. 2016.
Code Appendix
#python script for basestation, code adapted from sample codes for each of these libraries imported below.
import bluetooth
import time
import numpy as np
import ast
import matplotlib
import os
from IPython import display
import pygame
from pygame.locals import *
from time import gmtime, strftime
matplotlib.use("Agg")
import matplotlib.pyplot as plt
import matplotlib.backends.backend_agg as agg
import subprocess
import RPi.GPIO as GPIO
import time
import sqlite3

GPIO.setmode(GPIO.BCM)
GPIO.setup(27, GPIO.IN, pull_up_down=GPIO.PUD_UP) #quit button
GPIO.setup(5, GPIO.IN) #photoresistor

os.putenv('SDL_VIDEODRIVER','fbcon') #touchscreen control of pygame interface
os.putenv('SDL_FBDEV','/dev/fb1')
os.putenv('SDL_MOUSEDRV','TSLIB')
os.putenv('SDL_MOUSEDEV','/dev/input/touchscreen')
pygame.init()

pygame.mouse.set_visible(False)

def main(): #main loop

    global val #variable for loop continuously polling

    val = True;

    def GPIO27_callback(channel): #callback function to break loop, could use fifo to instantaneously break loop, but I allowed for the last set of data collections.
        global val
        val=False;
        print('breaking loop')
        print(val)
    GPIO.add_event_detect(27, GPIO.FALLING, callback=GPIO27_callback) #establish callback
    conn=sqlite3.connect('AccelerationDatabase.db') #establishing connection with database
    c = conn.cursor() #database connection
    x=199;#initial variables for graph selection
    y=201;
    bd_addr = "98:D3:34:90:A2:60" #bluetooth address and port
    port = 1


    data = " "; #initial data
    i=1;
    xavg = [0];
    count=1;
    yavg = [0];
    zavg = [0];
    a = [1,2,3,4,5,6,7,8,9,10];#plot initialization
    plt.clf()
    plt.plot(a, a)
    plt.draw()
    plt.show(block=False)
    plt.savefig('1.png',dpi=35)

    screen = pygame.display.set_mode((320,240)) #pygame screen initialization
    background = pygame.Surface(screen.get_size())
    background.fill((255,255,255))
    screen.blit(background,(0,0))
    my_font = pygame.font.Font(None,20)
    pygame.display.flip()

    while val: #begin while loop
        if i==5:
            sock = bluetooth.BluetoothSocket (bluetooth.RFCOMM) #wait for 5 iterations of 20 seconds each to allow for connection of bluetooth to prevent hangup during boot sequence
            sock.connect((bd_addr,port))
            conn=sqlite3.connect('AccelerationDatabase.db')
            c = conn.cursor()
        while GPIO.input(5)==1: #use of light sensor to put the pygame in to an effective sleep mode, meaning that the bluetooth connection is closed for 20 seconds
            sock.close()
            print('no light')
            my_font = pygame.font.Font(None,20)
            my_buttons={'Low Light Levels, Sleep Mode!': (150,120)} #display for this
            for my_text, text_pos in my_buttons.items():
                text_surface = my_font.render(my_text,True,(50,50,50))
                rect = text_surface.get_rect(center=text_pos)
                screen.blit(background,(0,0))
                screen.blit(text_surface,rect)
            pygame.display.flip()
            time.sleep(20)
            sock = bluetooth.BluetoothSocket (bluetooth.RFCOMM)
            sock.connect((bd_addr,port))

        if i > 5:
            if count <= 11:
                my_font = pygame.font.Font(None,20)
                my_buttons={'Acquiring Data, Please Wait!': (150,120)}
                for my_text, text_pos in my_buttons.items():
                    text_surface = my_font.render(my_text,True,(50,50,50))
                    rect = text_surface.get_rect(center=text_pos)
                    screen.blit(background,(0,0))
                    screen.blit(text_surface,rect)
                pygame.display.flip()
            DATAINP = str(sock.recv(9600)); #input data


            data += DATAINP;
            data += " ";


            inp = np.array(data);

            data2 = data.replace("\r\n"," ");
            data2=data2.replace("-","");
            data2=data2.replace("  "," ");
            data2=data2.replace("  "," ");
            data2 = data2.strip(" ");
            data2 = data2.split(" "); #obtain data in the format needed to perform calculations
            print(len(data2))


            if count >11:    #obtain mousebutton up screen touch event for graphical interface, after 10 iterations.
                for event in pygame.event.get():
                       if event.type is MOUSEBUTTONUP:
                        x,y = pygame.mouse.get_pos()

                        print(x)
                        print(y)

            if len(data2) >= 100:
                data2 = map(int, data2);
                count = count+1;
                xavg.append(sum(data2[1:50]/50);
                yavg.append(sum(data2[51:100])/50);
                zavg.append(sum(data2[101:150])/50); #obtain averages
                currenttime = strftime("%H:%M:%S", gmtime());
                conn=sqlite3.connect('/home/pi/AccelerationDatabase.db')#store into database
                c = conn.cursor()
                c.execute("INSERT INTO AccelerationDatabase VALUES (?,?,?,?,?)",(currenttime, xavg[count-1], yavg[count-1], zavg[count-1], 12345))
                for row in c.execute('SELECT * FROM AccelerationDatabase ORDER BY ax'):
                    print(row)
                conn.commit()
                conn.close() #store and commit values into the database
                print(xavg)
                data = " ";

            if count >11:
                if x<200: #button corresponding to all axis displayed graphically
                    if y>200:
                        if x>150:
                            my_font = pygame.font.Font(None,20)
                            my_buttons2={'x':(25,220), 'y':(75,220), 'z':(125,220), 'all':(175,220), 'quit':(300,220)} #onscreen buttons for graphical interface if past the 10th iteration
                            screen.blit(background,(0,0))
                            for my_text, text_pos in my_buttons2.items():
                                text_surface = my_font.render(my_text,True,(50,50,50))
                                rect = text_surface.get_rect(center=text_pos)

                                screen.blit(text_surface,rect)

                            os.remove('1.png') #graph for all axis
                            print('here3')
                            plt.clf()
                            plt.plot(a, xavg[count-10:count], label="x")
                            plt.plot(a,yavg[count-10:count], label="y")
                            plt.plot(a, zavg[count-10:count], label="z")
                            plt.xlabel('iteration')
                            plt.ylabel('acceleration mm/s^2')
                            plt.title('all axes')
                            plt.legend()
                            plt.draw()
                            plt.show(block=False)
                            plt.savefig('1.png',dpi=35)
                            Graph=pygame.image.load('1.png')
                            screen.blit(Graph, (0,0))
                            pygame.display.flip()


                if x<50: #button corresponding to x axis displayed graphically
                    if y>200:
                        my_font = pygame.font.Font(None,20)
                        my_buttons2={'x':(25,220), 'y':(75,220), 'z':(125,220), 'all':(175,220), 'quit':(300,220)}
                        screen.blit(background,(0,0))
                        for my_text, text_pos in my_buttons2.items():
                            text_surface = my_font.render(my_text,True,(50,50,50))
                            rect = text_surface.get_rect(center=text_pos)

                            screen.blit(text_surface,rect)
                        os.remove('1.png')
                        print('here')
                        plt.clf()
                        plt.plot(a, xavg[count-10:count])
                        plt.xlabel('iteration')
                        plt.ylabel('acceleration mm/s^2')
                        plt.title('x axis')
                        plt.draw()
                        plt.show(block=False)
                        plt.savefig('1.png',dpi=35)
                        Graph=pygame.image.load('1.png')
                        screen.blit(Graph, (0,0))
                        pygame.display.flip()

                if x<100: #button corresponding to y axis displayed graphically
                    if y>200:
                        if x>50:
                            my_font = pygame.font.Font(None,20)
                            my_buttons2={'x':(25,220), 'y':(75,220), 'z':(125,220),'all':(175,220), 'quit':(300,220),}
                            screen.blit(background,(0,0))
                            for my_text, text_pos in my_buttons2.items():
                                text_surface = my_font.render(my_text,True,(50,50,50))
                                rect = text_surface.get_rect(center=text_pos)

                                screen.blit(text_surface,rect)
                            os.remove('1.png')
                            print('here2')
                            plt.clf()
                            plt.plot(a, yavg[count-10:count])
                            plt.xlabel('iteration')
                            plt.ylabel('acceleration mm/s^2')
                            plt.title('y axis')
                            plt.draw()
                            plt.show(block=False)
                            plt.savefig('1.png',dpi=35)
                            Graph=pygame.image.load('1.png')
                            screen.blit(Graph, (0,0))
                            pygame.display.flip()

                if x<150: #button corresponding to z axis displayed graphically
                    if y>200:
                        if x>100:
                            my_font = pygame.font.Font(None,20)
                            my_buttons2={'x':(25,220), 'y':(75,220), 'z':(125,220),'all':(175,220), 'quit':(300,220)}
                            screen.blit(background,(0,0))
                            for my_text, text_pos in my_buttons2.items():
                                text_surface = my_font.render(my_text,True,(50,50,50))
                                rect = text_surface.get_rect(center=text_pos)

                                screen.blit(text_surface,rect)
                            os.remove('1.png')
                            print('here3')
                            plt.clf()
                            plt.plot(a, zavg[count-10:count])
                            plt.xlabel('iteration')
                            plt.ylabel('acceleration mm/s^2')
                            plt.title('z axis')
                            plt.draw()
                            plt.show(block=False)
                            plt.savefig('1.png',dpi=35)
                            Graph=pygame.image.load('1.png')
                            screen.blit(Graph, (0,0))
                            pygame.display.flip()


        data = " "; #reset data after storing in database
        data2 = None;
        RAND = None;

        i = i+1;
        time.sleep(20);
        print(val)
if True: #runs the main loop, then cleans up GPIO after loop breaks
    main()
    GPIO.cleanup()
//code for the Arduino Uno Accelerometer Tag
//Sample code from the following libraries used in developing this code
#include "I2Cdev.h"
#include <SD.h>
#include <SoftwareSerial.h>
File myFile;
SoftwareSerial mySerial (4,7); // RX, TX
#include "MPU6050_6Axis_MotionApps20.h"
//#include "MPU6050.h"

#if I2CDEV_IMPLEMENTATION == I2CDEV_ARDUINO_WIRE
    #include "Wire.h"
#endif
MPU6050 mpu;

//from MPU library
#define OUTPUT_READABLE_REALACCEL


#define LED_PIN 13 // For Arduino
bool blinkState = false;

// MPU control/status vars obtained from the MPU library
bool dmpReady = false;  // set true if DMP init was successful
uint8_t mpuIntStatus;   // holds actual interrupt status byte from MPU
uint8_t devStatus;      // return status after each device operation (0 = success, !0 = error)
uint16_t packetSize;    // expected DMP packet size (default is 42 bytes)
uint16_t fifoCount;     // count of all bytes currently in FIFO
uint8_t fifoBuffer[64]; // FIFO storage buffer

// orientation/motion vars
Quaternion q;           // [w, x, y, z]         quaternion container
VectorInt16 aa;         // [x, y, z]            accel sensor measurements
VectorInt16 aaReal;     // [x, y, z]            gravity-free accel sensor measurements
VectorInt16 aaWorld;    // [x, y, z]            world-frame accel sensor measurements
VectorFloat gravity;    // [x, y, z]            gravity vector
float euler[3];         // [psi, theta, phi]    Euler angle container
float ypr[3];           // [yaw, pitch, roll]   yaw/pitch/roll container and gravity vector

// packet structure for InvenSense teapot demo
uint8_t teapotPacket[14] = { '$', 0x02, 0,0, 0,0, 0,0, 0,0, 0x00, 0x00, '\r', '\n' };


volatile bool mpuInterrupt = false;     // indicates whether MPU interrupt pin has gone high
void dmpDataReady() {
    mpuInterrupt = true;
}


void setup() {
//setup for serial communications and accelerometer, from the sample code provided in the libraries listed above
    #if I2CDEV_IMPLEMENTATION == I2CDEV_ARDUINO_WIRE
        Wire.begin();
        TWBR = 24; // 400kHz I2C clock (200kHz if CPU is 8MHz)
    #elif I2CDEV_IMPLEMENTATION == I2CDEV_BUILTIN_FASTWIRE
        Fastwire::setup(400, true);
    #endif

    Serial.begin(115200);
    while (!Serial);

    Serial.println(F("Initializing I2C devices..."));
    mpu.initialize();


    Serial.println(F("Testing device connections..."));
    Serial.println(mpu.testConnection() ? F("MPU6050 connection successful") : F("MPU6050 connection failed"));

    Serial.println(F("Initializing DMP..."));
    devStatus = mpu.dmpInitialize();

    mpu.setXGyroOffset(220);
    mpu.setYGyroOffset(76);
    mpu.setZGyroOffset(-85);
    mpu.setZAccelOffset(1788);

    if (devStatus == 0) {
        // turn on the DMP, now that it's ready
        Serial.println(F("Enabling DMP..."));
        mpu.setDMPEnabled(true);

        Serial.println(F("Enabling interrupt detection (Arduino external interrupt 0)..."));
        attachInterrupt(0, dmpDataReady, RISING);
        mpuIntStatus = mpu.getIntStatus();


        Serial.println(F("DMP ready! Waiting for first interrupt..."));
        dmpReady = true;

        packetSize = mpu.dmpGetFIFOPacketSize();
    } else {
        Serial.print(F("DMP Initialization failed (code "));
        Serial.print(devStatus);
        Serial.println(F(")"));
    }

    pinMode(LED_PIN, OUTPUT);

    mySerial.begin(9600);
    Serial.println("Initializing SD card...");
     pinMode(10, OUTPUT); //LED set to be on when memory card is being written to

    if (!SD.begin(10)) {
      Serial.println("initialization failed!");
      return;
    }
    Serial.println("initialization done.");


}

void loop() {
  for(int i=1; i<51; i = i+1) {  //50 iterations, x y and z data collected

      if (!dmpReady) return;

      while (!mpuInterrupt && fifoCount < packetSize) {

      }

      mpuInterrupt = false;
      mpuIntStatus = mpu.getIntStatus();

      fifoCount = mpu.getFIFOCount();

      if ((mpuIntStatus & 0x10) || fifoCount == 1024) {

          mpu.resetFIFO();
          Serial.println(F("FIFO overflow!"));

      } else if (mpuIntStatus & 0x02) {

          while (fifoCount < packetSize) fifoCount = mpu.getFIFOCount();


          mpu.getFIFOBytes(fifoBuffer, packetSize);


          fifoCount -= packetSize;

          #ifdef OUTPUT_READABLE_REALACCEL
              // display acceleration, gravity adjusted
              mpu.dmpGetQuaternion(&q, fifoBuffer);
              mpu.dmpGetAccel(&aa, fifoBuffer);
              mpu.dmpGetGravity(&gravity, &q);
              mpu.dmpGetLinearAccel(&aaReal, &aa, &gravity);


              Serial.print("areal\t");
              Serial.print(aaReal.x);
              Serial.print("\t");
              Serial.print(aaReal.y);
              Serial.print("\t");
              Serial.println(aaReal.z);
              myFile = SD.open("accelx.txt", FILE_WRITE); // save data in text file
              if (myFile) {
                Serial.print("Writing to x.txt...");
                myFile.println(aaReal.x);
                myFile.close();
              }
              myFile = SD.open("accely.txt", FILE_WRITE);
              if (myFile) {
                Serial.print("Writing to y.txt...");
                myFile.println(aaReal.y);
                myFile.close();
              }
              myFile = SD.open("accelz.txt", FILE_WRITE);
              if (myFile) {
                Serial.print("Writing to z.txt...");
                myFile.println(aaReal.z);
                myFile.close();
              }
          #endif


          // blink LED to indicate that the card is being written to
          blinkState = !blinkState;
          digitalWrite(LED_PIN, blinkState);
	//delay(400) here if you want evenly spaced data points to transfer data every 20 seconds;
      }
  }
    mySerial.begin(9600); //read text files, and send to tag through serial bluetooth connection
    myFile = SD.open("ACCELX.TXT");
    if (myFile) {
      //mySerial.println("accel.txt:");
      while (myFile.available()) {
        mySerial.write(myFile.read());
        }
        myFile.close();
      }
    myFile = SD.open("ACCELY.TXT");
    if (myFile) {
      //mySerial.println("accel.txt:");
      while (myFile.available()) {
        mySerial.write(myFile.read());
        }
        myFile.close();
      }
    myFile = SD.open("ACCELZ.TXT");
    if (myFile) {
      //mySerial.println("accel.txt:");
      while (myFile.available()) {
        mySerial.write(myFile.read());
        }
        myFile.close();
      }
    delay(20000); //delay here if you want the data transfer every 20 seconds of a highly sampled small timeframe of data
    SD.remove("accelx.txt");
    SD.remove("accely.txt");
    SD.remove("accelz.txt");
}
##Python Script to Access SQLITE3 database and list values in ascending order.
import sqlite3
conn=sqlite3.connect('/home/pi/AccelerationDatabase.db')
c = conn.cursor()
val = raw_input('Please enter the value you want to list with respect to, enter ax (x axis), ay (y axis), az (z axis), time, or r (photoresistor ambient light value): ');

for row in c.execute('SELECT * FROM AccelerationDatabase ORDER BY '+val):
    print(row)