Mapping Robot
Arvind Kannan and Chris Fedors
Introduction
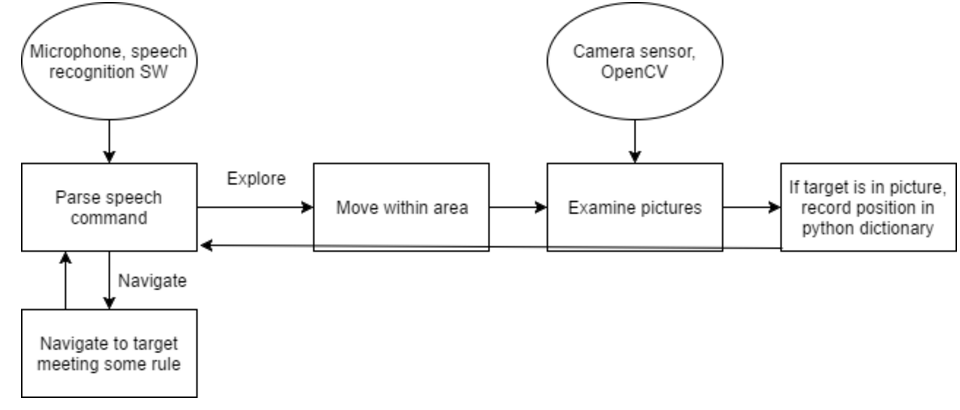
For our project, we made a robot that is able to acquire different colors of targets, drive towards them, and then return to the start position. Along the way of driving towards the target, corrections are made based on the position of the centroid of the target. We used the PiCamera for capturing images, OpenCV for processing the images, the microphone on a Logitech webcam for listening for speech commands, and the Google Speech Recognition API for doing speech to text conversion.
Objective
Our goal for this project was to create a robot that could use computer vision techniques to acquire targets (represented by purple, green, and orange folders) with minimal false positives. We wanted the robot to take speech commands to provide an easy interface for controlling the robot, especially given that the robot was intended to be mobile.
Installation
We installed the picamera
We installed OpenCV and the Python bindings for OpenCV using:
sudo apt-get install python-opencv. The next module we installed was SpeechRecognition, which had an interface for using Google's Speech Recognition API from Python. This was accomplished using pip install SpeechRecognition, but there were some dependencies that needed to be installed first. Using the SpeechRecognition module required a version of PyAudio later than 2.9 if the speech recognition code is going to get input from the microphone. Our project indeed needed the microphone (specifically, the microphone of a Logitech webcam) to obtain speech, so we needed PyAudio to be version 2.9 or later. Since the Raspbian archives that are accessed when a sudo apt-get install command is run had a PyAudio version earlier than 2.9, using that method of installation would not get us a current enough Python 2 version of PyAudio. As such, we used pip install pyaudio, which pulled the latest Python 2 PyAudio source, and built it for the Raspbian Operating System. To get this to work properly, we had to install the portaudio library development package via sudo apt-get install portaudio19-dev. After all of this, a suitable version of PyAudio was installed, and we verified that a simple speech recogition script could successfully get input from the microphone of the Logitech webcam and run it pass it to the speech recognition API.
In OpenCV Python, color images are represented as three-dimensional arrays, so we had to import numpy for manipulating the images in the process of doing target detection. An image is a two-dimensional array of pixels, and within each of these pixels is an array of length 3 that has the values for red, green, and blue.
Design
Picamera For Acquiring Images
OpenCV Target Recognition
To give the our robot the best chance at finding the targets, we decided to choose targets that were bright colors and not very reflective. The bright colors were chosen because they would stand out from the dull background colors of the lab. Low reflectivity was also desired so that the perceived color of folders did not vary due to slight changes in lighting. This still presented a problem during testing, as different lighting conditions often cuased enough of a color change in the targets to make them unrecognizable.
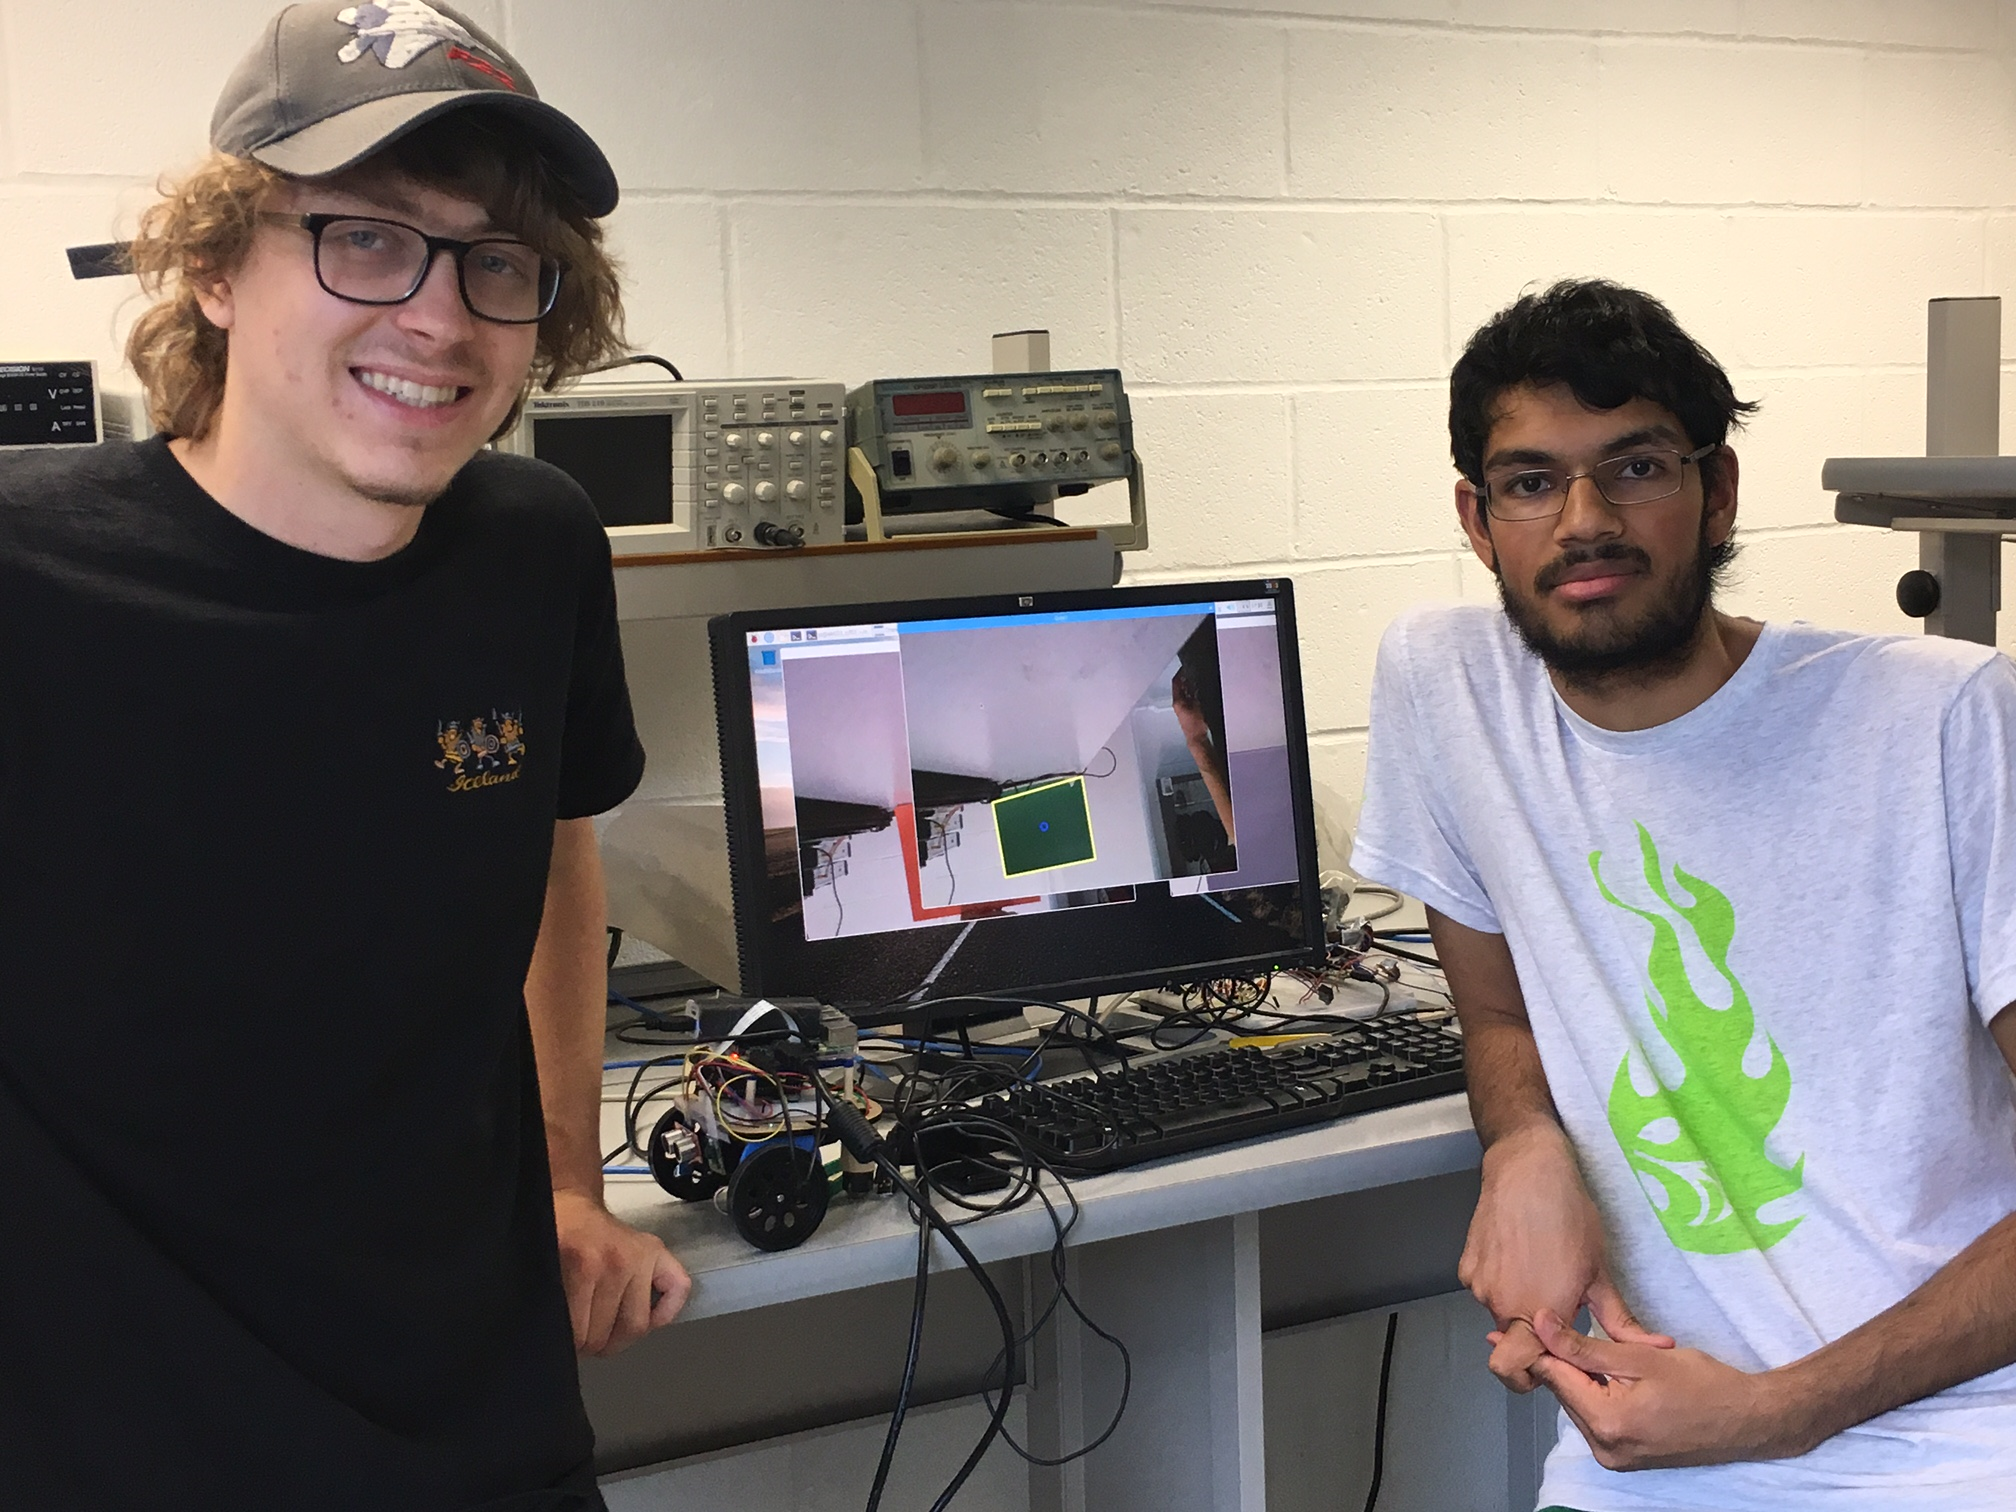
The first challenge in target recognition was separating the color of the folders out from the rest of the environment. We decided the easiest way to do this was to convert the RGB (red, blue, green) image to HSV (hue saturation value). HSV values are much easier to tune for brightness and color than RGB. Once we have the HSV color version of the image, we mask everything in the color range currently being considered. This filters out all parts of the image that don't fall into the min and max HSV values we set, returning an image that is white where the color is present and black where it is not present. After this process, the image has a large white rectangle where the folder is present along with white splotches where the color is also present. These splotches could prove to be a problem for the edge detection done later on, so we blur the image using a Gaussian blur to eliminate the smaller splotches as well as bring out the edges on the folder. The image is then thresholded to get rid of any light gray splotches that resulted from the blurring. The image should look much smoother after this, with most of the noise from the background gone and the target completely filled in. Next, we use OpenCV's Canny Edge Detector on the image, which outlines all the edges in the image with a thin white line. After the edges have been isolated, we use OpenCV's findCountours, which finds all the contours on the image. These contours are just the boundary of a line of pixels, all with the same intensity. We then take these contours and filter them by their area and number of corners. We take the contours that pass this test and only save the largest one, since the largest object is most likely to be the folder. After we have gone over all the contours, we find the coordinates of the contour's centriod and its area. These, along with the folders known side length and aspect ratio, are then used to calculate the distance to the target.
OpenCV Course Correction
Using the data gathered from the target recognition alogirthm, we were able to steer our robot toward the center of the target. This was done by finding the difference between the x position of the target and the center of the screen. This diffrence was then used, along with the distance to the target, to find the angle the robot needed to rotate toward in order to be headed directly at the target. We used this algorithm to zero in on a target from long range, then used the close up image detection for the final approach.
During testing, we found that if the robot got too close to the target, the edges of the target would be cut off by the camera's field of view. This resulted in the image detection algorithm not recognizing the contour of the target, and therefore not identifying it. To fix this, whenever we mask the target by color, we checks the percentage of the image that is covered by that color. If more than 20% of the image is the target's color, we say that the target is identified and within close range. The close range flag signals the robot to move slowly, in order to prevent hitting the target.
Speech Recognition
The speech recognition componet was structured as a callback. The Python SpeechRecognition library has an interface for making the microphone start listening via PyAudio, adjusting for background noise at the beginning of the script, and then calling a callback function when the library detects that the sound (most likely speech) being received by the microphone exceeds the threshold of background noise. This was pretty cool, since it meant that we didn't have to poll for speech, which would have severely constricted the structure of our code, since it would have to revolve around a polling loop. It should be noted, based on this, that if the room in which this system is running is very loud in the phase where the library adjusts for background noise, then it will be very hard for speech to be recognized, because it likely won't be recognized as greater than the background noise threshold. In the callback function, we call the recognize_google function of the SpeechRecognition module, which takes in the audio passed into the callback and returns a string with the what the speech recognition algorithm thinks was said. There are a couple errors we have to catch, UnknownValueError, which happens when the speech recognition algorithm is unable to figure out what was said, and RequestError, which is when the library is not able to reach Google's servers (most likely because of network connectivity issues). The string corresponding to the speech is passed to a function called process_command that performs the necessary operations based on what keywords were in the string. Some examples include quitting the program if the word 'stop' was in the string, setting the color of the target the robot should look for to green, or making the robot spin for 10 seconds.
Ultrasound
Our initial plan involved using an ultrasonic sensor for detecting the range of the folders and any other obstacles. While testing the sensor, we found that it was only accurate in the 60-20 cm range, which does not allow us to accurately detect targets directly in front of the robot. This limitation is likely due to the Raspberry Pi's non-real-time OS limiting how quickly it can respond to the interrupts generated by the ultrasound sensor. Since the Raspberry Pi takes time to respond to the interrupt, and distance sensing at close range is very sensitive to timing, measurements below ~20cm where too inaccurate to rely upon.
Rotary Encoders
Encoders were initially going to be included to keep track of the robot's x and y position as it moved around. Unfortunately, the wiring for the encoders was causing short circuits, which, after some time, caused them to stop functioning. This occurred toward the end of our testing, so we where unable to replace them, instead determining distance traveled based on the amount of time the robot traveled in a given direction.
Testing
We created several scripts to facilitate testing. There were scripts that tested one component of the project, such as simple movement, rotation of a particular angle in degrees, getting images from the picamera, getting results from the speech recognition library, getting the encoders to trigger callbacks and recognizing targets in images, and other scripts that tested two or more components of the project to see that everything fit together properly, such as a script that blended image analysis and movement and a script that blended image analysis and speech recognition.
Some of the one-component test scripts were used repeatedly even after we had moved on to integrating larger parts of the project. This is because most of the one-component test scripts served very well as calibration scripts. Once the necessary parameters were tuned, the adjusted code could replace the older version of that code in the calibration script, as well as in the integrated scripts. For example, this was helpful with image recognition, because different lighting conditions often made us have to tweak the boundaries of the color masks used for isolating the colors of interest, or when we had to change which colors we were looking for after we couldn't find folders in the colors we had originally anticipated. The ultrasound test was also useful in this capacity, allowing us to idenify the robot's minimum and maximum range during testing.
Once we got into the phase of testing where the robot was actually moving, we encountered some difficulty in debugging. Having wires plugged into the robot while the robot was moving hindered the movement, but on the other hand, not having a HDMI cable plugged into the robot meant that the information we printed to the console could not be seen. We addressed this issue by making the rc.local bash script run our python script and pipe the output to a file. This way, information such as the robot's current position, the positions of the targets that were found, the distance sensor reading, the robot's orientation, etc. at every iteration of the main loop could be written to the log file for every iteration and later be used to debug. Having the information in such a clear presentation was especially helpful given that we had no good way of seeing what the robot was doing in real time, since the log file allowed us to visualize and recover what the robot was doing in real time.
When we had a script that performed computer vision on the image in a loop with the main thread and made the robot move based on the results from the computer vision, we noticed that since we had created a image_detection module, a new picamera instance was being generated each time a picture was going to be taken. This really slowed things down. So we decided to have a start_camera() function and end_camera() function in the module that were responsible for creating a picamera isntance and destroying it, respectively. That way, our main script could start up the camera by calling the start_camera function, not have to re-start it for subsequent images, and ensure that the camera instance was closed properly when no more images are needed by calling the end_camera funtion.
Results
After a long period of testing, the robot was able to accomplish its goals reasonably well. After tuning the image recoginition extensively, the robot was able to very accurately identify the colored folders in a variety of lighting conditions, with very few false positives. The image recognition code was also able to identify the range of the targets to within 10cm. The addition of close range image detection also greatly increased the robot's ability to recognize the targets at close range and avoid running over the folders. All these systems worked well together and allowed the robot to run through its full look for folder, drive toward folder, and go back to start sequence without error multiple times in one test. If the encoders worked, the robot could have easily been able to remember the location of folders and drive back to them on demand.
The use of the Google API for speech recognition technically worked, but performed sub-optimally. The robot's WiFi communication could be so slow that it would take up to a minute for it to hear and processes one word. Given more time, we would have downloaded the speech recognition files relevent to our project. This get rid of the WiFi bottleneck and speed up the process significantly.
Conclusion
Overall, we were pretty successful in our goal of recognizing the targets with OpenCV. Additionally, we were pretty satisfied with how few false positives there were. Even without us having a designated space for the robot to move in, where the background was a uniform color like white, we let the robot roam around in a lab with varied backgrounds. The speech recognition of the project worked, but it was relatively slow because of having to use WiFi to pass audio samples to Google's servers for running speech recognition algorithms. We approached it in this way for a couple reasons: first, it was the really simple to install and Google has enough speech data so that its recognition algorithm can classify the speech of a word into one of many words. One change we could have made to reduce the latency would be to have a recognition algorithm running locally on the Raspberry Pi. We would have a smaller speech data corpus, meaning that fewer words could be recognized, but that would be fine because there aren't too many different words needed to control the robot we built.
Bill of Material
- Raspberry Pi 3 - $0 - borrowed from Prof. Skovira
- 2 Parallax servos - $20 - borrowed from Prof. Skovira
- Batteries - $5
- PiCamera 3 - $25 - borrowed from Prof. Skovira
- Logitech C920 webcam (used microphone only) - $30
- 2 Encoders (ultimately didn't use) - $10 - borrowed from Prof. Skovira
- Tape - $2
References
- http://picamera.readthedocs.io/en/release-1.13/
- https://github.com/Uberi/speech_recognition/blob/master/examples/background_listening.py
- http://blog.ayoungprogrammer.com/2013/04/tutorial-detecting-multiple-rectangles.html/
- https://solarianprogrammer.com/2015/05/08/detect-red-circles-image-using-opencv/
Work Distribution
Arvind Kannan
Worked on main program logic, robot movement and pathfinding, and speech recognitions
Chris Fedors
Worked on target detection, robot movement, and encoder/ultrasound testing
Contact
Arvind Kannan, ak633@cornell.edu
Chris Fedors, cjf83@cornell.edu
Code Appendix
# Arvind Kannan, ak633
# Chris Fedors, cjf83
# Final Project
# Mapping Robot
# Last updated: 5/18/17
# mapping_robot.py

import speech_recognition as sr
import random
import datetime
import os
import subprocess
import pyaudio
import time
import picamera
import cv2
import pyaudio
import speech_recognition as sr
import image_detection as imdet
import math
from datetime import datetime

TARGET_AREA = 10000

# GPIO set up
import time
import RPi.GPIO as GPIO

GPIO.setmode(GPIO.BCM)
GPIO.setup(12, GPIO.OUT) # servo
GPIO.setup(16, GPIO.OUT) # servo
GPIO.setup(23, GPIO.IN) # ultrasound
GPIO.setup(24, GPIO.OUT) # ultrasound

GPIO.setup(5, GPIO.IN)
GPIO.setup(6, GPIO.IN)


pulse_start = 0
pulse_end = 0
duration = 0

def get_micro():
	""" Returns current time in microseconds"""
	dt = datetime.now()
	return dt.microsecond

# This callback function is called when GPIO pin 23
# sees a rising or falling edge.
def ultrasound_receive(channel):
	global pulse_start
	global pulse_end
	global duration
	if(GPIO.input(23) == GPIO.HIGH):
		pulse_start = get_micro()
	else:
		pulse_end = get_micro()
		duration = pulse_end-pulse_start

# Takes ultrasound distance sensor reading, and returns distance
# in cm.
def ultrasound_pulse():
	"""Returns range of objects in centimeters, needs to block for ~100ms"""
	global duration
	print "Pulsing ultrasound"
	# Send a pulse to GPIO pin 24, and look for response
	GPIO.output(24, GPIO.LOW)
	time.sleep(2/1000000.0)
	GPIO.output(24, GPIO.HIGH)
	time.sleep(10/1000000.0)
	GPIO.output(24, GPIO.LOW)
	time.sleep(0.1)
	dist = duration/53.33
	print dist
	if dist <= 0 or dist > 200:
		dist = None
	return dist

# Register callback function ultrasound_receive.
# The bouncetime is small so as to not mess up with timing of the receiving
# of the signal.
GPIO.add_event_detect(23, GPIO.BOTH, callback = ultrasound_receive, bouncetime=1)

# These functions were used in Lab 3 to calculate what
# commands to send to the motors, and they are still useful here.
def calc_servo_dc(width):
	return (100 * width / (20.0 + width))
def calc_servo_freq(width):
	return (1.0/(.02 + width/1000.0))

# Constants used by the drive function (below).
STAND_STILL_W= 1.5
MAX_CW_W = 1.3
MAX_CCW_W = 1.7

stand_still = calc_servo_dc(STAND_STILL_W)

# Start PWM instances for left and right servos.
p1 = GPIO.PWM(12, calc_servo_freq(STAND_STILL_W))
p2 = GPIO.PWM(16, calc_servo_freq(STAND_STILL_W))
p1.start(stand_still)
p2.start(stand_still)
p = [None, p1, p2]

# This drive function sends the appropriate PWM signal to
# the specified servo.
def drive(num, s):
	d = 0
	f = 50
	if s == 'cw':
		d = calc_servo_dc(MAX_CW_W)
		f = calc_servo_freq(MAX_CW_W)
	elif s == 'ccw':
		d = calc_servo_dc(MAX_CCW_W)
		f = calc_servo_freq(MAX_CCW_W)
	elif s == 's':
		# Send 0 signal to completely stop the servo.
		d = calc_servo_dc(0)
		f = calc_servo_freq(0)
	# num indexes p array, and that allows us to get the
	# correct PWM instance without needing a conditional here.
	p[num].ChangeDutyCycle(d)
	p[num].ChangeFrequency(f)

# Halt the motors while we're waiting for setup of other
# parts of system.
drive(1, 's')
drive(2, 's')

max_ccw = calc_servo_dc(1.7)
max_cw = calc_servo_dc(1.3)

start = False
target_color = None

# Explore mode is defined as when the robot is looking for
# any colored target, and will add their positions to the
# list of targets of that color.
# Mission mode is defined as when the robot is looking for
# a particular colored target.
EXPLORE_MODE = 'explore'
MISSION_MODE = 'mission'

mode = EXPLORE_MODE

# Intended as a debugging tool (have the robot spin for a while)
# before we started using log files to debug errors.
# Note that the time is not specified. If you call this function,
# you have to time.sleep() afterwards for how long you want the
# robot to spin, and call stop() to stop the motors afterwards.
def spin():
	drive(1, 'cw')
	drive(2, 'cw')


def stop():
	drive(1, 's')
	drive(2, 's')


# Take in the string of what was said to the robot,
# and respond appropriately based on the keywords in the
# phrase.
def process_command(cmd_str):
	global start
	global target_color
	global mode
	print 'processing command'
	cmd_str = cmd_str.lower()
	toks = cmd_str.split(' ')
	print cmd_str
	if 'spin' in cmd_str:
		spin()
		time.sleep(10)
		stop()
	elif 'start' in cmd_str:
		print '********************STARTING\n\n\n'
		start = True
		mode = EXPLORE_MODE
	elif 'orange' in cmd_str:
		target_color = 'orange'
		mode = MISSION_MODE
	elif 'green' in cmd_str:
		target_color = 'green'
		mode = MISSION_MODE
	elif 'purple' in cmd_str:
		target_color = 'purple'
		mode = MISSION_MODE
	elif 'stop' in cmd_str:
		exit()

# This is called when speech is heard over the background noise.
def callback(recognizer, audio):
	# recognize speech using Google Speech Recognition
	try:
		cmd_str = r.recognize_google(audio)
		print("You said: " + cmd_str)
		process_command(cmd_str)
	# Account for if Google speech recognition is not able to tell what
	# was said.
	except sr.UnknownValueError:
		print 'Your speech was not recognized'
	except sr.RequestError as e:
		print('You probably lost Internet connection, so you could not get results from Google speech recognition')

# Set up speech recognition instance and the microphone
r = sr.Recognizer()
m = sr.Microphone()
# Account for background noise so the library knows when somebody's speaking near
# the microphone.
with m as source:
	r.adjust_for_ambient_noise(source)

# start listening in the background (note that we don't have to do this inside a `with` statement)
stop_listening = r.listen_in_background(m, callback)
# `stop_listening` is now a function that, when called, stops background listening
print 'finished setting up mic\n\n'

X_PIXELS = 1024
Y_PIXELS = 768


reached_target = False

# Lists with positions of targets of the appropriate color
orange_targets = []
green_targets = []
purple_targets = []


x, y = 0.0, 0.0 # Robot's current x, y position (starts at origin), in cm
robot_orientation = 0.0 # Robot's current orientation (starts facing North)
# For orientation, 0 degrees is facing north, 90 degrees is facing east, etc.

# Given an orientation, return the orientation
# within the range 0 to 359 degrees.
def orientation_in_range(orient):
	while(orient) < 0.0:
		orient += 360.0
	while(orient) >= 360.0:
		orient -= 360.0
	return orient

# Helper function for get_angle function
def calc_ang(O, A):
	return math.degrees(math.atan(float(O) / float(A)))

# If existed in targets list, give the position of that closest one.
# Otherwise, just return the position passed in.
def closest_in_targets_list(target_pos, color):
	TARGET_CLOSENESS_CONSTANT = 70.0
	if color == 'orange':
		targets = orange_targets
	elif color == 'green':
		targets = green_targets
	elif color == 'purple':
		targets = purple_targets
	for elem in targets:
		if abs(target_pos[0] - elem[0]) < TARGET_CLOSENESS_CONSTANT and abs(target_pos[1] - elem[1]) < TARGET_CLOSENESS_CONSTANT:
			return elem
	targets += [target_pos]
	return target_pos

# Get angle between robot and centroid of target.
# This is used so the robot can correct it's course to the target.
def get_angle(rect_center, rect_area):
	global robot_orientation
	#tx, ty = target_pos[0], target_pos[1]
	x_disp = rect_center[0] - 1024/2 # x disp in pixels
	dist_to_object = 21108 / math.sqrt(rect_area)
	ang = calc_ang((26.4 * x_disp / math.sqrt(rect_area)), dist_to_object)

	print 'robot orientation is ' + str(robot_orientation)
	if ang < 0.0:
		return ('ccw', 'ccw', ang)
	return ('cw', 'cw', ang)

# Empirically determined constant based on experimenting with
# rotations of a known angle, like 90 or 180 degrees.
# THis constant times an angle in degrees gives the amount of
# time in time.sleep() before robot can move on.
ANG_TO_TIME_CONSTANT = 0.005

# Implement correction to robot's course based on horizontal position
# of centroid. Only correct if the angle is substantial, because otherwise
# there would be over-fitting and robot's movement wouldn't be very efficient.
def face_target(rect_center, rect_area):
	global robot_orientation
	direction_servo1, direction_servo2, ang = get_angle(rect_center, rect_area)
	if(abs(ang) > 7.5):
		robot_orientation = ang + robot_orientation
		robot_orientation = orientation_in_range(robot_orientation)
		drive(1, direction_servo1)
		drive(2, direction_servo2)
		print '***Correcting to: ' + str(ang)
		time.sleep(abs(ang) * ANG_TO_TIME_CONSTANT)
		stop()

# Rotate function - update the robot's orientation,
# run the servos in the proper directionm for the correct
# amount of time, then stop the servos.
# We choose the smaller rotation angle, since you could
# of course rotate either way to rotate a certain amount.
def rotate(ang):
	global robot_orientation
	robot_orientation += ang# update
	while robot_orientation > 360.0:
		robot_orientation -= 360.0
	while robot_orientation < 0.0:
		robot_orientation += 360.0
	if ang < 180.0:
		drive(1, 'ccw')
		drive(2, 'ccw')
		time.sleep(ang * ANG_TO_TIME_CONSTANT)
	else:
		drive(1, 'cw')
		drive(2, 'cw')
		ang = 360.0 - ang
		time.sleep(ang * ANG_TO_TIME_CONSTANT)
	stop()

# Turn left and right servos cw and ccw, respectively.
# The code that calls this function is responsible for
# using time.sleep() with the duration of the forward
# movement and calling stop() afterwards.
def drive_forwards():
	drive(1, 'cw')
	drive(2, 'ccw')

# move_towards makes a correction based on the centroid position
# and then drives forwards.
def move_towards(rect_center, rect_area):
	face_target(rect_center, rect_area)
	drive_forwards()

# Return the new position of the robot based on orientation,
# how long the robot moved forward, and the robot's current position.
# As you can tell, the robot's global position (x, y) must be passed
# in to this function, and the output of this function should be
# assigned to (x, y) to update the global position.
def change_pos(robot_pos, orientation, time_motor):
	new_x = robot_pos[0]
	new_y = robot_pos[1]
	# 21.24 is an empirically defined constant to make
	# the position be in centimeters
	time_motor *= 21.24
	if orientation < 90.0:
		new_x += time_motor * math.sin(math.radians(orientation))
		new_y += time_motor * math.cos(math.radians(orientation))
	elif orientation < 180.0:
		orientation -= 90.0
		new_y -= time_motor * math.sin(math.radians(orientation))
		new_x += time_motor * math.cos(math.radians(orientation))
	elif orientation < 270.0:
		orientation -= 180.0
		new_x -= time_motor * math.sin(math.radians(orientation))
		new_y -= time_motor * math.cos(math.radians(orientation))
	else:
		orientation -= 270.0
		new_x -= time_motor * math.cos(math.radians(orientation))
		new_y += time_motor * math.sin(math.radians(orientation))
	return (new_x, new_y)

# Find the position of the target based on the robot's position and orientation,
# along with the centroid and area of the rectangle corresponding to the target
def get_position(rect_center, rect_area):
	x_disp = rect_center[0] - 1024/2 # x disp in pixels
	# 21108 is a constant determined based on the aspect ratio of the image.
	dist_to_object = 21108 / math.sqrt(rect_area)
	print 'Rect_area is ' + str(rect_area)
	print 'Dist_to_object is ' + str(dist_to_object)

	# 26.4 is a derived constant based on how the trig worked out
	# and on the aspect ratio of the image
	total_dist = math.sqrt(dist_to_object * dist_to_object + (26.4 * x_disp / math.sqrt(rect_area)) * (26.4 * x_disp / math.sqrt(rect_area)))
	dx = total_dist * math.sin(math.radians(robot_orientation + calc_ang((26.4 * x_disp / math.sqrt(rect_area)), dist_to_object)))
	dy = total_dist * math.cos(math.radians(robot_orientation + calc_ang((26.4 * x_disp / math.sqrt(rect_area)), dist_to_object)))
	print 'x distance to target:' + str(dx)
	print 'y distance to target:' + str(dy)
	return (x + dx, y + dy)

# finds closest target of correct color to the robot
def find_closest_target(color):
	if color == 'orange':
		targets = orange_targets
	elif color == 'green':
		targets = green_targets
	elif color == 'purple':
		targets = purple_targets
	min_dist = None
	min_target_pos = None
	for target in targets:
		tx, ty = target[0], target[1]
		dis = math.sqrt((tx - x) * (tx - x) + (ty - y) * (ty - y))
		if min_dist is None:
			min_target_pos = target
			min_dist = dis
		elif dis < min_dist:
			min_target_pos = target
			min_dist = dis
	return min_target_pos

# used for tracking how many consecutive times we've rotated,
# so we can give up and try to move closer
search_count = 0
# used for keeping track of when to override start command being
# given via speech
iter_count = 0
# keep track of the current iteration number we're on
iter2_count = 0
# Start picamera instance
imdet.start_camera()

# The copious numbers of print statements are there because the output of this
# program was redirected to a file that was used as a log file to help with debugging.
try:
		while True:
			if not start:
				iter_count += 1
				if iter_count == 90000:
					start = True
					print 'TIMER OVERRIDE -- start set to true'
					print 'waiting for you to speak a color'
					a_time = time.time()
					# If 60 seconds have elapsed with a color being recognized
					# by speech recognition library, continue to next iteration.
					while time.time() - a_time < 60.0:
						if target_color is not None:
							break
				continue
			iter2_count += 1
			print '\n\n\nITERATION: ' + str(iter2_count)
			print 'ROBOT_ORIENTATION: ' + str(robot_orientation)
			print 'MODE: ' + mode
			print 'DISTANCE SENSOR READING: ' + str(ultrasound_pulse())
			print 'ORANGE list: '
			print orange_targets
			print 'GREEN list: '
			print green_targets
			print 'PURPLE list: '
			print purple_targets
			print 'ROBOT x and y pos:'
			print str(x) + ', ' + str(y)

			# If the robot is in mission mode, and has not yet reached the target,
			# analyze the image. If the target is not seen, rotate and try to acquire
			# the target. Otherwise, move towards the target, making course corrections
			# as necessary.
			if mode is MISSION_MODE and (not reached_target):
				search_count = 0

				# Find rect of desired color
				rect_center, rect_area, copy_img = imdet.image_detection(target_color)

				# If target of desired color was not found, rotate 15 degrees so we can try again.
				if rect_center is None or rect_area is None:
					result = find_closest_target(target_color)
					rotate(15)
					continue
				# If target of desired color was found, move towards it for a second.
				move_towards(rect_center, rect_area)
				time.sleep(1)
				stop()

				# The distance sensor didn't work too reliably in our range,
				# so we decided not to use it.
				# DISTANCE_SENSOR_CONSTANT = 20.0 # within 5 cm
				# distance_sensor_val = ultrasound_pulse()

				face_target(rect_center, rect_area)
				# The constants 425000.0 and 157000.0 were empirically determined
				# based on playing around with our image detection test calibration script
				# with our robot at different distances from the target. We observed the
				# area the target took up in the image based on the distance from the target
				# at which we wanted the robot to stop.
				while rect_area < 425000.0:
					# If the target is no longer seen, move back to start mode so we can reset the situation.
					# Otherwise, move towards the target until we're close enough.
					if rect_area < 157000:
						rect_center,rect_area,_ = imdet.image_detection(target_color)
						if rect_center is None or rect_area is None:
							print 'cannot find rect'
							start = False
							target_color = None
							iter_count = 0
						else:
							move_towards(rect_center, rect_area)
					else:
						_, rect_area, _ = imdet.image_detection(target_color, faster = True)
						drive_forwards()
					begin_t = time.time()
					time.sleep(0.5)
					entered_while4 = True
					distance_sensor_val = ultrasound_pulse()
					end_t = time.time()
					x, y = change_pos((x, y), robot_orientation, end_t - begin_t)
					print 'INRANGE'
				stop()
				print '===REACHED DESIRED TARGET'
				rotate(180)
				start = False
				target_color = None
				iter_count = 0

			elif mode is MISSION_MODE:
				# The target has been reached, so we switch back to explore mode (and thus require
				# speech instruction to switch back to mission mode)
				mode = EXPLORE_MODE
				search_count = 0
			# If the mode is EXPLORE_MODE, find targets of any of the three colors
			elif mode is EXPLORE_MODE:
				# Find targets by looking for large rectangles of the correct color
				# This is accomplished by calling the image_detection module's
				# namesake function, image_detection.
				rect_centerO, rect_areaO, copy_imgO = imdet.image_detection('orange')
				rect_centerG, rect_areaG, copy_imgG = imdet.image_detection('green')
				rect_centerP, rect_areaP, copy_imgP = imdet.image_detection('purple')
				print 'IMAGE DETECTION DONE'
				print rect_areaG
				if rect_areaO is not None:
					rel_distO = float(TARGET_AREA) / float(rect_areaO)
					print 'rel distance to orange: ' + str(rel_distO)
				if rect_areaG is not None:
					rel_distG = float(TARGET_AREA) / float(rect_areaG)
					print 'rel distance to green: ' + str(rel_distG)
				if rect_areaP is not None:
					rel_distP = float(TARGET_AREA) / float(rect_areaP)
					print 'rel distance to purple: ' + str(rel_distP)

				# A constant -- the minimum pixel area of the polygon in the image
				# for which we consider it to be the target.
				MIN_ACCEPTABLE_AREA = 5000

				if rect_areaO is not None and rect_areaO > MIN_ACCEPTABLE_AREA:
					target_posO = get_position(rect_centerO, rect_areaO)
					closest_in_targets_list(target_posO, 'orange')
					print '**** Orange rect found\n\n\n'
					if rect_centerO[0] < 1024/2:
						print 'Orange rect is left of center from robot perspective by: ' + str(1024/2 - rect_centerO[0]) + ' pixels'
					else:
						print 'Orange rect is right of center from robot perspective by: ' + str(rect_centerO[0] - 1024/2) + ' pixels'
					print 'orange target position is: ' + str(target_posO)
					move_towards(rect_centerO, rect_areaO)
					time.sleep(1)
					x, y = change_pos((x, y), robot_orientation, 1.0)
					stop()
					# The distance sensor didn't work too reliably in our range,
					# so we decided not to use it.
					# DISTANCE_SENSOR_CONSTANT = 20.0 # within 5 cm
					# distance_sensor_val = ultrasound_pulse()
					entered_while1 = False
					face_target(rect_centerO, rect_areaO)
					# The constants 425000.0 and 157000.0 were empirically determined
					# based on playing around with our image detection test calibration script
					# with our robot at different distances from the target. We observed the
					# area the target took up in the image based on the distance from the target
					# at which we wanted the robot to stop.
					while rect_areaO < 425000.0:
						# If the target is no longer seen, move back to start mode so we can reset the situation.
						# Otherwise, move towards the target until we're close enough.
						print 'area: ' + str(rect_areaO)
						if rect_areaO < 157000.0:
							rect_centerO,rect_areaO,_ = imdet.image_detection("orange")
							if rect_centerO is None or rect_areaO is None:
								print 'cannot find rect'
								start = False
								target_color = None
								iter_count = 0
							else:
								move_towards(rect_centerO, rect_areaO)
						else:
							_, rect_areaO, _ = imdet.image_detection("orange", faster = True)
							drive_forwards()
							time.sleep(0.5)
						begin_t = time.time()
						distance_sensor_val = ultrasound_pulse()
						end_t = time.time()
						x, y = change_pos((x, y), robot_orientation, end_t - begin_t)
					stop()

					print '===REACHED ORANGE TARGET'
					rotate(180)
					start = False
					target_color = None
					iter_count = 0

				elif rect_areaG is not None and rect_areaG > MIN_ACCEPTABLE_AREA:
					target_posG = get_position(rect_centerG, rect_areaG)
					closest_in_targets_list(target_posG, 'green')
					print '**** Green rect found\n\n\n\n'
					print 'green target position is: ' + str(target_posG)
					# Move towards the green target that was found
					move_towards(rect_centerG, rect_areaG)
					time.sleep(1)
					x, y = change_pos((x, y), robot_orientation, 1.0)
					stop()
					# The distance sensor didn't work too reliably in our range,
					# so we decided not to use it.
					# DISTANCE_SENSOR_CONSTANT = 20.0 # within 5 cm
					# distance_sensor_val = ultrasound_pulse()
					face_target(rect_centerG, rect_areaG)
					# The constants 425000.0 and 157000.0 were empirically determined
					# based on playing around with our image detection test calibration script
					# with our robot at different distances from the target. We observed the
					# area the target took up in the image based on the distance from the target
					# at which we wanted the robot to stop.
					while rect_areaG < 425000.0:
						# If the target is no longer seen, move back to start mode so we can reset the situation.
						# Otherwise, move towards the target until we're close enough.
						if rect_areaG < 157000.0:
							rect_centerG,rect_areaG,_ = imdet.image_detection("green")
							if rect_centerG is None or rect_areaG is None:
								print 'cannot find rect'
								start = False
								target_color = None
								iter_count = 0
							else:
								move_towards(rect_centerG, rect_areaG)
						else:
							_, rect_areaG, _ = imdet.image_detection("green", faster = True)
							drive_forwards()
						begin_t = time.time()
						time.sleep(0.5)
						distance_sensor_val = ultrasound_pulse()
						end_t = time.time()
						x, y = change_pos((x, y), robot_orientation, end_t - begin_t)
					stop()

					print '===REACHED GREEN TARGET'
					rotate(180)
					start = False
					target_color = None
					iter_count = 0
				elif rect_areaP is not None and rect_areaP > MIN_ACCEPTABLE_AREA:
					target_posP = get_position(rect_centerP, rect_areaP)
					closest_in_targets_list(target_posP, 'purple')
					print '**** Purple rect found\n\n\n\n'
					print 'purple target position is: ' + str(target_posP)
					move_towards(rect_centerP, rect_areaP)
					time.sleep(1)
					x, y = change_pos((x, y), robot_orientation, 1.0)

					stop()
					# The distance sensor didn't work too reliably in our range,
					# so we decided not to use it.
					# DISTANCE_SENSOR_CONSTANT = 20.0 # within 5 cm
					# distance_sensor_val = ultrasound_pulse()
					face_target(rect_centerO, rect_areaO)
					# The constants 425000.0 and 157000.0 were empirically determined
					# based on playing around with our image detection test calibration script
					# with our robot at different distances from the target. We observed the
					# area the target took up in the image based on the distance from the target
					# at which we wanted the robot to stop.
					while rect_areaP < 425000.0:
						# If the target is no longer seen, move back to start mode so we can reset the situation.
						# Otherwise, move towards the target until we're close enough.
						if rect_areaP < 157000:
							rect_centerP,rect_areaP,_ = imdet.image_detection("purple")
							if rect_centerP is None or rect_areaP is None:
								print 'cannot find rect'
								start = False
								target_color = None
								iter_count = 0
							else:
								move_towards(rect_centerP, rect_areaP)
						else:
							_, rect_areaP, _ = imdet.image_detection("purple", faster = True)
							drive_forwards()
						begin_t = time.time()
						time.sleep(0.5)
						distance_sensor_val = ultrasound_pulse()
						end_t = time.time()
						x, y = change_pos((x, y), robot_orientation, end_t - begin_t)
					stop()

					print '===REACHED PURPLE TARGET'
					rotate(180)
					start = False
					target_color = None
					iter_count = 0
				else:
					# Try rotating to look for a better direction.
					# If that doesn't work for 360 degrees of rotation,
					# move forward for a second, and try again.
					print '*** could not find anything -- ROTATING'
					ROTATION_CONSTANT = 30
					rotate(ROTATION_CONSTANT) # rotate
					search_count += 1
					if search_count == 360 / ROTATION_CONSTANT:
						search_count = 0
						drive_forwards()
						time.sleep(1)
						x, y = change_pos((x, y), robot_orientation, 1.0)
						stop()
					continue
# When testing with a keyboard attached, the script is terminated with
# Ctrl-C, since it didn't make sense to have a script that lasted a particular
# amount of time.
except KeyboardInterrupt:
	pass
# Cleanup - closing picamera instance, stopping PWM instances, GPIO cleanup
imdet.end_camera()
p1.stop()
p2.stop()
GPIO.cleanup()
# Arvind Kannan, ak633
# Chris Fedors, cjf83
# Final Project - mapping robot
# Last modified: 5/18/17
# image_detection.py (target recognition module)

import picamera
from picamera.array import PiRGBArray
import numpy
import numpy as np
import cv2
import time

camera = 0
up_close = False

#Thresolds for colors in HSV
lower_grey = np.array([0,0,0])
upper_grey = np.array([255,255,255])

lower_purple = np.array([120,20,80])
upper_purple = np.array([170,255,220])

lower_orange = np.array([0, 70, 70])
upper_orange = np.array([50, 255, 255])

lower_green = np.array([50,60,40])
upper_green = np.array([95,255,255])

def start_camera():
	global camera
	camera = picamera.PiCamera()
	camera.resolution = (1024, 768)

def end_camera():
	global camera
	camera.close()


def get_color_mask(color, hsv):
	if color == "purple":
		mask = cv2.inRange(hsv, lower_purple, upper_purple)
	elif color == "orange":
		mask = cv2.inRange(hsv, lower_orange, upper_orange)
	elif color == "green":
		mask = cv2.inRange(hsv, lower_green, upper_green)
	else:
		mask = cv2.inRange(hsv, lower_grey, upper_grey)
		print "unrecognized color"
	return mask

def take_picture(camera):
	rawCapture = PiRGBArray(camera)
	time.sleep(2)
	# grab an image from the camera
	camera.capture(rawCapture, format="bgr")
	img = rawCapture.array
	return img

def convert_BW(hsv, img, color):
	mask = get_color_mask(color, hsv)
	per = cv2.countNonZero(mask)
	per = per/(1024.0*768.0)
	print str(color) + " is %" + str(per) + " of image"
	res= cv2.bitwise_and(img,img,mask=mask)
	gimg = cv2.cvtColor(res, cv2.COLOR_BGR2GRAY)
	return gimg, per

def process_img(gimg):
	gimg = cv2.GaussianBlur(gimg,(19,19),0)
	gimg = cv2.threshold(gimg, 25, 255, cv2.THRESH_BINARY)[1]
	return gimg

def find_edges(gimg):
	eimg = cv2.Canny(gimg, 50, 150)
	# Following two lines were commented out because they caused
	# a Gtk display error when not run in the RPi desktop, but when
	# in the desktop, this imshow was very helpful for debugging.
	#cv2.imshow('edged', eimg)
	#cv2.waitKey(0)
	return eimg

def find_contours(eimg,img):
	pimg = img.copy()
	squares = []
	maxsquare = None
	maxsquarearea = 0
	maxcontour = None
	contours, hierarchy = cv2.findContours(eimg, cv2.RETR_EXTERNAL, cv2.CHAIN_APPROX_SIMPLE)
	for contour in contours:
		# Approximate the corners of the polygon
		area = cv2.contourArea(contour)
		perimeter = cv2.arcLength(contour, True)
		corners = cv2.approxPolyDP(contour, perimeter * 0.05, True)

		#if len(corners) != 4:
		if len(corners) > 5 or len(corners) < 2:
			continue
		# Ignore concave shapes
		if not cv2.isContourConvex(corners):
			continue
		if area < 1000:
			continue

		# Find the quad of largest area
		corners = corners.reshape((corners.shape[0], 2))
		squares.append(corners)
		if area > maxsquarearea:
			maxsquare = corners
			maxsquarearea = area
			maxcontour = contour
			#Calculate centroid
			M = cv2.moments(contour)
			x_center = int(M['m10']/M['m00'])
			y_center = int(M['m01']/M['m00'])

	if maxsquare is None:
		print 'no square with area > 200'
		x_center = None
		y_center = None
		maxsquarearea = None
	else:
		# Draw outlines on the image
		cv2.circle(pimg, (x_center,y_center),10,(255, 0, 0),3)
		cv2.polylines(pimg, squares, True, (0, 255, 255), 5)
	return (x_center,y_center), maxsquarearea, pimg

def image_detection(color, faster = False):
	"""Takes in image color (purple, orange, or green)
	Returns (x,y), area, image
	-(x,y) are x and y coordinates of centriod of largest recatangle in image
	-area is area of largest rectangle
	-image has largest reactangle highlighted and centriod circled
	"""
	global camera
	print '***Camera set up'
	img = take_picture(camera)
	hsv = cv2.cvtColor(img, cv2.COLOR_BGR2HSV)
	gimg, per = convert_BW(hsv,img,color)
	if(per < 0.20 and not faster):
		gimg = process_img(gimg)
		print '***Filtered Image'
		eimg = find_edges(gimg)
		print '***Contoured Image'
		return find_contours(eimg,img)
	else:
		print "UP CLOSE"
		return (1024/2.0,768/2.0), per*(1024*768),img
# Arvind Kannan, ak633
# Chris Fedors, cjf83
# Final Project - mapping robot
# Last modified: 5/18/17
# img_detection_test.py (calibration script for checking target recognition)

import cv2
from image_detection import *

start_camera()

data = image_detection("orange")
print data[1]
cv2.imshow("Orange", data[2])
cv2.waitKey(0)
data = image_detection("purple")
print data[1]
cv2.imshow("Purple", data[2])
cv2.waitKey(0)
data = image_detection("green")
print data[1]
cv2.imshow("Green", data[2])
cv2.waitKey(0)


end_camera()