Mars Rover
ECE 5725 Final Project Report
Presented by
Hanwen Wang (hw544), Yuxin Cao (yc2263)
12/08/2016
Objective
We built a intelligent car equipped with camera. It can communicate with the control center (a iOS app) with Wifi. It would send the images it captures to the control center. The control center will send control signal to the Mars rover. The car can also autonomously navigate to a black object within its range of view.
Introduction
We built the intelligent car with the module given in Lab4. The car is equipped with the two servos, one for each of its two wheels. The speed and direction control of the car is implemented by adjusting the speed of the two servos. When a servo has a higher speed than another, the car would turn. We can implements speed and direction control by changing the PWM signals for the two servos.
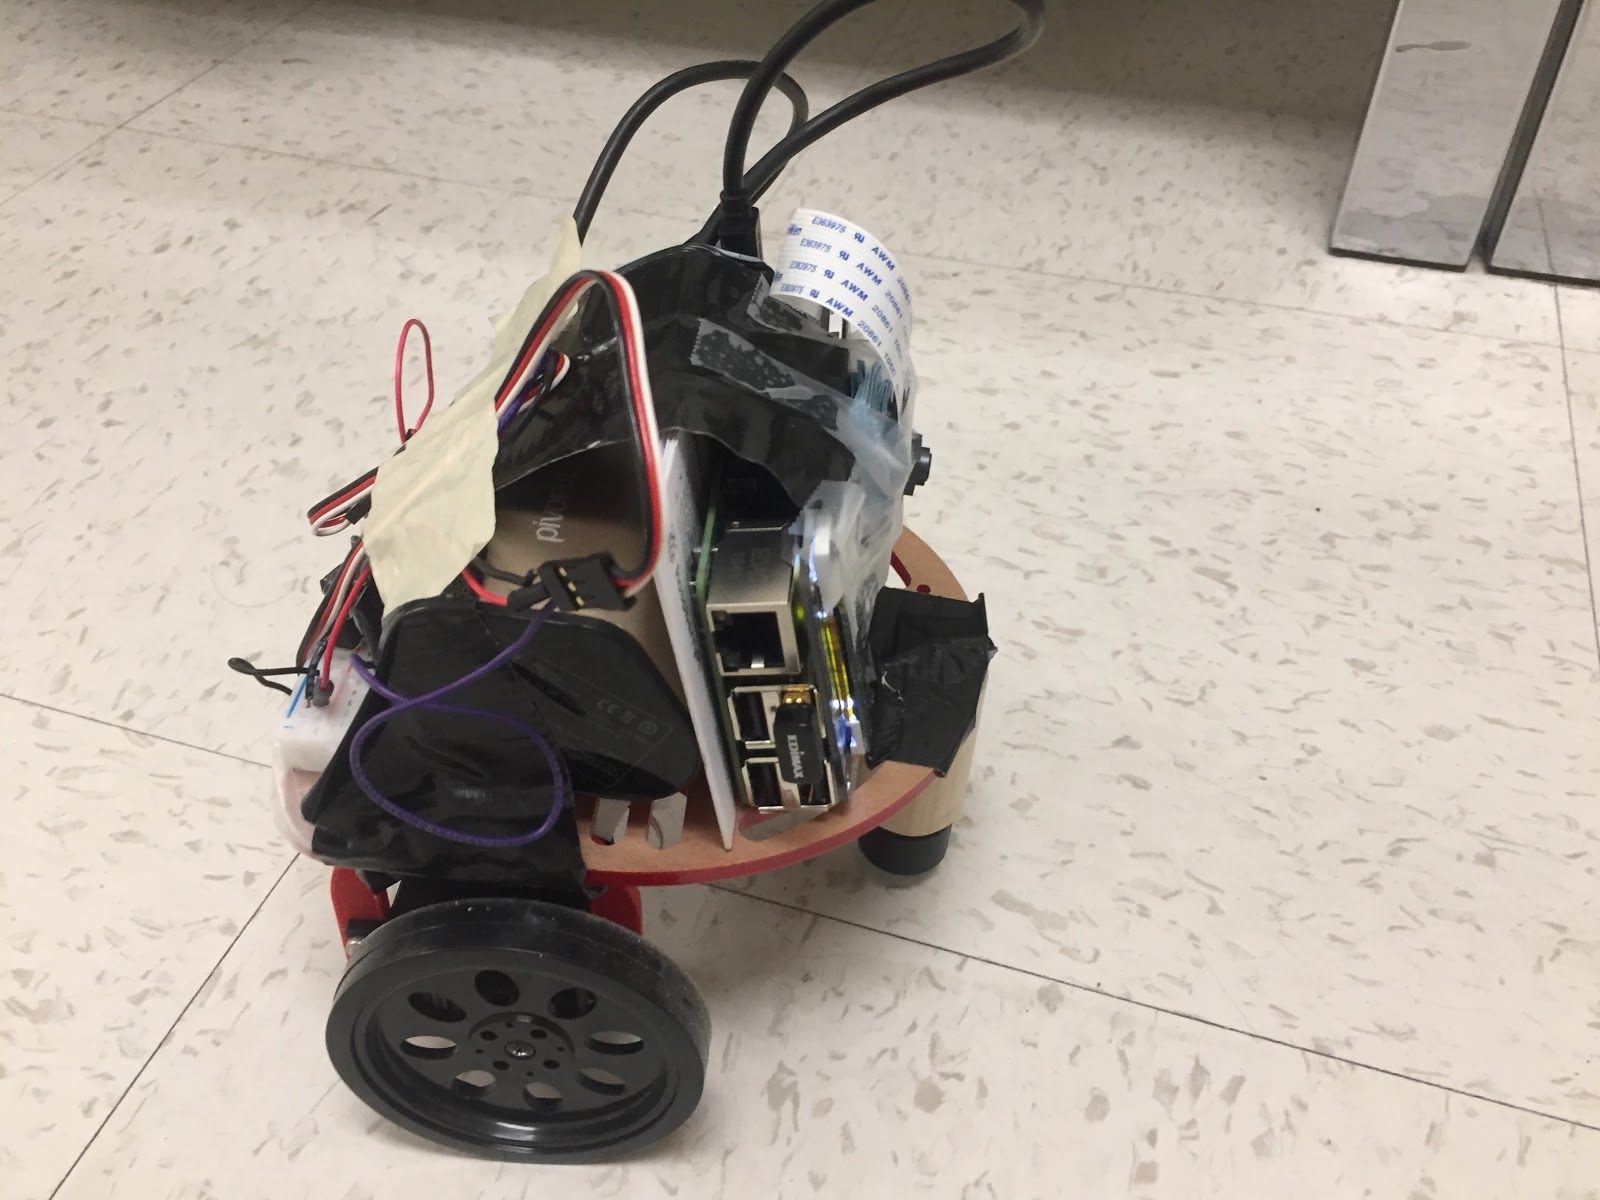
Figure 1: Intelligent car built for this project. Right hand side is the front of the car, where there is a camera. Both of the wheels are connected with one servo. The car is controlled by Raspberry Pi which has a USB WiFi module connected to it to make it able to access to the internet. The big battery is used to provide power for the Pi through USB and there are four 1.5V batteries on the bottom to provide power for servos. The prototype board on the back of the car is used to connect the GPIO of the Pi with the control signal wires and power wires.
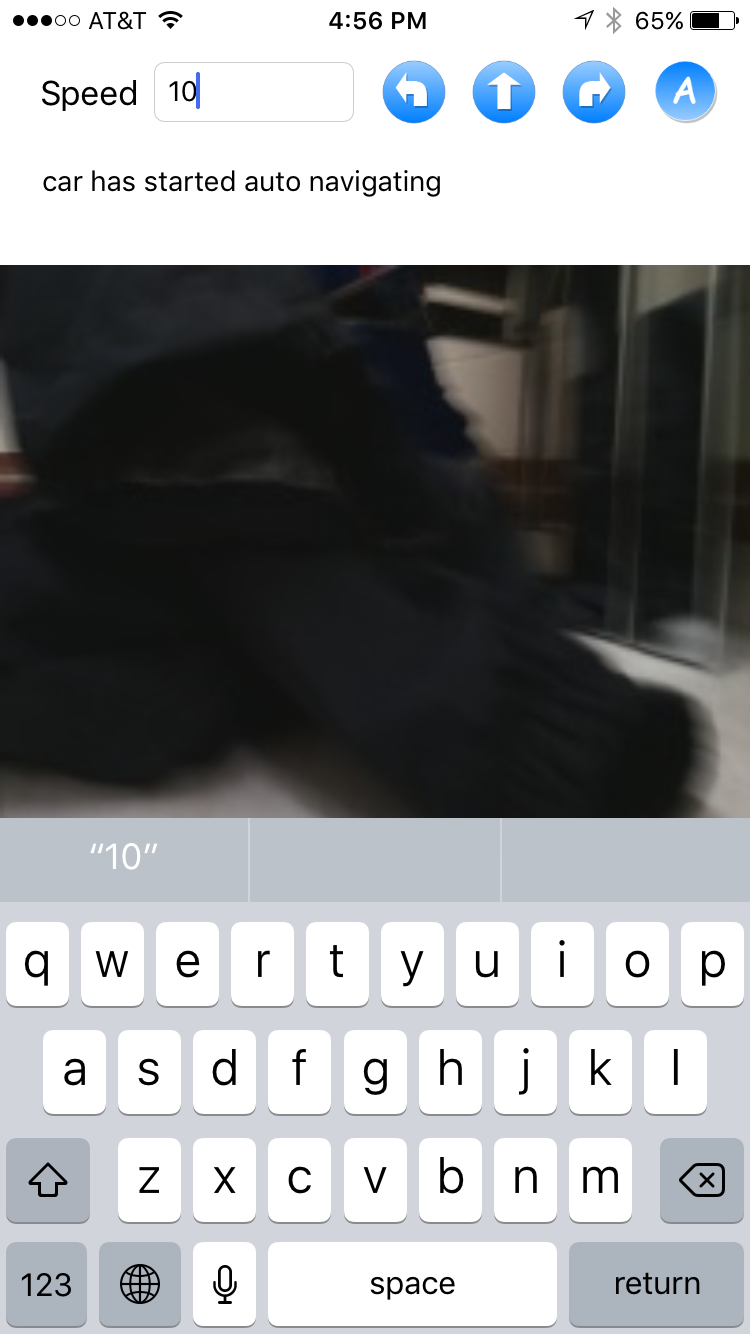
Figure 2: the iOS app for the project to control the car and inspect the image captured by the intelligent car. The speed textfield at the left-hand-side at the top is used for user to specify the speed of the car. There are four buttons at the top of the app. They are turn-left button, go-ahead button, turn-right button and toggle-auto-navigation button. There are text to tell user about the status of the car and imageview to display image fetched from the database.
We equipped the car with a WiFi module, which connects to the WiFi in campus. The car with WiFi can connect to the internet and therefore communicate with the iOS app. We use an real-time database called Firebase for the phone and the car to talk to each other. The control signal is sent from the iOS app to Firebase, and the car is keep pulling the control signals from the Firebase to adjust its servos control. On the other hand, the car will upload the images its camera captured to Cloudinary cloud image service. By calling the Cloudinary API, the image will be stored and a URL will be returned to the car. Then the car would store the image URL to the Firebase database, so the iOS app can see the updated image URL and fetch the image.

Figure 3: The system diagram of our project.
As an extension of the project, we implemented autonomous functionality for the car. The car will use the camera to navigate to an black color object within the range of the sight. This functionality is implemented by using OpenCV. The car is keep detecting the largest black object within its range of view. It would find the center of the black object and adjust its servos accordingly to navigate to the object. It will stop in front of the object when it has reached it. Then the car will take a picture of the object and upload the picture to Cloudinary and Firebase.
Design and Testing
Car Control
One innovation in car control is that we developed a app to control the car remotely. Through this app, we can set the speed and direction of the car, we can also control the car to take picture through this app. This app can also help us to change modes of controlling. We designed two ways to control the car, the first way is manully control, more specifically, Using app we we send the speed and direction value to firebase. Then the car use Wifi module to read the speed and direction and decide where to go. The second way is self-navigation, more specifically, the care will find the biggest black object in its view and self navigated to find the black object and then take a picture of this object and send back the picture to app.
Development process:
At first step, we designed the basic code to control the car move forward, turn left, turn right. Then we developed an app that can set speed and direction of car remotely, we also use cloudinary to store the picture taken. After we tested the manul control code can work perfectly, we design self-navigation mode in which the car can self-navigate to find the biggest object in this view.
WiFi Communication and Cloud Services
We used USB WiFi module plugged into the Raspberry Pi to make the car connect to the internet. The WiFi is setted to connect to RedRunner WiFi network in the campus. The reason why we use this network is because it doesn’t require authentication. When the Raspberry Pi power up, it would connect to this network automatically. We wrote a shell script to make the Pi send its IP address to our email account after the Pi has connected to the internet. So without connect the Pi to display we can ssh to the Pi and control the Pi based on the IP address.
We use Firebase as the database where the Pi and iOS app keep pulling the information from. When they want to update the control signal or captured image, they could simply update the information in the database. Why we used Firebase is because it is a real-time database, which can ensure low delay and we are quite familiar with it.
We don’t store the image directly into Firebase because if we do so, the database would be contains a lot of data and becomes less efficient. Instead, we store the image to Cloudinary which provide a nice free image storage service. After storing the image to Cloudinary, we can fetch different size of the image by specifying the parameters in the URL, which make it very handy when developing iOS app to display the image. After uploading the image to Cloudinary, we just store the URL of the image to Firebase so that we can hide the implementation of image service from the iOS app.
How we test the cloud service is by simply writing small module in Python to access the cloud service, including storing and fetching the information from the cloud service. After we made sure the module could work, we integrate the modules with other code and test the whole system work.
Autonomous Car with OpenCV
How we implement the autonomous function of the car is by using OpenCV. We installed the OpenCV onto the Raspberry Pi. When an image is captured by the camera. We would call the OpenCV library to extract black object from the background. Then we would using an algorithm to find the center of the biggest black object in the image, which would becomes the target of our navigation.
We develop the OpenCV code first on our laptop because the Raspberry Pi would have a high latency when using text editor. We took some images and wrote algorithm to see in which way can we extract the object from the background. Eventually we found by using RGB color to differentiate the object from the background is the easiest approach. Due to the limitation of time, we go with that it. When the program running on the laptop can successfully extract the black object from the background and find the center of it. We using git to transfer to code to Raspberry Pi. We checked the code still run and will derive the same result on the Pi and then we integrate this module with servo control code. Then we check if the code could fulfill our requirement that the car can navigate to the black object.
We encountered some problem like sometimes the car don’t go toward the object as we expected. Sometime the car is doesn’t react fast enough. How we tackle with these problem is by writing a test program to check how long of time each step of the function would take and find the most inefficient part. We rewrote the algorithm of the find center code which was most inefficient by referring to this algorithm problem
https://leetcode.com/problems/number-of-islands/.
When debugging, we print out the matrix the OpenCV program output to the screen and also sent the image the car captured to phone. By doing so, we had identified the problem like inefficient code, bad threshold of classifying black from other colors. After fixing these problems, we managed to make the car ride autonomously in a more stable fashion.

FIgure 4: output of testing program to find out the most inefficient part in the program.
Results
Car Control
We had encountered problem like can’t control the servo speed as expected referred to the datasheet. After consult with the teaching assistant Jingyao, we knew that we didn’t calibrate the servo. After doing so we found the servo speed can be controlled as expected.
We found even if we had calibrate the car, it is very hard to make the servo stay still when setting the speed to zero. The servo would vibrate and the zero speed point keep changing so we need to calibrate it again to make the control more accurate. We think it is the hardware problem. We think for intelligent car, it would be easier to build a four wheel car. The servo would change the direction of the two wheel in the front and use motor to drive the car forward.
Eventually, we can control the car going forward in different speed and turning left or right.
WiFi Communication and Cloud Services
The WiFi connection can be automatically set up every time the Raspberry Pi boot and sent the IP of the car via email. However, the speed of the WiFi is not very satisfying, and as a result, we have to give up the functionality of keep posting the image the car capture as a stream to the database. The Firebase and Cloudinary cloud service works well throughout our project and we are still within the free quota of usage.
Autonomous Car with OpenCV
We spent several hours try to follow the instruction online to install OpenCV. The instruction required us to download and compile the OpenCV code which takes a very long time and required a lot of disk space on the Pi. After failure because of running out of space, we consulted TA Jingyao and learnt from him that we can install the OpenCV by simply doing sudo pip install opencv-python. This command is very handy, fast and only required very little disk space. This way of installing also works.
We tried several ways to extract object from the background like first turn the image into HSV image and extract the object in HSV space. After decided to use RGB as the criteria to differentiate the object from the background, we spent some times to find the best threshold for RGB value.
Conclusions
We finished designing and implementing a car equipmented with a camera which we can control through app remotely to monitor surroundings. Under manully-control mode, this car can be controlled by the app and take pictures back to app. Under self-navigation mode, this car can track the biggest dark object in this view. We tested the function of car under two modes and it can work very well. We also provide some ideas based on which we can improve our project in the future.
Future work
We finished the basic development. There are a few improvements we plan to make in future. First, in self-navigation part, It would be better if we could set the object in the car's view. Now the car will automatically find the biggest black object in this view. Sometimes, there are two or more big objects in car's view, then it can do distinguish the object it wants find.
The second improvement we want to make is that we want to use bluetooth as communication module. Cause now the car with wifi module can only work with internet access. If we use bluetooth module, we have to redesign the communication protocol between car and app. Also we need to design schema how we transfer and store pictures.
Reference
ECE 5725 Lab Instructions
http://docs.opencv.org/3.0-beta/doc/py_tutorials/py_tutorials.html
Contribution
Hanwen Wang works on car servos control and integration of the code for auto-navigation.
Yuxin Cao works on the cloud services, the iOS app and the integration of the code for auto-navigation
Budget
All the parts used on our final project are borrowed from professor. We didn’t spent any money for it.
Code Appendix
Script to send IP address through email
#!/bin/bashtext=""until [ ${#text} -gt 0 ]; doecho "waiting for ip"text=$(ip route ls)sleep 3doneecho $text | mail -s "Raspberry Pi IP" email@gmail.com
Camera.py
import picameraclass Camera:def __init__(self):self.camera = picamera.PiCamera()def takePicture(self, path):# camera = picamera.PiCamera()self.camera.capture(path)
DB.py
from firebase import firebaseimport timebase_url = 'https://mars-rover-ece5725-16fa.firebaseio.com/'db = firebase.FirebaseApplication(base_url)class DB:def __init__(self):passdef readDirection(self):dir = db.get('/direction', None)return dirdef readSpeed(self):speed = db.get('/speed', None)return speeddef readMode(self):mode = db.get('/auto', None)return mode
ImageExtract.py
import cv2import numpy as npimport mathHEIGHT = 15WIDTH = 20BLACK_THRESHOLD = 10STOP_THRESHOLD = 0.2RGB_BLACK_THRESHOLD = 20ROW = [1, 0, -1, 0]COL = [0, -1, 0, 1]class ImageExtract:"""find the center of the largest black object in given image."""def __init__(self):self.debug = Falsedef set_debug(self, debug):self.debug = debugdef find_center_quick(self, image):"""find the center of the biggest cluster in obj (using 'number of island' algorithm):param image::return:"""area = 0height_center = -1width_center = -1for i in range(HEIGHT):for j in range(WIDTH):if image[i][j] == 255:res = self.dfs(i, j, image)if res[0] > area:height_center = res[1] / res[0]width_center = res[2] / res[0]return height_center, width_centerdef dfs(self, row, col, matrix):area_sum = 1height_sum = rowwidth_sum = colmatrix[row][col] = 0for i in range(4):r = row + ROW[i]c = col + COL[i]if 0 <= r < HEIGHT and 0 <= c < WIDTH and matrix[r][c] == 255:res = self.dfs(r, c, matrix)area_sum += res[0]height_sum += res[1]width_sum += res[2]return area_sum, height_sum, width_sumdef filter_out_background(self, image_path):"""filter out background to get only black objects:param image_path::return:"""img = cv2.imread(image_path)resized_img = cv2.resize(img, (WIDTH, HEIGHT), interpolation=cv2.INTER_AREA)# define range of black colorlower_black = np.array([0, 0, 0])upper_black = np.array([RGB_BLACK_THRESHOLD, RGB_BLACK_THRESHOLD, RGB_BLACK_THRESHOLD])# Threshold the image to get only black colorsmask = cv2.inRange(resized_img, lower_black, upper_black)if self.debug:print 'view matrix:', maskreturn mask@staticmethoddef find_center(img):"""find the center of the biggest cluster in obj:param obj::return: height_center, width_center"""# create distance matrix (the square distance of every pixel to every black pixel)distance_matrix = np.zeros((HEIGHT, WIDTH))for target_i in range(HEIGHT):for target_j in range(WIDTH):for i in range(HEIGHT):for j in range(WIDTH):if img[i][j] > BLACK_THRESHOLD:distance_matrix[target_i][target_j] += \math.pow(target_i - i, 2) + math.pow(target_j - j, 2)# find center in the distance matrixcenter_i = 0center_j = 0for i in range(HEIGHT):for j in range(WIDTH):if distance_matrix[i][j] < distance_matrix[center_i][center_j]:center_i = icenter_j = jreturn center_i, center_jdef most_area_are_black(self, img):"""if black pixels is larger than STOP_THRESHOLD, return True, otherwise return False:param obj::return:"""height = img.shape[0]width = img.shape[1]count = 0for i in range(height):for j in range(width):if img[i][j] > BLACK_THRESHOLD:count += 1if self.debug:print 'count of black:', countprint 'stop required count of black:', height * width * STOP_THRESHOLDif count > height * width * STOP_THRESHOLD:return Trueelse:return Falseif __name__ == '__main__':extract = ImageExtract()extract.set_debug(True)mask = extract.filter_out_background('left.JPG')cv2.imwrite('mask.jpg', mask)print extract.most_area_are_black(mask)ImageExtract.find_center(mask)
ImageUploader.py
import cloudinaryimport cloudinary.uploaderimport cloudinary.apifrom firebase import firebaseimport timeimport cv2base_url = ''db = firebase.FirebaseApplication(base_url)cloudinary.config(cloud_name = "",api_key = "",api_secret = "")class ImageUploader:def __init__(self):passdef deletePrevImages(self):db.delete('/image', None)def uploadImage(self, path, width, height):path = self.resizeImage(path, width, height)attList = cloudinary.uploader.upload(path)self.deletePrevImages()url = attList['secure_url']result = db.post('/image', url)print "post image to", urldef resizeImage(self, path, width, height):img = cv2.imread(path)if img.shape[0] < height or img.shape[1] < width:return pathresized_img = cv2.resize(img, (width, height), interpolation=cv2.INTER_AREA)cv2.imwrite('resized_img.jpg', resized_img)return 'resized_img.jpg'
Servo.py
import timeimport RPi.GPIO as GPIO# low pulse always 20 ms per cycle.low_pulse_time = 20# to get speed zero, we shall set high_pulse_time to 1.5 mshigh_pulse_time_offset = 1.5# the max adjustable range for high pulse is 0.75 ms [1.5-0.75, 1.5+0.75]high_pulse_max_range = 0.2class Servo:def __init__(self, port_num):self.port_num = port_numGPIO.setmode(GPIO.BCM)GPIO.setwarnings(False)GPIO.setup(port_num, GPIO.OUT)self.p = GPIO.PWM(port_num, 1000.0 / (low_pulse_time + high_pulse_time_offset))self.p.start(high_pulse_time_offset / (low_pulse_time + high_pulse_time_offset))self.debug = Falseself.set_speed(0)def set_debug(self, debug):self.debug = debugdef set_speed(self, speed):"""The speed is an integer with the range of [-10, 10].-10 means turning in full speed toward one direction.10 means turning in full speed toward another direction.0 means steady."""assert speed <= 10 and speed >= -10high_pulse_time = high_pulse_time_offset + high_pulse_max_range * speed / 10.0total_pulse_time = high_pulse_time + low_pulse_timefrequency = 1000.0 / total_pulse_timeduty_cycle = (high_pulse_time / total_pulse_time) * 100self.p.ChangeFrequency(frequency)self.p.ChangeDutyCycle(duty_cycle)if self.debug:print 'high_pulse_time is', high_pulse_time, 'ms'print 'total_pulse_time is', total_pulse_time, 'ms'print 'frequency is', frequencyprint 'duty cycle is ', duty_cycleprint ''# Testif __name__ == '__main__':left_servo = Servo(18)left_servo.set_debug(True)time.sleep(3)left_servo.set_speed(5)time.sleep(3)left_servo.set_speed(10)time.sleep(3)left_servo.set_speed(-7.5)time.sleep(3)left_servo.set_speed(50)time.sleep(3)
ServoControl.py
import timefrom Servo import Servohalf_speed = 5zero_speed = 0left_servo_orientation = 1right_servo_orientation = -1class ServoController:"""Control both servos to make the car move forward, backward or turn round."""def __init__(self, left_servo_port_number, right_servo_port_number):self.debug = Falseself.left_servo = Servo(left_servo_port_number)self.right_servo = Servo(right_servo_port_number)self.left_servo_speed = 0 # 0 means stop, 10 means full speed forwardself.right_servo_speed = 0self.set_speed()def set_speed(self):if self.debug:self.print_speed()self.left_servo.set_speed(self.left_servo_speed)self.right_servo.set_speed(self.right_servo_speed)def turn_right(self):self.left_servo_speed = half_speed * left_servo_orientationself.right_servo_speed = zero_speedself.set_speed()def turn_left(self):self.right_servo_speed = half_speed * right_servo_orientationself.left_servo_speed = zero_speedself.set_speed()def go_left_forward(self, speed):assert speed <= 10 and speed >= 0self.left_servo_speed = speed * left_servo_orientation * 3 / 4self.right_servo_speed = speed * right_servo_orientationself.set_speed()def go_right_forward(self, speed):assert speed <= 10 and speed >= 0self.left_servo_speed = speed * left_servo_orientationself.right_servo_speed = speed * right_servo_orientation * 1 / 2self.set_speed()def go_straight_ahead(self, speed):"""speed: 0 means stop, 10 means full speed forward"""assert speed <= 10 and speed >= 0self.left_servo_speed = speed * left_servo_orientationself.right_servo_speed = speed * right_servo_orientationself.set_speed()def print_speed(self):print 'left servo speed:', self.left_servo_speedprint 'right servo speed:', self.right_servo_speeddef set_debug(self, debug):self.debug = debugif __name__ == '__main__':try:servo_controller = ServoController(5, 6)print 'servos have been activated'time.sleep(3)while 1:#servo_controller.go_straight_ahead(0)servo_controller.go_left_forward(5)#servo_controller.go_right_forward(5)print 'go'time.sleep(10)except KeyboardInterrupt:pass
new_main.py
import timefrom Servo import Servofrom ServoController import ServoControllerfrom Camera import Camerafrom ImageUploader import ImageUploaderfrom ImageExtract import ImageExtractfrom DB import DBdir = 0speed = 5def auto_mode(servo_controller, camera, imageUploader, imageExtract):camera.takePicture("image.jpg")image = imageExtract.filter_out_background("image.jpg")shallStop = imageExtract.most_area_are_black(image)image_center = imageExtract.find_center_quick(image);print 'image center:', image_centerif image_center[1] <= 6:servo_controller.go_right_forward(5)elif image_center[1] >= 14:servo_controller.go_left_forward(5)else:servo_controller.go_straight_ahead(5)return shallStopdef manualMode(servo_controller, camera, imageUploader):global dirglobal speeddir = DB.readDirection()if dir == -1:servo_controller.turn_left()elif dir == 1:servo_controller.turn_right()else:servo_controller.go_straight_ahead(speed)speed = DB.readSpeed()#camera.takePicture("image.jpg")#imageUploader.uploadImage("image.jpg", 200, 150)if __name__ == '__main__':camera = Camera()imageUploader = ImageUploader()imageExtract = ImageExtract()DB = DB()try:servo_controller = ServoController(5, 6)print 'servos have been activated'while 1:mode = DB.readMode()if mode == 1:if auto_mode(servo_controller, camera, imageUploader, imageExtract):servo_controller.go_straight_ahead(0)imageUploader.uploadImage("image.jpg", 200, 150)breakelse:manualMode(servo_controller, camera, imageUploader)except KeyboardInterrupt:pass